Showing posts with label gadget. Show all posts

Thursday, November 25, 2021

My DEOcross C-ears electric earwax cleaner

If you have family member(s) who loves to pick ears using the traditional earwax rod or even cotton rod, here is a better and safer gadget for them.

This DEOcross C-ears electric earwax cleaner only cost me around RM15.

It operates with an AAA alkaline battery, and works by vibrating and vacuuming the ear wax out into its nozzle.

Here is the content inside the packing box:

  • Transparent plastic casing
  • The main body
  • 2x removable nozzles
  • Cleaning brush
  • AAA alkaline battery


On its body, there is only one button to turn it on and off.

Its removable nozzle is soft, with a length of 2.5cm which is safe to use for ordinary human inner ear.

After use, you can detach the nozzle and clean it with water.

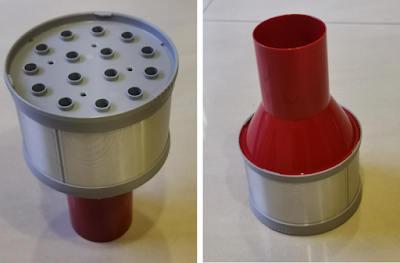
There is a filter at the main body's head to prevent the vacuumed earwax from entering into the main body. It is also removable and can be washed with water.

The only complaint I have with this gadget is that, its battery compartment cap is pretty loose and easy to drop off. I use a piece of cellophane tape to stick the cap firmly to its body.


Friday, November 19, 2021

My portable ultrasonic turbine mini washer

Other than my CCKO CK9919 stainless steel smart garbage bin, I have also purchased a portable ultrasonic turbine mini washer at the price of slightly above RM40, during the recent 11.11 big sale promotion festival. It is mainly used to wash the mopping cloth of my Roborock S7 robot cleaner.


Inside the packaging box, there are:
  • The round washer unit with 9cm diameter, which can be put inside water.
  • USB cable with a controller unit in the middle. The controller unit cannot be put inside water.
  • USB traveler wall charger, also cannot be put inside water.


Some similar products come with a water bucket. The water bucket can even be foldable to save storage space and to make it easier for carrying along. However, those units with attached water bucket can easily cost double the price than this one.

As you can buy a bucket at the price of a few ringgit only, I think this unit without bucket is good enough, and it has a much better cost-performance ratio.

There are 3 suction cups under the unit. You can stick it at the bottom of a water bucket, or at the inner wall of the water bucket, or inside a basin, or inside any suitable water container.


This mini washer is designed to wash up to 1kg load of clothes, which is more than enough to wash my robot's mopping cloth.


It has 4 modes of operation, controlled by its controller:

  • Mode A: cycles of 2 minutes forward and reverse spinning + 1.5 minutes of ultrasonic cleaning + 5 minutes of bubble cleaning
  • Mode B: forward and reverse spinning
  • Mode C: ultrasonic cleaning
  • Mode D: bubble cleaning
Its forward and reverse spinning action will produce a swirl in the water, to clean up the clothes inside, similar to the way of how ordinary washing machine functions.

When the washing is finished, you can switch off its electricity power at the wall socket to turn it off. Otherwise, it will automatically turn off itself after 30 minutes of operation.

See it in action in the video below:


I find it to be a very good companion for any robot cleaners with mopping function. You can wash several mopping clothes together at one go with it.


Wednesday, November 17, 2021

My CCKO CK9919 20 litres stainless steel smart rechargeable sensor garbage bin

During the recent 11.11 big sale promotion festival, I have purchased a CCKO brand (model CK9919) 20 litres stainless steel smart rechargeable sensor garbage bin to be used in my kitchen. Its price was around RM170 after discount.


It is "smart" in the sense that it can automatically open its lid whenever its infra-red sensor detects an object near its top, then start a 5 seconds countdown after the object is cleared, and then automatically close back its lid.

You can see it in action in the video below:


Besides infra-red object detection, its lid can also be automatically opened by slight vibration to the bin (such as gently kicking its body) or by pressing a button on its top panel.

In this way, you can throw your rubbish into it without touching any part of the garbage bin. Convenient and hygienic.

There are other even smarter models of garbage bin available in the market. Some can even automatically wrap up the garbage bag inside when it is full, and automatically reload a new garbage bag after the existing used one is taken away. However, those types of smarter garbage bin require the use of their own special garbage bag (which is not cheap), and their price is higher too. Therefore, I did not choose those smarter type.

There are quite a number of different sizes available for CCKO elegant stainless steel garbage bin. In terms of shape, there are also 3 choices: round cylinder, rectangular and square.

For kitchen use, I found the rectangular type is more space-saving, and the size of either 15 litres or 20 litres is more suitable. Both the 15 litres and 20 litres have the same base size of 30cm x 22cm. Their difference is on the height: 20L one has a height of 50.5cm whereas 15L one is 39.5cm.

You can use smaller size one for living room, bedroom, writing desk, toilet, etc. accordingly.

The CCKO smart garbage bin consists of 3 parts: the stainless steel outer bin, black colour plastic inner bin, and its cover. Just like normal garbage bin, you can put garbage bag inside the inner bin to collect your rubbish.

This CCKO garbage bin comes with a user manual, a QC certificate, a USB charging cable, and 3 sample garbage bags. The user manual is written in Chinese.


Its actual opening available for you to throw rubbish is approximately 25cm x 13.5cm only.


The magic is played by its cover, with sensors and electronic motor to open and close its lid. It is powered by a 1,500 mAh rechargeable 18650 lithium-ion battery. The size of this 18650 battery is larger than AA size battery.

Charging can be done by connecting the round connector of its charging cable to its charging port, and the USB end to either a wall charger or a power bank. It is said that a single charge can last for more than a month operation.


When you take out the cover and turn it over, you can find 2 compartments. One is the battery compartment, and the other compartment is used to place a bag of activated carbon to remove bad odour.


I like this garbage bin very much. It is smart. Its stainless steel body looks solid, classy and elegant. It is easy to use.

More importantly, this CCKO CK9919 garbage bin is water-resistant, protecting its electronic parts from damage being splashed by liquid. I did read some online reviews to some of its cheaper counterparts without water-resistant feature that those garbage bin will stop working after some time, probably due to electronic parts damaged by liquid.


Friday, November 5, 2021

My B03 home-use upper-arm digital blood pressure measuring and monitoring machine with colour background and voice function

After I have purchased and used the Jumper JPD-500E fingertip pulse oximeter, I have recently added a B03 home-use upper-arm digital blood pressure measuring and monitoring machine for my family use.


There are several types of home-use blood pressure monitor available in the market, including the traditional bisep (upper-arm) type, wrist type, finger type, etc. The American Heart Association (AHA) recommends the upper-arm culf type for more reliable measurements.

This B03 upper-arm digital blood pressure monitor can operate with 4 AAA-size alkaline batteries, or powered with 6V USB power source. It has English speaking voice function, providing instruction for blood pressure measuring, and reading out the result after the measurement is completed. It cost slightly more than RM50.


This machine provides 3 measurement values, namely Systolic (upper) value in mmHg, Diastolic (lower) value in mmHg, and pulse rate in bpm. It has memory to store up to 99 times of readings each for up to 2 different persons. It will auto power-off itself 1 minute after measurement is completed and there is no further operation by the user.

Before its first usage, we need to set its date and time by long pressing the S button and then using the M button to do the value setting, so that the date and time for its stored readings are correct.

Blood pressure readings below 120/80 mmHg are considered in the normal range. High blood pressure a.k.a. hypertension is categorized base on severity into Elevated, Stage 1 Hypertension and Stage 2 Hypertension.

Hypertension is also called "the silent killer" as many patients do not have obvious symptom for years. They might not be aware of having hypertension, unless periodically doing medical check-up with doctor, or using this type of home-use digital blood pressure monitor to frequently self check-up.

Hypertension after the Elevated level will need to seek for medical consultation from doctor, and medication might be needed to lower down the blood pressure. Prolonged hypertension can cause damage to body organ.

On the other hand, low blood pressure a.k.a. hypotension refers to blood pressure readings below 90/60 mmHg. Hypotension generally has less impact to our health than hypertension, and usually does not need any special medical treatment, unless there is symptom occurred.

The B03 digital blood pressure monitor uses the standard from World Health Organization (WHO) to determine the category level of its measured blood pressure. Its backlight will turn green for normal blood pressure, orange for mild hypertension, and red for severe hypertension. This visual effect is very handy, especially for the elderly to know the category of their blood pressure level, without the need to interpret the Systolic and Diastolic readings themselves.


The more recent International Society of Hypertension (ISH) 2020 classification of hypertension is as below:


As mentioned in the User Manual of the B03 digital blood pressure monitor, our blood pressure constantly changes throughout the day. It tends to be higher in the early morning and also in the afternoon, and lower at night during our sleep.

There are many mobile apps available to help us record down and monitor our blood pressure readings. Unfortunately, the B03 digital blood pressure monitor is unable to send its readings to our handphone, and we have to manually key-in the readings in the app by ourselves.

One of the recommended mobile app to use is BP Journal developed by a Malaysian called Jason Ong (owner of PortalGroove Solutions). It supports a multitude of global and regional blood pressure classification guidelines (ISH, ACC/AHA, ESH/ESC, NICE, etc.). It supports multi-profiles and able to generate report so that you can share with your doctor or family members.

As prevention is always better than cure, it is highly recommended for every family to be equipped with an upper-arm digital blood pressure monitor, to be used by the whole family, especially the elderly. With the handy blood pressure monitoring machine, you no longer need to check your blood pressure at clinic, as you can self-service at home, and you can have as frequent measurements as you like.


Sunday, October 24, 2021

Upgraded my Roborock S7 cleaning robot with its auto-empty dock that supports both bag and bagless debris emptying

When I bought my cleaning robot, I have chosen Roborock S7 instead of S6-Max or S5-Max because I knew it is the model that can pair with Roborock auto-empty dock.

In fact, I find it quite difficult to empty out the dust in the Roborock S7 dust box because the debris can be trapped in quite a lot of places inside the dust box. The only effective way to quickly empty it out is to vacuum out the debris, which is exactly what the Roborock auto-empty dock function to do. As such, I suspect that the dust box is designed that way to entice people to buy its auto-empty dock to make life easier.

Currently, there are already 3 generations of Roborock auto-empty dock:

  • The 1st generation can only work with disposable 1.8 litre dust bag, which can easily hold debris for more than a month.
  • The 2nd generation has a cyclone separator unit to collect debris into its dusbin without dust bag. Alternatively, it can also work with the disposable dust bag by replacing the cyclone separator in it with the dust bag components.
  • The 3rd generation, not available to S7 yet, is able to automatically refill the robot's water tank and clean the robot's mopping cloth, besides emptying out the debris from the robot's dust box.
If you intend to buy a Roborock auto-empty docking station, I strongly encourage you to buy the 2nd generation that comes with both the cyclone separator and also the dust bag holder and disposable dust bag. I bought it at the price of slightly above RM1,600 in Banggood online shop.


The Roborock auto-empty dock has 2 colour selections: black and white. The Roborock S7 cleaning robot also has black and white selections.

I find that mixing the colour between the robot and its auto-empty dock also looks nice and would not cause any dissonance. Here is my white Robock S7 and its black auto-empty dock.


You can see that I have already replaced its cyclone separator with its disposable dust bag unit. In this way, I don't need to clean its dustbin, as all the debris will be stored inside the 1.8L dust bag.

Its cyclone separator looks like lotus seedpods. The Roborock auto-empty dock user manual has the instruction to change it with the dust bag unit, and vice-versa.


The Roborock auto-empty dock comes in 2 pieces after unboxing, which we need to assemble its body onto its base by screwing 5 screws that are marked with the screwdriver sign. An L-shape screwdriver is available at the base for that purpose.

The Roborock auto-empty dock comes with a dust box with an air-inlet, to replace the one in the S7. You will need to remove a lit that covers the air-inlet window in the S7 robot too. Detail instruction is given in the user manual.

The debris in the robot's dust box is sucked into the left cylinder of the dock station, and then settles down in the right cylinder, either in its dust bag or directly in the dustbin.

There are 2 filters inside the left cylinder, namely the rear HEPA filter and the front cup filter, both are removable and washable.

After the Roborock S7 robot made its first docking onto this auto-empty docking station, you will find additional functions for this auto-empty dock in the Roborock mobile apps.

The left button at the bottom of the main page has changed to "Empty Dustbin".


There is also an Auto-Empty Settings menu option, in which you can set the empty mode to be either smart, light, balanced, or max.


When assembling this Roborock auto-empty dock, I was amused by its state-of-the-art brilliant and beautiful design, which is a combination of engineering, art, practicality, hygiene, and user experience. It's just amazing. You could be feeling the same when you assemble a unit too.

Note that when the robot is docked onto this auto-empty docking station, it is pretty tightly "sucked" on it and not manually removable, unless by force, which is a big no-no.

If you want to bring the robot to another place for multi-floor cleaning, you can detach it from the docking station by using the Remote Control function in its mobile app. Just control it to move backward, and it will come out from its docking station.

In certain countries, Roborock has bundled them together as S7+. If you see the S7+ model, it is actually an S7 rebot that comes together with its auto-empty dock. But, you need to beware that the auto-empty dock in the S7+ might be of the first generation, without the cyclone separator.


Saturday, July 31, 2021

My rechargeable portable mosquito killer lamp

I had bought a few units of the electronic UV light type of mosquito trap before. They were functioning well in trapping and killing mosquitoes.

Unfortunately, after one to two years of usage, all of them became problematic and unable to function well. The problems faced are:

  • In some units, the LED lights became dimmer and dimmer, until no longer able to attract the mosquitoes.
  • In some units, the LED totally unable to turn on.
  • In some units, the fan became noisier and noisier, causing it to be an annoyance itself, particularly during the silent night.
  • In some units, the fan totally not rotating, and therefore unable to trap the mosquitoes.
This time, I decided to buy the electrocute type, at almost the same price as the previous suction type. It looks like this:


The lamp has a similar bluish lamp to attract the mosquitoes and insects to fly towards it. Surrounding the lamp are metal wires with electricity current to electrocute the insects. At the outer layer, there is a plastic cage to prevent ourselves from accidentally touch on the metal wires.


The plastic cage is easily removable for us to clean up the dead body of insects at the metal wires. There is a small brush that comes together with the lamp for this cleaning purpose.

This type of lamp comes with 3 different models:
  • Without a rechargeable battery, that needs to be always connected to a USB charging source in order to work.
  • With 2000 mAh rechargeable battery. When fully charged, the lamp can work for up to 8 hours without connecting to a power source.
  • With 4000 mAh rechargeable battery. When fully charged, the lamp can work for up to 16 hours without connecting to a power source.
There is a switch for you to turn on and turn off the light. In fact, the switch has 2 ON positions. The upper position turns on the blueish mosquito attraction light, and the lower position turns on a warm white reading light.


At the base of the lamp, there is a hanger to hang it in an upside-down position. So it is flexible to be put on tabletop, or be hung up in the air.

Its rechargeable feature is in fact very useful, especially for the following situations:
  • You can put it up and running anywhere, even in a place without a power source.
  • It can still function well during the time of electricity blackout. That is also the time you are likely to get more mosquitoes disturbance since your fan and air-cond are not functioning.
  • You can use it as an emergency light during electricity blackout.
  • You can use it during camping, as a dual function light in your camp.


Wednesday, July 28, 2021

My Roborock S7 hybrid vacuum and mop robot cleaner

Finally, I have retired my 4 years old Neato XV-11 robotic vacuum cleaner and replaced it with a new Roborock S7 which has both vacuum and mop function.


The Roborock S7 is currently selling at the price of RM2xxx. You should be able to get it at a lower price of RM2,099 during certain online promotion period. It is slightly more expensive than Roborock S6 MaxV.


The main differences of Roborock S7 from its previous versions including:
  • It is the first, and currently the only, Roborock model that supports Roborock auto empty dock. Anyhow, the Roborock auto empty dock is sold separately, and the price is quite high too.
  • It comes with Roborock's new innovation in vibration mopping technology that can scrub the floor at up to 3,000 cycles per minute, to be more effectively remove dried and stubborn stains on the floor.
  • It comes with new VibraRise technology, which, when it's ultrasonic sensor accurately detects a carpet underneath, it will automatically lift up its mopping cloth so that not to wet up the carpet, at the same time able to increase its vacuum suction power to clean up the carpet area.
However, the Roborock S7 does not come with A.I. cameras as in Roborock S6 MaxV, therefore missing the function of being able to "see" and avoid obstacles that block its path.
 
Roborock S7 can be configured and controlled using the Roborock mobile app, and also with your favourite voice assistant such as Google Assistant, Amazon Alexa, Apple Siri, Tmall Genie (天猫精灵), Xiaomi Xiaoai Classmate (小爱同学), etc. You can even control it using Xiaomi Mi Home app too.

One thing I like is that Roborock supports multilingual, although it can only use one language at a time. It will report its status with voice using your preferred language, which can be English, Chinese, Deutsch, Espanol, Francais, Italiano, Russian, Hebrew, Polski, Portugues, Ramana, Turk, Thai, Viet, Indonesian, Malay, etc.


Before start using it, you will need to connect Roborock S7 to your home WiFi, which in turn connected to the Internet. The Roborock mobile app in your handphone is able to auto-detect the Roborock robot cleaner nearby, and push your home WiFi settings to the robot.

Roborock S7 only support 2.4GHz WiFi up to Wireless-N. The 5Ghz WiFi and WiFi 6 are not supported. Anyhow, the 2.4GHz WiFi has the longest reaching range among them, and this is crucial for the Roborock S7 to get connected in order to work properly.

Roborock uses LiDAR navigation technology to scan and map your house. The map is stored in the cloud under your own Roborock account. You can share your robot with other Roborock users, and once shared, they will have access to your robot settings including the maps too.

You can also install Roborock app in multiple mobile devices and login with the same account, and all of them will have synchronized robot settings and information.

Roborock S7 supports multi-level mapping. Up to 4 maps can be stored for each robot.


The floor map of your house will be automatically drawn with LiDAR navigation during its first usage, and it is pretty accurate. The carpet area(s) are also identified and marked in the map.

After the map is drawn and saved, you can separate it into different rooms, or to merge rooms into larger one. You can configure it so that different room can have different intensity of cleaning and/or mopping.

As one of the standard features, you can draw virtual wall(s) on the map to prevent the robot from crossing over. You can also define certain area(s) on the map, such as your toilet or staircase, as no-go zone. You can also specify certain area(s) to be vacuum only without mopping (the no-mop zone).

This way of setting blockage to the robot using software configuration is much more better and much convenient than my Neato XV-11 way of using physical magnetic stripes.

Roborock S7 supports 4 levels of vacuum power, 4 levels of mopping scrub intensity, and 2 levels of mopping route. This enable you to ask the robot to clean more thoroughly in certain areas, such as the dining room and kitchen area, than the rest of your house.


Another standard feature is scheduling for its cleaning routine. It is fully customizable, as shown in the screenshot below.


Roborock keeps its cleaning history in the app. You can see its entire cleaning path and time taken in the history. This assure you that the cleaning was done properly and according to your instruction.


The Roborock app has a section to show the estimated time remaining for the replacement of wear-and-tear parts of the robot, as well as the time for upcoming maintenance, such as cleaning its sensors to upkeep its performance.


The Roborock app even comes with manual remote control function, for you to drive and control the robot like a remote control car, to move it to your preferred location. There are even 2 different modes of remote control - buttons and joystick.


Just like other cleaning robots, although the Roborock can help you to do automated floor cleaning, it is not the set-and-forget type. There are still 3 items that you need to periodically do, namely:
  • To take out its mopping cloth and wash it, then put it back. This should be done after every mopping.
  • To take out its dustbin box and empty it. Wash and then put it back. This should be done when the dustbin box is about to be fully filled up.
  • To take out its water tank and wash it. Refill with water and put it back. The water tank should be able to supply water for 2-3 times mopping of a typical terrace house.
If you have purchased the Roborock auto empty dock, then the dock will handle the job of emptying the dustbin box for you. You just need to replace the dust bag of the auto empty dock every few weeks.

One thing I dislike is that this Roborock S7 only comes with one mopping cloth. I would suggest you to buy a few more mopping clothes for changing, so that you have more time to do the washing and drying.

Note that the mopping cloth of Roborock S7 is different from the mopping cloth used in older versions - S6 MaxV, S6, S5 Max, etc. This is because of the new vibration mopping function. As such, make sure you buy the correct mopping cloth for Roborock S7 to be compatible with its base.


Thursday, July 8, 2021

My Huawei Scale 3 body analyzer scale

I've purchased the Huawei Scale 3 body analyzer scale at the price of RM99 directly from Huawei Online Store during their recent online promotion. The RRP of this scale is RM149 during normal days.


This scale is operated by 4 AAA size batteries. When used by a single person daily, the batteries can last for about a year. When used by the whole family, they can probably last for about 6 months.


Beside body weight, this scale can also measure body mass based on bioelectrical impedance analysis. It can also measure our heart rate (a.k.a. pulse rate).
 
In order to get accurate measurements, you need to step your feet on top of its 4 ITO electrodes, and wait for the 3 readings showing on its surface by turn respectively.

Before using the scale, you need to pair it with the Huawei Health app in your smartphone, which you can download from either Huawei AppGallery, Google Play Store or iTunes AppStore. It is the same Huawei Health app that connect with Huawei smart watch, smart band, heart rate monitor, and other supported wearable devices by Huawei or Honor.


You need to use Bluetooth to do the initial pairing. The scale should be able to autodetected by the latest version of Huawei Health. After that, you can add in WiFi pairing.

With WiFi pairing, your scale can actually send the measurement data to the cloud, and then sync to your handphone that is connected to the Internet, regardless of the location of your handphone.


You can share your scale with up to 10 smartphones, each installed with Huawei Health respectively.

The scale can be shared with up to 10 users, such as your family members, each will have individual historical records, and the scale is intelligent enough to identify the right person based on past record readings.

In the event 2 or more persons are having similar weight, body mass index (BMI) and body fat rate readings, the app will ask you to identify the right person for the measuring records.

There is also a guest measurement feature to let anyone to use the scale and get the measuring and analysis result with your handphone, without saving the data as historical record. In this way, you can share your scale with your guest visitors too.

The app will need you to provide your correct gender, age (calculated from date of birth) and height information, in order for its Trufit body composition analysis algorithm that is based on big data and A.I. to provide you with more than 10 body indicators.

The indicators available are:
  • Weight
  • BMI
  • Body fat rate
  • Skeletal muscle mass
  • Visceral fat
  • Basal metabolic rate
  • Body water percentage
  • Bone mineral content
  • Protein percentage
  • Fat-free mass
  • Heart rate
Each of the indicators has own analysis and explanation screen to explain what are them in layman terms.

The app can also show you whether your weight, BMI and heart rate are respectively low, normal, slightly high or high.

Under the Body Composition section, it shows you the composition of your weight in kilograms, breakdown by water content, protein, fat, and bone mineral content.

Note that Huawei TruFit function is currently only available for adults between the age of 18 to 65. If you are under 18 or over 65, you can only get 3 results from the scale, which are your weight, BMI and your heart rate.

You can also set a goal in the app to achieve your desired weight. The app will inform you how far is your weight from your goal, and congratulate you once you've achieved your goal.


Saturday, June 26, 2021

My Jumper JPD-500E fingertip pulse oximeter with OLED display

According to a study led by University of Washington at Seattle researchers, a blood oxygen saturation level below 92% and fast, shallow breathing were associated with significantly elevated death rates in a study of hospitalized COVID-19 patients. (Click here to read the original source of the research paper)

Healthcare experts also mentioned that situation of happy hypoxia, or silent pneumonia, or happy hypoxemia, is known to be a complication of COVID-19, whereby the infected patient will have no obvious symptoms such as fever or cough. Measuring the blood oxygen saturation level is a method to reveal sign of COVID-19 infection for patient with such "silent" situation.

Recently, Singapore Temasek Foundation has announced to give one pulse oximeter to every household in Singapore, so that residents can monitor their blood oxygen levels regularly. The device checks the oxygen level in the blood and can help detect early signs of a deterioration in health. (Click here to read the original source of information)

Although my Huawei Watch GT2 is able to measure blood oxygen saturation (SpO2) level, its measuring process takes some time, which is a little bit inconvenient.

During the recent online e-commerce shopping spree, I decided to buy a pulse oximeter with the following reasons:

  • Unlike my Huawei Watch GT2, the pulse oximeter can provide instant reading.
  • It provides "second opinion" reading, so that I can counter-check and confirm the accuracy of the readings from both devices.
  • It can be easily shared among family members.
  • It is very easy to use, fool-proof, and simple for elderly people like my parents to use.
My criteria to choose a genuine medical-grade pulse oximeter:
  • It must be accurate. Although there are many cheap oximeters available in the online stores, I have read article that some of such oximeters come out with reading despite you trick it by putting a pencil into it instead of your finger (which it supposedly should not come out with any reading).
  • At least have a brand, and better be manufactured by a medical equipment manufacturer.
  • Certified as a medical device by CE and/or FDA.
  • With one year manufacturer warranty.
  • Budget below RM100, as I am pretty sure I should be able to get one with that price range.
and I had chosen the Jumper brand JPD-500E fingertip pulse oximeter with OLED display.


This pulse oximeter features an OLED colour screen display with 6 display modes in 4 directions. It is powered by 2 AAA batteries, which come together in the box. It also comes with printed user manual, a pouch, and a hanging stripe.

On its screen, it is able to show:
  • SpO2 reading (range: 35-100, accuracy: ±2%)
  • Pulse Rate (PR, range: 25-250 bpm, accuracy: ±2 bpm)
  • Perfusion Index (PI, a measurement of how "strong" is the pulse)
  • Photoplethysmogram (PPG, showing heart pump cardiac cycles)
  • Pulse bar (showing the strength of pulse)
  • Battery level


The pulse oximeter will start working once your clip your finger into it, and press on its one-and-only button. The readings shown are in real-time. It will switch off by itself after you remove your finger from it.

According to a research paper, if you are a right-handed person, you can get the most accurate value with your right hand middle finger; if you are a left-handed person, then you should use your left hand middle finger instead.


One feature I like about this Jumper JPD-500E pulse oximeter is that it is able to give an alert sound when its reading is detected to be out of normal range. This makes it really fool-proof, as you don't need to understand the readings shown on its screen. As long as it has reading and it doesn't give alert sound, you are quite OK. If it comes out with alert sound, then your reading is not OK, and you should take action on that, for example, to seek medical advice from your doctor.

The Jumper JPD-500E pulse oximeter is IPX 22 rated. It is not so waterproof and should be avoided to get contact with water. Anyhow, it is advisable to clean both your finger and the device with medical alcohol before use, for hygiene purpose, as well as to obtain better accuracy.

Regarding its accuracy, I find its SpO2 and Pulse Rate reading quite consistent with my Huawei Watch GT2.

Below is a photo of using both the devices together. You can see that the SpO2 reading is 1% different at that particular moment, as the reading will have a slight change of 1% from time to time during the measuring period. The Pulse Rate readings are both the same at 80 bpm.


Tuesday, June 8, 2021

My Niimbot D11 portable thermal label sticker printer

I had a Brother P-Touch 65 thermal label sticker printer in my household that served for more than 15 years. It was really handy to use. Recently, it had finally reached its end of life.

As its replacement, I have bought the Niimbot D11 portable thermal label sticker printer. If you are looking for a label printer under the price tag of RM100 that is capable of doing a lot of wonders, you can consider this too.


Niimbot D11 operates with internal rechargeable battery. You can recharge its battery with its USB port from wall charger, power bank, laptop USB port, etc.

Compared with most label printers that need 6 AA size battery to power up, this rechargeable type can no doubt save quite a lot of battery money, and also easy to get recharged. However, I think we can no longer expect its lifespan to last for many years without changing its internal battery.

The Niimbot D11 printer can't operate by itself. It needs to work together with the Niimbot mobile app which you can freely download from Google Play Store and Apple App Store. The app pairs with the label printer using Bluetooth connection.

I think this is a very brilliant way to unleash a lot of design possibilities to the printer, by letting us doing the design using the mobile app.

The label printer can be fed with different kinds of label sticker, of different sizes and different pre-printed patterns and designs. The printer is able to auto-detect the type of sticker you put in it. In case it has detected wrongly, you can also manually configure it for the right sticker type with the app.


Niimbot D11 can only print in black colour, but you can buy the pre-printed label base in colourful design, or normal white background, as well as in transparent background. Labels can be purchased from Niimbot e-commerce store, or inside the app (probably for purchase within China only).

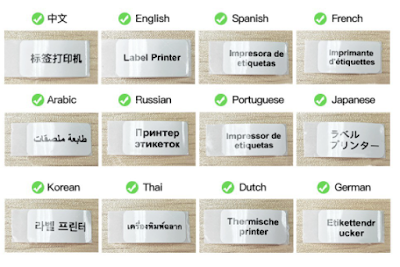
Niimbot supports printing text in multilingual, multiple lines, multiple font sizes, different alignment styles. It also comes with many different types of font.


Among the supported languages are English, Simplified Chinese, Traditional Chinese, Arabic, Russian, Japanese, Korean, Thai, and others as shown in the diagram above.


However, you need to switch the language preference in the app before you can have access to the various fonts made available to that particular language. This is a limitation that I find quite cumbersome. Hopefully this can be improved in future version of the app.


The label design interface is WYSIWYG type, and entering text is very alike using a word processor.


Beside text, you can also add in graphics and artworks to the label. There are quite a lot of ready made icons in the app too.


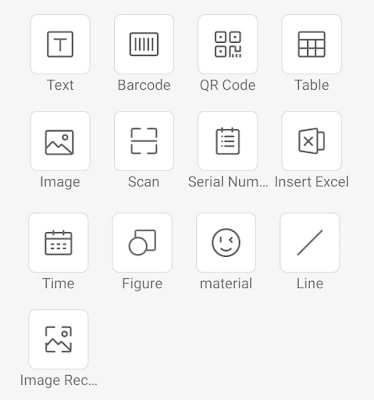
In fact, Niimbot D11 supports many types of printing element, including barcode, QR code, table, graphics, etc.


It can even support batch printing from lines of entry in Excel file, and also printing of serial number, current date and time, etc. This could be useful in commercial usage, such as printing of price tag, production batch, etc.

The printing speed of this Niimbot D11 is pretty fast. However, its thermal label stickers are of fixed length with gap in-between 2 stickers in a roll. This will have limitation if you want to print super long text.

All in all, I find this Niimbot D11 portable thermal label sticker printer to be value of money, and it makes label design fun and easy, with many possibilities.


Hint: Click on the "Older Posts" link to continue reading, or click here for a listing of all my past 3 months articles.