Showing posts with label IT talks. Show all posts

Sunday, November 12, 2023

A comprehensive comparison between Lexar 1TB NM710 and NM790 M.2 2280 PCIe Gen 4x4 NVMe SSD

Over the past 2 years, Lexar has emerged as a brand known to produce good performance and yet very cost-effective solid-state drives (SSD).

Lexar started as a manufacturer producing SD cards, CompactFlash cards and thumb drives, spun off from Cirrus Logic in the mid-1990s.

Later, it was acquired by Micron in the mid-2000s. In mid-2010s, it was again acquired by China Shenzhen based company Longsys until now.

Today, Lexar partners closely with another China company Yangtze Memory Technology (YMTC), producing advanced SSD comparible to Samsung 990 Pro series, and selling at price cheaper than the Samsung SSD.

The NM710 and NM790 are the 2 most popular models among the various models of Lexar M.2 2280 PCIe Gen 4x4 NVMe SSD with 1TB storage capacity available in the Malaysian market.

Both of them look pretty identical, but there is a price difference of slightly above 17% between them.

So, what are the differences that caused their price gap? I have come out with a comprehensive comparison table as follows:


From the table above, we know that both of them are using the same MAP1602A controller chip from MaxioTech.

The main different between them is the NAND flash chip used. Lexar NM710 is using the older TLC 128 layer NAND, while NM790 is using the newer TLC 232 layer NAND.

By making use of the later and more advanced NAND chip, Lexar NM790 has a faster data read/write speed, and also a higher TBW in endurance.

Anyhow, both of them are having the same MTBF of 1.5 million hours and a manufacturer warranty period of 5 years.

It is also worthwhile to note that both of them do not have built-in DRAM chip as data buffer. They are using an alternative technology called Hosted Memory Buffer (HMB) instead, which is making use of a small portion of the computer's RAM as data I/O buffer.

As NAND I/O speed is slower than DRAM, DRAM is used in SSD as data writing buffer, so that in the event there are a lot of data writing in at high speed until the NAND chips unable to catch up, incoming data can store temporary in the DRAM buffer for the NAND chips to pick up. 

In the situation where there is no DRAM designed for the SSD, or when the DRAM buffer is also full, data writing speed will be forced to slow down for the SSD to catch up the data write-in.

By using the RAM of the computer as buffer in HMB, the buffered data would need to travel a longer distance following the PCIe data path in the motherboard to the RAM chip, and later back to the SSD for writing to the NAND chip. 

Theoretically, this approach is slower than having a direct DRAM in the SSD itself. The latency is dependent on the motherboard and RAM type used. It shouldn't be a problem for the latest Z790 motherboard with fast PCIe channels, working together with high-speed DDR5 RAM in more than 5000 Mhz.

The key advantage of using HMB is to reduce the cost of having a built-in DRAM chip, which is one of the factors Lexar SSD can be so price competitive. Without the DRAM chip in action, the SSD also able to consume less power and dissipate less heat.

Both of them do not have Power Loss Protection (PLP) mechanism too. A sudden power loss might cause bad sector(s) and premature damage to the NAND chip in the SSD.

This should not be a concern if this SSD is used in a laptop, as the laptop has a battery as power backup. If you were to use this SSD in a desktop or PlayStation 5, you might want to consider using an Uninterrupted Power Supply (UPS) to protect the computer and its SSD from sudden power failure.

Both of them also do not have hardware-based data encryption feature to protect the data stored in the SSD from unauthorized access. The data I/O speed will be reduced if you turn on this kind of data encryption feature, as data needs to be encrypted before writing in, and also needs to be decrypted during reading out. Without data encryption, the data read/write speed is comparatively faster.

Anyhow, if you really need the data in the SSD to be encrypted, there are software-based solution, such as the Bitlocker available in Windows 11 Pro, or certain 3rd party software, generally being part of today's antivirus solution. Note that software-based data encryption is usually even slower than hardware-based encryption.

Both of them do not have fancy RGB lighting as well. As the SSD is probably either covered by its own heatsink or the heatsink of the motherboard, it makes less sense for SSD to have RGB lighting.

In short, the key difference between Lexar NM710 and NM790 is the NAND chip used, which is the reason for the differences in their read/write speed, endurance, and eventually their price difference.

If you don't mind spending a little bit more, NM790 is the one to go with. If you are on budget, NM710 is also a good choice for you among all the SSDs available in the market nowadays.

One more thing to remember, among the SSD types in the market, PCIe NVMe type is faster than SATA type, and SATA type SSD is of course much faster than HDD.

The latest version of PCIe is 5, you will need to latest CPU working with Z790 chipset motherboard in order to slot in a PCIe 5 SSD and get the best out of it. Being everything on the latest up-to-date technology, the cost of each of those components is much higher.

The Lexar NM710 and NM790 are both based on PCIe version 4. They are supported by more variety of motherboards and chipsets, and are priced cheaper too.


Monday, July 24, 2023

My CyberPower CL1000EVR Automatic Voltage Regulator (AVR)

A few months back, when I upgraded my CyberPower UT800EG UPS with APC BV1000I-MSX 1kVA/600W Easy UPS for power protection to my desktop PC and network equipment, I've relocated the old CyberPower UT800EG UPS to my living room to provide power protection for my TV, IPTV box and cordless phone.

Later, I decided to retire the old UPS and to protect my TV, IPTV box and cordless phone with a more proper Automatic Voltage Regulator (AVR).

Advantages of replacing the old CyberPower UT800EG UPS with a CyberPower CL1000EVR AVR:

  • At the cost of below RM100, the CyberPower CL1000EVR AVR is cheaper than the UPS.
  • Generally, AVR has a very long lifespan of easily more than 10 years, while UPS has a much shorter lifespan.
  • The battery in the UPS can only last around 2 years. After that, it would need to be replaced for the UPS to continue function as designed. Faulty battery could also be a potential cause of fire hazard.


As printed on its packaging box, this CyberPower CL1000EVR AVR is able to perform:
  • Output voltage regulation with surge protection and AVR function (prevent overvoltage as well as undervoltage)
  • Overload protection with circuit breaker


It is pretty small in size, about the same as a household UPS. This is how it looks like:


At its back, it has a power switch and 4 universal power outlet sockets.


The seller has attached a flyer of CyberPower range of products in UPS, AVR and surge protector, which I find is pretty useful in providing comparison information among them.


Surge protector power extension could be an even cheaper option, but bear in mind that:

  • Surge protector can only protect overvoltage spikes but not undervoltage.
  • Surge protector cannot regulate the voltage waves.
  • Surge protector normally makes use of varistor to capture the spikes. The varistor itself has a limited lifespan, and it sacrifices itself to capture the spikes. For each spike it captures, its lifespan will reduce tremendously.
If you want to have the maximum power protection for your expensive electrical equipment, you can make use of a combination of surge protector, AVR and UPS by connecting the AVR to surge protector, and connecting UPS to AVR, then connecting your devices to the UPS.


Tuesday, June 20, 2023

Fixed Windows Explorer not responding issue

Today, my laptop suddenly experienced the Windows Explorer not responding issue.

The symptoms were like this:

  • When you double-click on a document, for example a PDF file or an Excel file, by right, the file should be opened by its associated application. Now, it hangs when the application trying to load up. The rest of the Windows and running applications will still function well, only the portion of Windows Explorer or File Explorer hangs up.
  • When you right-click on a file icon, by right, a pop-up option menu should appear. Now, it hangs before the pop-up menu is able to show up.
To fix this, you will need to go to command prompt window with administrator's right.

Because the right-click function no longer working, you can no longer just call out the CMD icon, right click on it, and select "Run as administrator" anymore.

Luckily, there is still alternative way to do so without using the right click menu.

To do so, press Win-R to open the Run dialog box, key-in "cmd" and press ctrl-shift-Enter. The command prompt window with administrator's right will be opened.

Then, run the System File Checker (SFC) to scan and repair your system files that could be corrupted.

The command is:
C:\> sfc /scannow


The process will take some time before it reached 100% completion.

Next, run the Deployment Image Servicing and Management (DISM) tool to further scan and repair any corrupted critical system files.

The command is:
C:\> dism /online /cleanup-image /restorehealth

Your computer needs to be connected to the Internet when you execute this command.

After the process is completed, restart your computer. Hopefully, this is able to fix your problem. It did fix my laptop problem!


Sunday, March 19, 2023

Upgraded my CyberPower UT800EG UPS with APC BV1000I-MSX 1kVA/600W Easy UPS

My CyberPower UT800EG 800VA/400W UPS has been serving me well for more than 3 years, and it is still functioning well.

It has never failed to protect my Dell XPS 8930 desktop, my Asus RT-AX86U router and Unifi BTU from sudden blackouts and also voltage spikes during thunderstorms.

Anyhow, I anticipate its internal battery, which is not user serviceable, has already reached more than half its lifespan.

Not to take the risk, I decided to get a new UPS, and I found this APC BV1000I-MSX 1000VA/600W Easy UPS as its upgrade.


This APC BV1000I-MSX Easy UPS has 4 universal power outlets (the CyberPower UT800EG only has 3), and it has a larger capacity of 1000VA/600W which is able to provide longer battery runtime. It also has a higher surge suppression rating of 156 Joules (compared with CyberPower UT800EG's 125 Joules).


While transporting, its battery stays disconnected. Before use, we need to connect its battery by using its yellow coloured battery connector at its back. Detailed instruction is available in its user manual.

Same with CyberPower, this APC UPS also comes with 2 years warranty, which registration can be made online.

I have reallocated my CyberPower UT800EG UPS to my living room to provide power protection for my TV, IPTV box and cordless phone.

Even though its battery might run flat in the next 2-3 years time, I think it can still serve as a good AVR to protect those appliances in my living room.


Thursday, February 16, 2023

Honor MagicBook 16 well-worth laptop suitable for work and study

During the recent Chinese New Year online promotion period, I discovered that the Honor MagicBook 16 laptop has its selling price dropped to RM29xx. (This promotion is still available in some of the online shops, including the Honor official website, now at a slightly higher price of RM2999 and lesser free gift, until the end of February 2023)

I remember when it first launched last year, its initial selling price was at RM4299.

Without much hesitation, I have bought one with 18 months credit card interest-free instalment of RM163.68 per month, which does not affect much on my personal finance cashflow. I believe at this time, you can't find another new laptop with built-in 16GB RAM 512GB SSD and high performance CPU at such a value-for-money price.


I have recorded down a comprehensive list of specifications of this laptop, as detail as possible, as follow (click the image to enlarge it):


The information above is obtained by running several diagnostic applications on my laptop. I believe it is the most detailed one you can find in the Internet. Even Honor official website also not providing as much detail about this laptop.

The specifications are based on my Malaysia official set of Honor MagicBook 16. The same model of laptop sold in other regions might have a slightly different specs.

I have highlighted the background of the items in green for high specs, yellow for medium specs, and pink for normal specs. From there, you can see that this is a relatively good laptop with some nice components inside.

This kind of specs is commonly found in the flagship laptop during 2021. Now in 2023, the latest version of some of the components might be one or two generations ahead of this laptop, as indicated in the last column of the table above. Anyhow, none of the components of this laptop is deemed outdated, and it can still be used for several years without much performance or compatibility issue. In short, this laptop is future-proof!

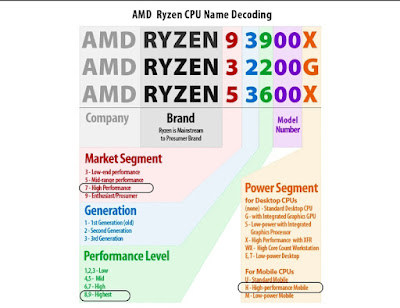
This laptop comes with a high-spec AMD Ryzen 7 5800H CPU, which is comparable with the Intel Core i7-11800H CPU. The performance of its built-in Radeon RX Vega 8 GPU is comparable with the standalone NVIDIA GeForce GT1030 GDDR5 version.

The chart below provides information on how to decode the AMD Ryzen CPU and determine whether it is of high performance, mid-range or low-end.


The laptop screen has a mixture of good and normal features. It has excellent colour gamut, game-level high refresh rate, and certified low blue light treatment. It also has above-average contrast ratio and brightness. However, it has ordinary screen resolution, PPI and view angle. Therefore, its screen is excellent for work and study, but might be a bit lacking for professional graphics/video designers.

One thing I like about this laptop is its WiFi AX support of connection speed up to 1.2Gbps. This speed is even higher than what the UTP Cat6 network cable can deliver.


My laptop comes with several free gifts. The most worthy one is 1 year subscription of Microsoft 365 Personal worth hundred over ringgit in the market. It comes in a sealed genuine envelop, which you can resell to others if you don't intend to use it. It also comes with a wireless mouse and a backpack, which you can use or sell to others. The market value of the mouse should be less than RM100, same to the market value of the backpack.

All in all, this is a relatively high-performance laptop with relatively new specs, no problem in handling the usage for work or study. However, it does not come with a standalone GPU, and might not be so ideal for heavy gaming or multimedia rendering.

In China market, and possibly some other regions but not Malaysia yet, there exist another model with almost the same specs and with GPU as well, called Honor MagicBook 16 Pro. That laptop comes with an NVIDIA GEForce RTX3050 display card, make it powerful enough to also handle gaming and multimedia rendering needs.

What I like about this laptop:
  • Solid and classy casing with nice professional-looking colour.
  • Big screen but light weight, good for reading document and/or working with multiple windows on the screen.
  • Less harmful and less lethargic to your eyes, thanks to its high refresh rate and low blue light treatment.
  • Its camera is located on top of the screen (unlike previous models of Huawei/Honor laptops with camera on the keyboard)
  • You can share its charger with your handphone. When travelling, this allows you to bring fewer chargers in your luggage.
  • It supports supercharging which can charge up its battery very fast.
  • It's speakers can produce pretty good sound, after tuning with Nahemic tuner.
  • It's mic is echo-cancelling and noise-suppressing, nice to use for conference calls.
  • It can establish handy connection with your handphone, with features slightly better than Windows Phone Link.
  • It has a fingerprint reading on/off switch, which is very convenient to use.
  • It has a 4-points touchpad, which you can configure its touch gestures in Windows 11.

What I dislike about this laptop:

  • It has a relatively short battery usage life of 8~10 hours only. Would be perfect if its battery can sustain for 12 hours and above screen on time.
  • Its screen resolution is at normal 1080p. Would be nice if it is 1440p or 2k.
  • Despite its 16 inches size, its keyboard does not come with numeric keypad on the right.
  • Its built-in camera is just normal. If you want high resolution, wide-angle, multi-focus and other more advanced features, better buy a webcam.
  • It has a normal non-touch screen. You cannot write, sign or draw on its screen.
After all, you can't expect to get all the nice features in a laptop selling at price below RM3k, right?


Thursday, February 9, 2023

Comparison among various Google One plans and Workspace Individual plan

Most Google users (including all Android phone users) started up with the free Google personal account.

The free Google personal account comes with 15GB of cloud storage shared among various Google services including Gmail, Google Drive, Google Photos, Android backup, etc. Certain 3rd party applications such as WhatsApp also make use of Google cloud storage to host your account backup data with them.

Soon, you will find that 15GB storage is not enough to be shared by all these online services. When the quota is used up, it will affect your Gmail sending/receiving, Android backup, WhatsApp backup, etc.

One way to handle this situation is to open multiple free Google personal accounts, so that you can get multiple of 15GB cloud storage. Then, you can make use of separate account to store your photos and videos, to host your WhatsApp backup copies, etc.

Another way is to expand your Google personal account's online storage space by paying subscription fee to Google.

Currently, there are 3 Google One subscription plans (Basic, Standard and Premium), and another Google Workspace Individual subscription plan, as follow:

The One Basic and One Standard plans are just storage expansion from the free 15GB plan, to 100GB and 200GB respectively. In addition, you can share your Google Drive storage with up to 5 of your family members under Google Family sharing plan.

Google has recently restricted the Google Meet session hosted by free accounts to 1 hour only. Your online meeting will be forced to terminate after the 1 hour time limit reached.

With One Premium subscription plan, you can not only enlarge your online storage space to 2TB, but also entitled to Google Meet premium service, which expands the online meeting duration hosted by you to 24 hours. Other Google Meet premium service features made available to you including the ability to have breakout meeting rooms for group discussion, ability to stream your online meeting live to Youtube, recording of the meeting session, background noise cancellation for better speech quality, etc.

However, there is also a big jump between the price of the One Standard plan and the One Premium plan.

In between them, there is another plan called Google Workspace Individual. This plan comes with 1TB online storage, the same Google Meet premium service as One Premium plan. In addition, it also comes with enhanced Google Calendar, with an appointment booking system for people to book appointment with you based on your availability as recorded in your Google Calendar. The appointments will be updated into your Google Calendar as well.

The Google Workspace Individual plan also comes with enhanced Gmail service, with increased outgoing email sending quota of 2,000 recipient email addresses per day. The enhanced feature also include ability to send out personalized email to a group of recipients using its mail merge function. You can also send out emails with nice design using the available templates.

As such, it seems that Google Workspace Individual plan is a cheaper alternative to Google One Premium plan, with lesser online storage space, but with better features in Gmail and Google Calendar. You get the same enhanced Google Meet in this plan too.

Apparently, the Google Workspace Individual plan is targeted to freelancers, SOHO users, start-up entrepreneurs, celebrities, artists, etc. with features to help them handle appointments with customers, and to send out personalized newsletters and marketing materials using the mail merge function.

Anyhow, even though you might not make use of all the available features in Google Workspace Individual plan, it is still quite a significant upgrade from Google One Standard plan, and a much cheaper alternative from Google One Premium plan. It is also the cheapest plan to get the premium Google Meet feature that extends the 1 hour meeting limit to 24 hours.

All the 5 plans mentioned above are for personal/individual usage, with a general @gmail.com account name and email address.

There are also business plans, at higher subscription price per account, with more features and functions, which you can make use of your own domain name instead of gmail.com.

There are also plans for education institutions, NGOs, etc. which comes with additional features and functions, yet can be free of charge to the eligible organizations.


Thursday, August 25, 2022

My UGREEN CD226 GaN 100W 4-ports USB fast charger

If you want to have a common charger for multiple devices that charge using USB cable, and better still, to be able to charge multiple devices at the same time, then you can look for a multiport charger such as this UGREEN CD226.


The UGREEN CD226 is a 4-ports charger that supports fast charging (or quick charging / super charging) of various protocols including PD3.0, PD2.0, PPS, QC4+, QC3.0, QC2.0, FCP, SCP, AFC, etc.

You can feel that this Gallium Nitride (GaN) charger is quite big (compared with those single port charger) and quite heavy. Holding it is like holding a tennis ball.

Anyhow, if it is not using the modern Gallium Nitride (GaN) technology, it might have been even much more larger in size. 

It has 3 USB-C charging ports and 1 USB-A charging port. Its maximum charging power is 100W. You can use one or more ports at the same time to charge your device(s) simultaneously.

It is compatible with many devices (handphone, smart watch, tablet, game station, ear phone, and even laptop).

If you connect your device to the right charging port, it supports the fastest charging speed compatible with your device's USB port. However, if you connect your device to a non-compatible fast charging port, it can still charge up your device without problem, but with a slower charging speed.

Port C1 and C2 have the same specs that support a maximum charging power of 100W. You should try charging your device with either one of these 2 ports first. If you are unable to get fast charging, then try port C3, followed by port A.

It supports products of multiple brands, including but not limited to iPhone, iPad, MacBook, Dell XPS, Asus, Lenovo, HP, Surface, Huawei, Honor, Samsung, Xiaomi, Vivo, Nintendo Switch, etc.

Apple product users might like it very much, because its charging speed is much more faster than Apple's original charger.

However, it does not support the latest 100W super charge protocol of my Honor Magic 4 Pro handphone. I can still use it to charge the Honor Magic 4 Pro, but the charging speed is much slower, compared with charging using the handphone's original supercharge charger.

Same with most other modern chargers, the UGREEN CD226 has protection mechanisms to prevent overheat, overvoltage, overcharge, etc.


Monday, August 1, 2022

Free online website to generate hi-res colorful QR codes with customized design

If you need to generate a QR code, for whatever reason, what tools do you normally use?

I have been using QRCode Monkey for quite some times, and I find this free online QR-code generating website is still among the best, as it is free of charge and feature-rich.


It allows you to generate QR codes of your own style and design. Your design can be colourful too.

Your QR code can be of high resolution until 2000x2000 px, which is good enough for most printing use.

You can save your QR code in the format of PNG file, as well as in vector graphics of SVG, PDF or EPS.

It even provides free API for your application to generate QR codes remotely.


If you need more advanced QR code functioning, you can also sign up for Pro account for free. That will enable you to generate QR code that integrates with various online application to do more wonders.


Saturday, April 23, 2022

Converted my Asus RT-AC86U router into AiMesh node and linked it to my new Asus RT-AX86U router to form home AiMesh system

Recently, I purchased a new Asus RT-AX86U router to replace my 4-years-old Asus RT-AC86U router. The main reason being I want to take advantage of the RT-AX86U's WiFi AX (a.k.a. WiFi 6) capability for some of the newer devices in my household.

What should I do with my old Asus RT-AC86U router after I have successfully replaced it? Well, I converted it into an AiMesh node to form a stronger, stabler home WiFi with larger coverage area, by creating an AiMesh system with the 2 routers.

Initially, I faced difficulty in getting my RT-AX86U to discover my RT-AC86U AiMesh node via wireless network, in order to add it into my home AiMesh system. I managed to resolve the issue by using a network cable.

Here are the steps to form an AiMesh system, with RT-AX86U as the AiMesh router, and RT-AC86U as the AiMesh node.

  • Make sure both the routers have already been updated to the latest firmware version. I am using  AsusWRT-Merlin firmware for both the routers, and the current latest version for both of them is 386.5_2.
  • Use a network cable to connect your PC or laptop to one of the LAN ports of the old RT-AC86U router. This is for you to use your browser to access the router's configuration web interface. Alternatively, you can also use WiFi connection to access the router's configuration.
  • Go to Administration > Operation Mode and select AiMesh Node. Click the Save button to confirm your selection.

  • Wait for your router to reset and restart itself into an AiMesh node, ready to join an AiMesh network.
  • Use your network cable to connect the WAN port of your AiMesh node directly to one of the LAN port of your AiMesh router.
  • Now, login to the configuration web interface of the AiMesh router, which should be the new router that links your home network to the Internet.
  • Click on the AiMesh button at the bottom of the Network Map page. The right panel will switch to AiMesh function.

  • Click on the Search button to search for your AiMesh node.
  • You should be able to find the old router as the search result almost immediately. If you don't use a network cable to join the routers together, but trying to use wireless connection instead, you might have trouble in finding the AiMesh node.
  • Follow the screen instruction to setup your AiMesh system. This process will take some time (about 1-2 minutes).
  • Once the AiMesh system is successfully established, you will be able to see the content inside the AiMesh function of the new router.
  • Congratulations. If you reach this step, your AiMesh system should be established. Now you can remove the network cable joining the 2 routers, and they should continue to link up with each other using WiFi connection.
  • Put your AiMesh node router to the location where you want to place it, and you are done.
You might want to configure your DHCP to give a fixed internal IP address to your AiMesh node router. You can find out its MAC address used to join the AiMesh system by clicking on its icon under the "List of AiMesh nodes in your AiMesh system" section, then click on More Config.

In future, you can update the latest firmware to your AiMesh node(s) from the AiMesh router's configuration page, under Adminstration > Firmware Upgrade.

#WorryFreeWiFi #ExtendableRouter


Tuesday, March 1, 2022

Sony WH-1000XM4 on-ear wireless headset good for music listening, video watching, phone call handling, online conferencing and gaming

I believe there is no doubt about Sony WH-1000XM4 being the best consumer-grade foldable, stereo on-ear wireless headset with built-in internal echo-cancelling microphones nowadays (during 2021-2022) for music listening with superb active noise-cancelling (ANC) features.

Well, the following criteria are rules of thumb in determining a good wireless headphone/headset:

  • High fidelity of music playback
  • Relatively large driver unit (>=40mm)
  • Wide frequency range at both low end (<=20Hz) and high end (>=20,000Hz)
  • Good noise-cancelling function
  • Long battery life per charge, can last more than 30 hours
  • Support Bluetooth 5 or above. This is crucial for low power consumption as well as low latency between connected devices.
  • Simultaneous wireless connection to 2 or more devices
  • Personalize setting profile with artificial intelligence (A.I.) learning and adapting feature
  • Comfortability for long-hour wearing

There are several brands with top-range consumer-grade headphones that can meet all of the above, including Sony, Bose, Sennheiser, Jabra, Apple, etc.

The Sony WH-1000XM4 is ranked the best among these best with its excellent noise-cancelling function, superb music playback (with the right equalizer setting), advanced A.I. personalization, and nice comfortability in wearing even for the whole day.

However, the Sony WH-1000XM4 is at the same time losing score in its microphone function, bringing doubts of whether it is still good for handling phone calls and/or speaking in online conferencing.

After using it for some time with its latest firmware, I would say its microphone function is still above average, though not among the best. With a simple 3rd party gadget upgrade, it can even instantly be greatly improved to be ranked among the best in handling calls/meetings and also in voice recording for online gaming, podcasting, video narration, etc.

I had been eying for this Sony WH-1000XM4 headset for several months in 2021, but its price tag of around RM1,500 had made me a bit hesitant to buy it, until the last 2021 12.12 online mega sale, when I saw it selling at RM888 promotional price only, I've immediately bought it.

Now I have used this headset for more than 70 hours, most of the time for online conferencing, followed by music listening, and the least usage time is for answering phone calls. I think it's time for me to write my review about this Sony WH-1000XM4 headset based on my past 2 months of 70+ hours usage experience.


Unboxing the Sony WH-1000XM4 headset

This Sony WH-1000XM4 headset comes with a nice carrying pouch, which is a little bit bulky compared with some other headsets, due to its thick ear cups.


also come together with it in its packaging box are:

  • Stereo audio cable for 3.5mm port (without microphone voice out function)
  • Airplane in-flight audio adapter plug
  • Very short USB charging cable (good enough for charging using power bank)
  • Quick reference guide
  • Instruction for online registration of its 15 months warranty
  • Instruction to download the Sony Headphones Connect mobile app for Android and Apple devices
  • A voucher code for 360 Reality Audio 3-months free trial subscription in either one of Deezer 360, Tidal, nugs.net and Artist Connection.

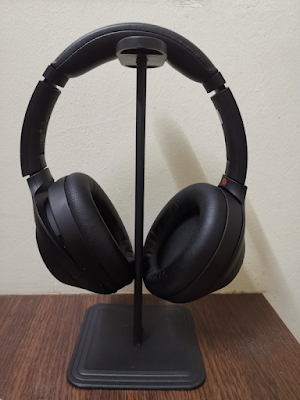
Adding a table-top tower stand for the headset

I have also bought a 3rd party aluminium headphone tower stand for it, at the price of around RM15 only.


Using the 2 buttons at the left ear cup

The Sony WH-1000XM4 left ear cup has 2 buttons. It is very easy for you to locate the correct button by touching and feeling around them with your thumb, without the need of seeing them. A brilliant UX design!

The upper button is a Customizable button that you can use to control either one of:
  • Ambient sound control
  • Google Assistant
  • Amazon Alexa
I have set this button for Google Assistant, and below is how the button works in this mode:

Continue pressing the button to talk or give command to Google Assistant.

When the headset is actively connected to a computer:
  • Press 1 time to toggle music start/stop
  • Press 2 times also to toggle music start/stop
When the headset is actively connected to your handphone:
  • Press 1 time to tell you the current time. Also to read out your phone's notification (such as SMS) for you, if any.
  • Press 2 times to stop reading the notification
The lower button is the Power button:
  • Press 1 time to tell you the current battery level
  • Long press to turn on/off the headset
By the way, the headset has a proximity sensor in this left ear cup. If it detects that you have removed it from your head, it will automatically pause the music and will resume the music when you wear it on again. It will also automatically turn off itself after you've removed it from your head for several minutes.


Using the touch panel at the right ear cup

For the right ear cup, its external surface is actually a touch panel, with the following functions:
  • Cover it completely with your right hand to enter into quick attention mode to let you listen to your surrounding ambient sound by greatly soften the music and temporarily turn off the ANC. It will go back to normal operation after you uncover the right ear cup.
  • Touch it with 2 fingers to toggle speak-to-chat mode on/off, to let you talk with somebody. In this mode, when there is a human speaking voice around, the music will be paused and the speaker will let you listen to the speech. This speak-to-chat feature can also be set to automatically turn on/off by itself based on A.I. detection of human talking voice, but you might face some minor issues with Microsoft Teams. Therefore, I prefer to manually control it using the 2 fingers method.
  • Tap 2 times (when call is incoming) to answer the phone call
  • Tap 2 times (in a call) end the phone call
  • Tap 2 times (not in a call) start/stop music
  • Long tap (when call is incoming) to reject the phone call
  • Long tap (in a call) toggle the call handling device between the headphone and your handphone
  • Long tap (not in a call) to start voice dial function
  • Swipe up to increase the sound volume
  • Swipe down to decrease the sound volume
  • Swipe forward for next music track
  • Swipe backward for previous music track
  • Swipe forward and hold at the edge to fast forward
  • Swipe backward and hold at the edge to fast reverse

Using the Sony Headphones Connect mobile app

The headset settings can be configured with your handphone using the Sony Headphones Connect mobile app which you can download from Google Play Store or Apple App Store.

The app is able to detect your Sony headset once the headset is paired and connected with your handphone via Bluetooth.

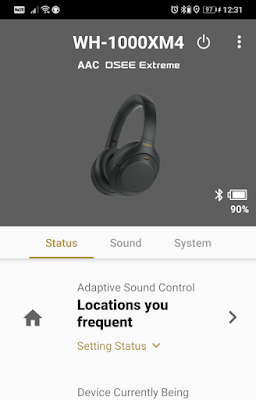
The Sony Headphones Connect app has 3 major pages under the Headphone bottom menu selection, namely: Status, Sound and System.


In the Status page, you can turn off the headphone from there. You can also view the current battery level of the headphone, its connection mode (Bluetooth or wired), the digital audio codec in used, whether DSEE Extreme is turned on, etc.

You can also perform the configuration for Adaptive Sound Control there. This is a very powerful A.I. enabled personalization feature which can adjust the sound output based on your detected action (either staying, walking, running or commuting), or based on your detected location (your home, office, favourite coffee shops, library, or any other places you frequently visit).

For each of the actions and/or recorded locations, you can have different sound settings for volume control, ANC level, speech handling, etc. Your headphone will automatically switch and adapt its sound settings based on its detection.


In this way, it can always optimize your music hearing experience by having adaptive settings that suit for your action or location. For example, you might want to maximize the ANC level at noisy places, but reduce the ANC level in places (such as your workplace) where sometimes you need to speak with people coming to you.


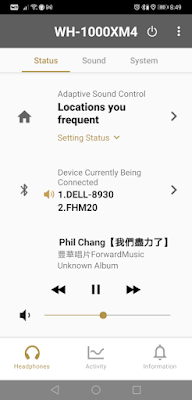
Scrolling down the screen, you can see information about currently connected devices (up to 2), and the current sound output is from which device. The headphone is able to automatically switch between the 2 connected devices based on the voice priority and importance, as determined by its A.I. You can also manually switch the sound output device here, or to select another device to replace one of the currently connected devices.

When you are using Adaptive Sound Control, the sound volume of your headset can be automatically adjusted to a just-nice level, not too loud and not too soft. The A.I. of the headset is able to fine-tune the sound volume for you.

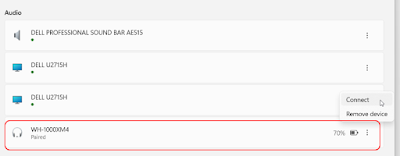
Beside using the app to determine and change the 2 connected devices from the multiple paired devices, you can also perform manual connection directly from the devices itself.

For Android devices such as your handphone, you can perform audio switch from the Switch Audio notification tab.


and for Windows devices such as your laptop or desktop computer, you can do so inside the Bluetooth & Devices setting screen.


The headset is intelligent enough to determine which existing connected device to be replaced. The longer you use your headset, the more accurate its selection will be. 

In case it has disconnected the wrong one, you can always perform manual connection from either the mobile app or the connecting device to get the 2 connected devices as you want.

The last portion of the Status screen shows information of the currently playing music, and the current sound level. The information includes the singer's name, song title, copyright owner, and album name. It supports multilingual display.


My settings in Sony Headphones Connect

For your reference, here are my settings in my Sony Headphones Connect app.

  • Adaptive Sound Control: on
    • Detection of Actions: on
    • Ambient Sound Control: on with default noise-canceling settings for Staying, Walking, Running and Transport
    • Learning of locations you frequent: on
    • Registered Locations: I've registered for a few places where I use the headset, including home, office, library, etc.
    • Notification Tone When Switching: on
  • Ambient Sound Control: on
    • Noise-canceling set automatically by Adaptive Sound Control
  • Speak-to-Chat: off (suggest to turn this off if you frequently use the headset for online conferencing, particularly Microsoft Teams)
  • Noise Canceling Optimizer completed for:
    • Personal optimizing
    • Atmospheric pressure optimizing
  • Equalizer customized to emphasize on human vocal, with added clear bass for musical instruments. Below is my equalizer setting for your reference:


  • Analyze ear shape for 360 Reality Audio Setup completed
  • Sound Quality Mode: Priority on Sound Quality instead of Stable Connection
  • DSEE Extreme: normally off. Sometimes will turn this on while listening to Youtube Music.
  • Connect to 2 devices simultaneously: on
  • Function of Custom button set to: Google Assistant
  • Touch sensor control panel: on
  • Automatic Power Off set to off when headphones are taken
  • Pause when headphones are taken off: on
  • Notification & voice guide: on
    • Tips for language: if you want your headset to accurately read out non-English words, you need to firstly change the language to that language (such as Chinese). After that, you can change back the language to English.
  • Automatic download of software: on
    • Only when connected via Wi-Fi
  • Activity Settings: record activity
  • Automatic Synchronization of Settings and Records: enabled

Why Sony WH-1000XM4 is excellent for music listening?
  • Sony has the world's leading-edge noise-cancelling technology. The Sony WH-1000XM4 is superb in both passive noise-cancelling and also active noise-cancelling. After you put on this on-ear headset, you can immediately feel ambient noise around you to be much softer, a pretty similar experience with putting on the pilot headset when sitting in the cockpit of helicopter or propeller airplane. With ANC on, you can totally immerse yourself with the music, without disturbance from ambient noise. I have several experience taking a pee and flushing the toilet bowl while wearing the headset. Guess what? I can hardly hear the flushing sound.
  • This headset has a wide frequency range and able to playback the music in high fidelity. You can clearly distinct among the sound from different music instruments, as well as the human singing vocal, and feel their respective distance and position.
  • With its DSEE Extreme technology, this headset is able to improve the music from low bitrate and/or compressed music source.
  • This headset is very comfortable to wear, and you won't feel it "pressing" on your head or on your ears. The length of its band is adjustable, and I don't feel much discomfort even after wearing it for a whole day.
  • Similar to all other on-ear headphones, you can feel some heat around your ear after wearing it for some time. However, unlike most other on-ear headphones, the heat does not continue to build up, and it stays at a still comfortable state, even after wearing it for a whole day.
  • Its fully charged battery can easily last for more than 30 hours, even when you turn on all of its features, even with simultaneous equalizer and DSEE Extreme on.
  • It can work as wireless headphone, as well as wired headphone. It even comes with an airplane in-flight audio adapter plug for you to connect it to the airplane's in-flight entertainment system.
  • Although its 360 Reality Audio feature can only work with several selected online music streaming websites such as Tidal, if you happen to use any one of the supported online music streaming platforms, you will enjoy the great experience of listening to music with 360 degree surround effect.
  • This headset is intelligent enough to automatically pause your music when there is a phone call, or when it detects you take it off from your head. It can automatically resume the music from where it stopped after the phone call, or when it detects you've put it back on your head. It also has feature to soften or pause the music when you speak with somebody around you, without the need of taking it off your head.
  • This headset is highly personalizable. Its equalizer is working pretty well for you to fine-tune your music listening experience.

Why Sony WH-1000XM4 is good for phone call handling?
  • It's Bluetooth connection is pretty stable even though it is quite some distance away from your handphone.
  • It's microphone has excellent noise-cancelling function. Even when you are at a noisy place with lots of people talking, or with TV noise, renovation drilling noise, baby crying, dog barking, motor noise, strong wind blowing noise, etc., those noises will be intelligently filtered out for the other party on your phone. However, if you are in a really noisy environment, your own voice might sound a bit "mechanical" due to the filtering effect.
  • It's right ear cup has touch panel with pretty many features for you to handle your call.
  • Although your voice won't sound as clear and loud as with using headsets with a boom mic, it still can handle satisfactory normally conversation, especially with its latest firmware version. Besides, there is a solution to greatly improve your voice by using 3rd party audio cable with attached boom mic.
  • Other than phone call handling, you can also use this headset to communicate with Google Assistant or Amazon Alexa.

Why Sony WH-1000XM4 is good for online conferencing?

I've used this headset in many video or audio conferencings in the form of Google Meet, Microsoft Teams, Zoom Meeting, Cisco Webex, etc. It can function well in all of them, by setting the conferencing application to use the computer system's audio as input and output.
  • I found that it's Bluetooth works better with computer (PC or laptop) than mobile device (handphone or tablet). Conferencing on computer using this headset has a more stable and better sound than mobile device.
  • Its features such as long battery life, comfortable to wear, does not heat up a lot, etc. makes it suitable for long hour video/audio conferencing.
  • Its excellent noise-cancelling features help you to filter out most of the ambient noise around you, so you can still comfortably have your online conference while you are in a pretty noisy place.
  • Your voice can be greatly improved by using 3rd-party audio cable with attached boom mic. Normally I use this when I am the main speaker/presenter in the online conference. Note that the original audio cable that comes together with this headset only support audio input but not audio output. When getting the 3rd-party audio cable with attached boom mic, you need to make sure the boom mic supports echo cancelling and noise-cancelling.
  • If you are working with multiple computers at the same time, you will find its ability to connect to 2 devices at the same time be very useful.

Why Sony WH-1000XM4 is good for video and gaming?
  • With the correct equalizer setting, this headset is capable to bring you great cinematic sound. It sounds so real to immerse yourself into the video or game.
  • This headset has very low non-noticeable audio latency when connected using Bluetooth, and no latency when connected using audio cable. Your screen's action is in sync with the audio you hear, without any noticeable delay effect.
  • For online gaming that you are going to talk a lot with your partners in the game, your voice will be loud and clear by using a 3rd-party audio cable with attached boom mic.

Some limitation of Sony WH-1000XM4

The Sony WH-1000XM4 will be perfect if the following shortcoming can be resolved, perhaps in the future version of WH-1000XM5.
  • It does not have a mute button. If you want to temporary mute it during a phone call or conference call, you need to do it on your phone dialer software or conference application.
  • Its original audio cable will be perfect if can support audio out, and comes with a good detachable boom mic.
  • It will be nice if its ear cups can be less bulky in design.

All-in-all, if you are looking for a good headset for music listening, video watching, phone call handling, online conferencing and gaming, you won't be wrong getting this Sony WH-1000XM4.


Sunday, January 30, 2022

How to find a new job in IT nowadays

As one of the many IT professionals, do you feel that you are not that aware of your value in the market and do not know how to sell yourself? Are you just don't like doing sales?

It is especially difficult for those who were last interviewed quite a long time ago. Since then, the rules of the game in the job market have changed significantly.

The IT job market, in general, is somewhat different from other markets:

  • A very large online presence of job seekers and companies.
  • Very fast distribution of information about negative and positive developments.
  • In many specialties, demand exceeds supply, based on which companies are adjusting HR policies and ways to attract/motivate employees.
  • The too-rapid growth of salaries, if compared with other spheres.

At the start, it's important to let everyone know about you.

Only 20-30% of jobs are posted on job search sites.

These days, candidates respond to ads rather infrequently. Published jobs are only a small part of the job market.

The bulk of the work is with passive candidates. Hiring managers and recruiters scout the internet daily for the right people. To help them find you, fill out social profiles and clearly state what you're looking for.

LinkedIn - The primary job and professional search platform these days.

  • Specify the technology stack you've used to work with. To screen out the unwanted jobs, you need to clearly state your job title in the Title, mention your stack or programming language. For example: Frontend React Developer, Fullstack.Net Programmer, Senior Java Engineer, Java Team Lead. Then you will have fewer unnecessary offers from recruiters.
  • Be sure to write technical skills right in the About field. This will help you get a clear idea of your skills. Do not write long sentences. Give the reader a clear text structure about your skills. For example: programming languages, frameworks, databases.
  • Describe in detail your work experience. Under each job, clarify the essence of the project/product, your role in the project and tasks, technology stack. A common mistake candidates make is to limit their experience description to the job title, time on the job, and company name. All the information a recruiter needs is omitted.
  • Certificates by profession, courses are taken, recommendations from colleagues and clients - the more of these in your profile, the higher the level of trust for you. Certificates must be relevant and up-to-date. Things change rapidly in IT: it makes sense to expose information within 5, at most, up to 10 years. Certificates and course completion certificates are often not a requirement in the hiring process. However, constantly improving one's skills and qualifications, bringing programs and courses to completion, and being result-oriented will set a candidate apart from the crowd.
  • Don't forget to ask for a line or two of recommendations from colleagues and supervisors.
  • LinkedIn has special setting called #OpenToWork you need to turn on so recruiters can find you. 


Job Search Sites and Online Resumes

It's a good idea to upload your resume to popular job search sites, such as Jooble which has job coverage in over 70 countries around the world.

But keep in mind that not all firms have access to a resume database of different sites. By creating a resume on each of them, you broaden your search/resume for employers. The principle of describing technical skills and experience is similar. Put technical skills summary at the beginning, in the most prominent place. Describe your work experience in detail.

Try to avoid writing a monolithic text and using too long sentences. No one will read it. Make the description of your experience user-friendly, clearly structured, and understandable.


Add a link to your portfolio

If you're a developer or automation QA, upload samples of your decent code to Github and put a link to it along with your contact info on your CV and LinkedIn profile - this will help in the evaluation process of your technical skills since most employers are looking at what you really can do. Code samples say a lot more about you than thousands of words on a resume. Especially in the case of juniors. A designer or web developer without a portfolio looks really weird. 

If you don't have any projects to show, or have something very old that doesn't reflect your current level, it's better to put them away and not show them to anyone.


Google yourself for a job.

You already know that only 20-30% of market jobs are posted on job search sites. So be proactive in your job search - search LinkedIn for job offers, recruiters, and managers using keywords like: We are hiring, Looking for Java, C# developers.

Send out applications and resumes, and write to them directly, all the while showing your interest. Write about why you are a good candidate and what makes you different. Stay tuned for news about startups that are invested in, or companies that report good business results and expansion plans.

Visit IT companies, subscribe to their social media accounts and newsletters and stay up-to-date on their news.


Widen your search

Write to your former colleagues or ask your acquaintances. Personal networking is still one of the most effective job searches today.

Subscribe to Telegram channels and Facebook groups where job ads are posted. You can also make use of Jooble to have a centralized access to job opportunities posted in LinkedIn, CareerBuilder, Craiglist, Glassdoor, Indeed, Jobrapido, Jora, Facebook, YouTube, etc.


Tuesday, December 14, 2021

How to keep MS Outlook meeting invitations inside Inbox after responding to them?

This is a frequently asked question (FAQ) that many people using Microsoft Outlook as their email client found their meeting invitations automatically deleted and moved from Inbox to Deleted Items folder once they've clicked on the button to accept or decline the meeting invitation.

The accepted meetings will appear inside your Calendar.

I believe many people prefer to keep the original meeting invitation emails inside their Inbox instead of deleting them, because the invitation email might contain important information about the meeting, such as the meeting agenda, attached documents, etc.

In fact, deleting responded meeting invitations from Inbox is not a bug, but rather a strange default behaviour of MS Outlook.

To change that default setting to retain your meeting invitation emails inside Inbox, go to File > Options, the Outlook Options dialog box as below will popup.


Select Mail on the left menu, scroll down to the Send messages section, and uncheck the option of "Delete meeting requests and notifications from Inbox after responding".

Click the OK button and you are done.


Wednesday, July 28, 2021

My Roborock S7 hybrid vacuum and mop robot cleaner

Finally, I have retired my 4 years old Neato XV-11 robotic vacuum cleaner and replaced it with a new Roborock S7 which has both vacuum and mop function.


The Roborock S7 is currently selling at the price of RM2xxx. You should be able to get it at a lower price of RM2,099 during certain online promotion period. It is slightly more expensive than Roborock S6 MaxV.


The main differences of Roborock S7 from its previous versions including:
  • It is the first, and currently the only, Roborock model that supports Roborock auto empty dock. Anyhow, the Roborock auto empty dock is sold separately, and the price is quite high too.
  • It comes with Roborock's new innovation in vibration mopping technology that can scrub the floor at up to 3,000 cycles per minute, to be more effectively remove dried and stubborn stains on the floor.
  • It comes with new VibraRise technology, which, when it's ultrasonic sensor accurately detects a carpet underneath, it will automatically lift up its mopping cloth so that not to wet up the carpet, at the same time able to increase its vacuum suction power to clean up the carpet area.
However, the Roborock S7 does not come with A.I. cameras as in Roborock S6 MaxV, therefore missing the function of being able to "see" and avoid obstacles that block its path.
 
Roborock S7 can be configured and controlled using the Roborock mobile app, and also with your favourite voice assistant such as Google Assistant, Amazon Alexa, Apple Siri, Tmall Genie (天猫精灵), Xiaomi Xiaoai Classmate (小爱同学), etc. You can even control it using Xiaomi Mi Home app too.

One thing I like is that Roborock supports multilingual, although it can only use one language at a time. It will report its status with voice using your preferred language, which can be English, Chinese, Deutsch, Espanol, Francais, Italiano, Russian, Hebrew, Polski, Portugues, Ramana, Turk, Thai, Viet, Indonesian, Malay, etc.


Before start using it, you will need to connect Roborock S7 to your home WiFi, which in turn connected to the Internet. The Roborock mobile app in your handphone is able to auto-detect the Roborock robot cleaner nearby, and push your home WiFi settings to the robot.

Roborock S7 only support 2.4GHz WiFi up to Wireless-N. The 5Ghz WiFi and WiFi 6 are not supported. Anyhow, the 2.4GHz WiFi has the longest reaching range among them, and this is crucial for the Roborock S7 to get connected in order to work properly.

Roborock uses LiDAR navigation technology to scan and map your house. The map is stored in the cloud under your own Roborock account. You can share your robot with other Roborock users, and once shared, they will have access to your robot settings including the maps too.

You can also install Roborock app in multiple mobile devices and login with the same account, and all of them will have synchronized robot settings and information.

Roborock S7 supports multi-level mapping. Up to 4 maps can be stored for each robot.


The floor map of your house will be automatically drawn with LiDAR navigation during its first usage, and it is pretty accurate. The carpet area(s) are also identified and marked in the map.

After the map is drawn and saved, you can separate it into different rooms, or to merge rooms into larger one. You can configure it so that different room can have different intensity of cleaning and/or mopping.

As one of the standard features, you can draw virtual wall(s) on the map to prevent the robot from crossing over. You can also define certain area(s) on the map, such as your toilet or staircase, as no-go zone. You can also specify certain area(s) to be vacuum only without mopping (the no-mop zone).

This way of setting blockage to the robot using software configuration is much more better and much convenient than my Neato XV-11 way of using physical magnetic stripes.

Roborock S7 supports 4 levels of vacuum power, 4 levels of mopping scrub intensity, and 2 levels of mopping route. This enable you to ask the robot to clean more thoroughly in certain areas, such as the dining room and kitchen area, than the rest of your house.


Another standard feature is scheduling for its cleaning routine. It is fully customizable, as shown in the screenshot below.


Roborock keeps its cleaning history in the app. You can see its entire cleaning path and time taken in the history. This assure you that the cleaning was done properly and according to your instruction.


The Roborock app has a section to show the estimated time remaining for the replacement of wear-and-tear parts of the robot, as well as the time for upcoming maintenance, such as cleaning its sensors to upkeep its performance.


The Roborock app even comes with manual remote control function, for you to drive and control the robot like a remote control car, to move it to your preferred location. There are even 2 different modes of remote control - buttons and joystick.


Just like other cleaning robots, although the Roborock can help you to do automated floor cleaning, it is not the set-and-forget type. There are still 3 items that you need to periodically do, namely:
  • To take out its mopping cloth and wash it, then put it back. This should be done after every mopping.
  • To take out its dustbin box and empty it. Wash and then put it back. This should be done when the dustbin box is about to be fully filled up.
  • To take out its water tank and wash it. Refill with water and put it back. The water tank should be able to supply water for 2-3 times mopping of a typical terrace house.
If you have purchased the Roborock auto empty dock, then the dock will handle the job of emptying the dustbin box for you. You just need to replace the dust bag of the auto empty dock every few weeks.

One thing I dislike is that this Roborock S7 only comes with one mopping cloth. I would suggest you to buy a few more mopping clothes for changing, so that you have more time to do the washing and drying.

Note that the mopping cloth of Roborock S7 is different from the mopping cloth used in older versions - S6 MaxV, S6, S5 Max, etc. This is because of the new vibration mopping function. As such, make sure you buy the correct mopping cloth for Roborock S7 to be compatible with its base.


Hint: Click on the "Older Posts" link to continue reading, or click here for a listing of all my past 3 months articles.