Showing posts with label IT talks. Show all posts

Monday, July 12, 2021

MySQL - How to insert record if not exists to avoid data duplication

While coding an application with MySQL as database, you might come into this situation:

You want to insert a new record into a table, if and only if there is no existing record in the table with certain matching fields.

  • The matching field(s) need not has a unique constrain in your table structure design.
  • Your insert statement does not include value definition for the table's autoincremented primary key (the "id"). As usual, you just let the database engine to determine the value of the autoincremented field for you upon successful insert action.
  • You only want to check for duplication in certain field(s). The rest of the fields can be the same or different. Meanings, as long as all those fields you want to check are completely matching, it is considered a duplicated record, regardless the rest of the fields are matching or not.
  • In the event you have found a duplication, you just want to do nothing and skip the insert. This is different from another situation whereby you want to update the existing record with current one.
  • You don't want to mess up with the primary key (the "id") sequence. Meanings, if there is a match, you just abort the insert action without touching the table. The "id" sequence can continue with next insert, without jumping autoincrement number.
and here is an example of the SQL statement, with value fed by PHP variables:

INSERT INTO `payment` (`year`,`month`,`item`,`category`,`type`,`account_no`,`date_due`,`value`,`payment_mode`,`paid_by`,`status`,`owner`,`payer`) SELECT $year,$month,'$item',$category,'$type','$account_no','$date_due',$value,$payment_mode,$payment_option,'$status',$owner,$payer FROM DUAL WHERE NOT EXISTS (SELECT 1 FROM `payment` WHERE `year`=$year AND `month`=$month AND `item`='$item' AND `type`='$type' AND `date_due`='$date_due' LIMIT 1)

The table structure for payment is as below:


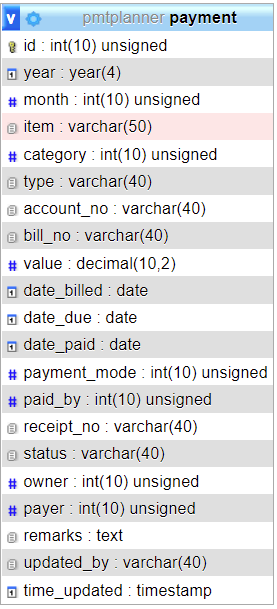
In the example above, you match on fields year, month, item, type and date_due in the table payment. Your insert statement will be executed if the select statement return no result, i.e. there is no matching record(s) fulfilling the search criteria.


Monday, March 15, 2021

Fixed Google Play services keeps stopping problem in Android device

Recently, my Samsung Galaxy Tab A 6 tablet suddenly hit the infamous "Google Play services keeps stopping" problem.

The following window will pop up almost every few seconds, even after you have chosen to close app or send feedback.


Clearing cache of Google Play services did not solve the problem.

The Google Play services was unable to be forced stop nor disabled.

Unable to uninstall updates to Google Play services too.

Restarting the tablet had no effect to the problem.

Force stop the Google Services Framework, clearing its cache and even clearing its data did not help.

It seems that factory reset the tablet will be the last resort.

Luckily, I managed to fix it before going to the extreme of factory reset option.

What I did was to manually download and install the Google Play services.

You can download the APK file of Google Play services from APKMirror website.

Choose the latest version, which currently is 21.06.13.

You need to download the APK file that matches with the CPU architecture of your Android device. In the case of Samsung Galaxy Tab A 6 (2016 edition), its architecture is arm64-v8a.

The APK file also needs to match with the Android OS version currently running on your device. In my case, it is Android 8.1.

After downloaded and installed the Google Play services APK file, my problem magically solved.


Sunday, March 7, 2021

My Vention 3-port 5 Gbps USB 3.0 hub with RJ45 gigabit ethernet LAN adapter

If you are using a laptop with limited number of USB ports, and/or without a built-in RJ45 ethernet LAN port, this Vention 3-port USB 3.0 hub with RJ45 gigabit ethernet LAN adapter could be a handy and useful companion for your laptop.


At the price of around RM50, this small gadget is able to extend one of the USB port of your computer into 3 USB ports. At the same time, it also converts the USB port into a gigabit ethernet LAN port that supports 1,000 Mbps network bandwidth.

The LAN port can work at the same time with the 3 USB ports on it.
 

It supports USB 3.0, which is able to provide a maximum data transmission speed of 5 Gbps.

It is also backward compatible with the older USB 2.0, which is able to provide a maximum data transmission speed of only 480 Mbps.

You can refer to the table below for the comparison of different generations of USB port.


As such, if your computer comes with both the USB 2.0 port(s) and USB 3.0 port(s), you should plug this gadget into the blue colour USB 3.0 port to obtain a much faster data transmission speed than the USB 2.0.

This gadget also has a micro-USB power in port for you to provide charging power from wall charging adapter or car charging adapter. It supports 5V/2A fast charging.


You might need to make use of this micro-USB power in port to provide additional power for charging your handphone and/or tablet with the USB 3.0 ports on the hub, or to power up certain external harddisk that requires a larger power to work.

Other than this 3-port USB 3.0 hub with RJ45 gigabit ethernet LAN adapter, Vension also has different range of similar products, such as USB-C hub, USB to audio port adapter, USB to 100 Mbps ethernet adapter, etc.

There is a cheaper Vention 3-port USB 2.0 hub with RJ45 100 Mbps ethernet LAN adapter that looks alike. I would recommend you to go for the USB 3.0 version with gigabit ethernet LAN adapter for much better performance. Don't buy the wrong version for a cheaper price!


Thursday, February 11, 2021

Fixed Microsoft Outlook unable to open any URL link in email problem

If you are using Microsoft Outlook as your email client, and facing the problem of unable to open any URL link in your emails, this could be a workable solution for you.

The symptom: whenever you click on a link in your email, expecting your web browser to open the link, or in the case of a mailto email address link, expecting Outlook to open the New Message window for you to write a new email to the recipient, you will get this pop-up error message instead: "Your organization's policies are preventing us from completing this action for you. For more info, please contact your help desk".  


However, if you are using Outlook in your home computer, or your IT personnel told you that they didn't impose any such restriction on your computer, then the actual problem is possibly due to corrupted Windows registry.

You can try to fix it by resetting related Windows registry entries to their original form.

To do this, use Notepad or any text editor to open a new plain text file, copy and paste the following content into it.

Windows Registry Editor Version 5.00

[HKEY_CLASSES_ROOT\SOFTWARE\Classes\htmlfile\shell\open\command]
@="\"C:\\Program Files (x86)\\Internet Explorer\\iexplore.exe\" -nohome"
[HKEY_CLASSES_ROOT\SOFTWARE\Classes\htmlfile\shell\opennew\command]
@="\"C:\\Program Files (x86)\\Internet Explorer\\iexplore.exe\" %1"

[HKEY_CLASSES_ROOT\.htm]
@="htmlfile"
[HKEY_CLASSES_ROOT\.html]
@="htmlfile"
[HKEY_CLASSES_ROOT\.shtml]
@="htmlfile"

[HKEY_LOCAL_MACHINE\SOFTWARE\Classes\htmlfile\shell\open\command]
@="\"C:\\Program Files (x86)\\Internet Explorer\\iexplore.exe\" -nohome"
[HKEY_LOCAL_MACHINE\SOFTWARE\Classes\htmlfile\shell\opennew\command]
@="\"C:\\Program Files (x86)\\Internet Explorer\\iexplore.exe\" %1"

[HKEY_LOCAL_MACHINE\SOFTWARE\Classes\.htm]
@="htmlfile"
[HKEY_LOCAL_MACHINE\SOFTWARE\Classes\.html]
@="htmlfile"
[HKEY_LOCAL_MACHINE\SOFTWARE\Classes\.shtml]
@="htmlfile"

[-HKEY_CURRENT_USER\SOFTWARE\Classes\htmlfile]
[-HKEY_CURRENT_USER\Software\Classes\.htm]
[-HKEY_CURRENT_USER\Software\Classes\.html]
[-HKEY_CURRENT_USER\Software\Classes\.shtml]

Save the above content in plain text as "fix-my-links.reg".

Login as a user with Administrator rights, and double click on this file fix-my-links.reg to fix your Windows registry.

After that, you should be able to open the URL links in your emails in Outlook now.


Saturday, November 21, 2020

Mirror displaying handphone screen on monitor and vice versa with WiFi connection using LetsView

If you are using an iPhone or Android phone, and you want to duplicate and show your handphone's screen on your computer monitor, laptop screen, or even smart TV screen, together with audio forwarding, you can easily do that with a free software called LetsView.

The beauty of LetsView is that it can also do the other way round, to duplicate your computer screen onto your handphone. This is pretty useful to make use of your handphone or tablet as a presentation control device, which you can control your computer screen (which can be in turn projected out to a large projector screen) by touching your handphone screen. You can perform drawing and highlighting with LetsView too.

LetsView can also perform computer to computer screen mirroring.

All you need is:

  • Download and install LetsView, free of charge, in both the screen mirroring source and destination devices. Supported systems including Windows, Android, Mac OS, iOS, and TV.
  • Connect both the devices into the same local network. The network connection can be using WiFi or LAN cable. It can work across VPN tunnel too.
  • Run LetsView in both devices.

Running LetsView app in smartphone is pretty straightforward. When the app is able to detect another device in the same local network running LetsView, you will eventually step into the following screen.

Phone Screen Mirroring means to cast your phone screen, together with phone audio, to a computer screen.

Computer Screen Mirroring means to cast your computer screen to the phone.

The screenshot below is captured from my computer monitor, showing the LetsView software displaying my phone screen on it.


When your phone screen is placed in landscape mode, the mirrored one on computer screen will also be displayed in landscape mode.

In your LetsView computer software, you also have the option for Phone Screen Mirroring and Computer Screen Mirroring. If you choose Computer Screen Mirroring, your computer screen, as well as your computer audio, will be mirrored to another computer running LetsView. The receiver will need to key in the PIN code as shown in LetsView of the source computer, for security purpose.


Before the computer screen starts to mirror to the receiver, a confirmation dialog will popup on the screen of the source computer, and you'll need to Allow it to complete the process.

The source computer can choose to either mirror the entire screen to the receiver, or just to mirror the screen of an application currently running on it.


Here is how the screen of the source computer will be shown in LetsView of the receiver computer.


LetsView is pretty useful when you want to work with your computer, while at the same time need to have a glance to your phone's screen from time to time. By showing the phone's screen on your monitor, it is very convenient to see what is on your phone's screen even without touching your phone.

This is also useful if you want to show both your computer screen and your phone screen to your audience in a presentation or live streaming session.

On the other hand, by mirroring your computer screen to your phone or tablet, you can transform your phone/tablet into a pretty powerful presenter device to remote control your computer screen. You can even write or draw on your phone's screen, and make it appears on the larger screen, by using LetsView whiteboard and drawing utility function.


Saturday, November 14, 2020

The difference between TikTok and DouYin

DouYin (斗音) is a short-video sharing social media introduced by ByteDance in China in 2016. In mid-2017, ByteDance launched DouYin's international counterparts called TikTok.

Although both DouYin and TikTok are sharing the same app icon that looks like below, they are in fact completely separate app, with respective user base and content.


Initially, both of them looks similar in functionality. Just that, DouYin operates and serves in Mainland China, and TikTok operates and serves the rest of the world outside Mainland China.

You can find TikTok app in Apple App Store, Google Play Store, Amazon App StoreHuawei App Gallery, etc. but you can find DouYin app in those mobile apps marketplace.

To download and install DouYin, you can visit to DouYin official website and click on the respective download button there for iOS or Android.

DouYin is opened to users from all around the world, which you can register an account and verify your identity using a mobile number in your own country.

Over the times, DouYin and TikTok have been developing separately, and now also have quite a lot of differences in looks-and-feels as well as functionality.

The main difference between TikTok and DouYin is still their separated user base, which results in totally different content uploaded by the separated community.

The user interface and content in DouYin is in Chinese. You can find thousands of official account of Chinese celebrities there. Chinese singers are also using it as one of their channels to release and promote their songs.

There are several leaderboards in DouYin's search function, as shown below.


On the other hand, the user interface in TikTok is English, and the content can be multilingual. There is no leaderboards in TikTok's search function yet. In fact, you can find a list of trending hashtags there.


There is no issue for you to install both TikTok and DouYin in your phone, and register as user in both of the app separately. You just need to treat them as different apps sitting together in your phone.


Saturday, October 3, 2020

Use Hekasoft to backup, migrate, optimize and maintain your profiles and emails in web browsers, email clients, Skype, uTorrent, and more...

I used to make use of a freeware called MozBackup to backup my user profile in Firefox and Thunderbird. The backup file can then be copied and restored in another computer, which is an easy and perfect migration, especially to all my emails stored in my Thunderbird profile.

Unfortunately, MozBackup has no longer been maintained since 2012. It stopped at version 1.5.2 Beta 1.

Luckily, I've found another freeware called Hekasoft Backup & Restore, which you can download here.

Hekasoft can do everything that MozBackup did for backup, restore and migration of user profiles and emails. In fact, Hekasoft supports much more software and equipped with more powerful functions.


It supports a vast variety of Chrome based (Chromium) browsers, Firefox based (Gecko) browsers, Microsoft Internet Explorer, Microsoft Edge, Opera, Lunascape, and more.

In terms of email clients, it supports Thunderbird, Postbox, eM Client, Incredimail, etc.

It also supports FileZilla, qBitTorrent, uTorrent, Skype, and some other software.

Beside the normal backup and restore of the user profiles of the same software (such as from Thunderbird to Thunderbird), either in the same computer or restoration in another computer, Hekasoft can also perform migration, optimization, plugin management, bookmark URL maintenance, and profile switching.


The different of "migration" from "backup & restore" is that, when we backup & restore, it is performed within the same software (eg. from Google Chrome to Google Chrome), while migration is to duplicate the profile settings and contents from one software to another (eg. from Google Chrome to Vivaldi).


The "optimize" function in Hekasoft is used to clean up the caches, crash reports, telemetry, dump files, etc. of the selected software, such as Thunderbird.

The "dead link checker" will dive into the bookmark URLs of Internet Explorer, report on problematic URL links, and enable deletion to those dead links.

The "plugin scanner" is dealing with the plugins, add-ons and extensions of web browsers.

The profile switcher enable easy switching between different default user profile of the software, such as Thunderbird. You can also create new profile, clone profile, and delete profile with it.

I strongly recommend Hekasoft to be your powerful tool to perform backup, restore, migration and maintenance to your web browser, email client, file downloader, Skype, etc.


Thursday, September 17, 2020

Yoodo unveiled customizable unlimited data plan on top of existing high-speed data plan

Yoodo has been known to offer high-speed data plan with usage quota that has uncapped speed and uncapped hotspot tethering.

Now, Yoodo has unveiled a new customizable unlimited data plan on top of the existing high-speed data plan, so that users can configure their data plan at the best of their need.

The maximum speed of Yoodo unlimited data plan is capped at either 3 Mbps or 6 Mbps.


Current price for 3 Mbps unlimited data plan is RM35 per month, and for 6 Mbps is RM43 per month.

Both of the 3 Mbps and 6 Mbps unlimited data plan come with:
  • Free 2GB of hotspot tethering quota
  • Free 2GB of data roaming quota
  • Free 50 minutes of voice call
Additional hotspot tethering quota, voice call minutes and SMS quantity can be purchased by user configuration in Yoodo app.

Yoodo SIM card is available for free and will be sent to your address, just click here to order it. You can also buy the Yoodo SIM card at 99 Speedmart at the minimal price of RM2.

New users who activate their Yoodo account using this referral code "cwqhp2909" will get free 7GB of high-speed data quota during first subscription month.


Tuesday, September 8, 2020

Fixed Windows 10 problem of not detecting any keyboard and mouse at login screen

Yesterday morning, when I booted up my desktop computer running Windows 10, I was stuck at the login screen because the keyboard and mouse are totally not functioning. It had taken me more than 2 hours to fix the problem.

The symptom:

  • The keyboard is not detected by Windows and not functioning. Pressing the Num Lock and Caps Lock will not toggle the LED light on the keyboard.
  • There is also no mouse cursor on the login screen.
  • The keyboard and mouse are functioning well if reboot into BIOS screen. This indicated that the problem is not with the keyboard or mouse or USB port, but something is wrong with the Windows system.

I have tried the following methods, but all of them failed to resolve the problem:
  • Change to connect to different USB port of the computer produced the same result.
  • Change to use another keyboard/mouse is also the same.
  • When using a wired mouse, the LED light on the mouse is illuminated, indicating the mouse is getting current from the USB port of the computer without problem.
  • Press the power button to shutdown Windows, and then start it up again, did not help at all.
  • Boot up with Windows 10 USB Recovery Drive, the keyboard and mouse were working fine. Perform a Start-up Repair did not find any problem.

How I finally fixed the problem?

I unplugged the computer power cord from my UPS and plug it directly to the wall socket. Then, switched on the computer.

When the computer reached the Windows login screen, cut off the electricity supply by switching off the wall socket.

On the next reboot after Windows encountered such an "unexpected power off", my keyboard and mouse are finally functioning again.

I know that this action of forcing unexpected power off was quite harmful to the computer hardware as well as to the Windows system, but it somehow managed to trigger an automatic repair during Windows startup which fixed the keyboard and mouse issue.

When everything was back to normal, I connected back the power supply of the computer to my UPS and tried to find out the cause of the issue. It was caused by an unsuccessful automatic update of "Cumulative Update Preview for .NET Framework 3.5 and 4.8 for Windows 10 Version 2004 for x64 (KB4570721)"

The update was then done manually after some precautions taken. It was successful and required a reboot. Luckily, after the reboot, my keyboard and mouse are still functioning well.


Monday, September 7, 2020

Hotlink Postpaid has increased data quota without additional charge since 5 September 2020

Hotlink Postpaid by Maxis has been around for quite some times, offering 3 different packages with different data quota limit, namely Hotlink Postpaid 30, Hotlink Postpaid 40 and Hotlink Postpaid 60.

All the 3 of them come with unlimited calls and unlimited SMS. The Hotlink Postpaid 60 plan also comes with an optional mid-range Android handphone bundle.

In August 2019, Hotlink had upgraded their Postpaid 40 and Postpaid 60 plans with additional high speed YouTube data, without additional charge, as shown in the middle table below.


Now, Hotlink has just upgraded all the 3 postpaid plans again with additional data quota, from 5 September 2020 onwards, without additional charge, as shown in the bottom table above.

If you have observed your monthly data utilization carefully, you will note that the YouTube quota in these Hotlink postpaid plans actually encompasses all the Google services, including YouTube, Play Store, Gmail, etc.

This upgrade is somehow seen as a response to the upgrade of Celcom XP Lite Postpaid Plans to include unlimited YouTube since early July 2020.


Tuesday, August 25, 2020

How to instantly make the background of photo & video transparent

A company called Kaleido AI GmbH in Vienna, Austria has successfully made use of artificial intelligence (A.I.) technology to effectively remove the background from the main object(s) in any photo and even video, awesomely making the background transparent, without the hassle of using any greenscreen.

In most cases, the conversion can be instantly completed within a second, and the result is impressively promising!

The product/service that makes photo background transparent is Remove.bg. It is available for Windows, Mac and Linux as a software, very useful to perform bulk images conversion, which you can download from this webpage: https://www.remove.bg/windows-mac-linux


It also has an Android app which you can click here to download and install it from Google Play Store.

Alternatively, you can also upload your photo to their website, just by a simple drag-and-drop action, to perform online conversion. The URL is: https://www.remove.bg/


Remove.bg provides API for integration, and its plugins are available for Photoshop, Zapier, Integromat, Figma, WooCommerce, Drupal, Sketch, and even Visual Studio Code.

Remove.bg sells credits for image conversion, 1 credit for 1 image conversion. If you don't need high resolution converted image, the converted preview image up to 0.25 megapixels is free of charge.

Below are some examples to give you an idea about what can be expected from Remove.bg background removal service.

Original photo:

Background removed:

Original photo:

Background removed:

Original photo:

Background removed:

Kaleido AI GmbH's A.I. technology for background removal is not only applicable to images, but also can be used for videos as well.

Currently, only online conversion is available for videos. The service name is called UnScreen, and its URL is: https://www.unscreen.com/

Below is a sample video provided in UnScreen website to see it in action.


Saturday, August 15, 2020

FileRun - self-hosted file sharing and content collaboration solution for personal, family or enterprise

I was looking for a multimedia content sharing solution to perform some sort of e-library function in a hosted server.

I would like to upload documents, e-books, presentation slides, audio files, video files, and the like to the system. Those content then can be accessible by particular persons and/or group of persons that I assigned permission with. They should be able to open the content directly in web browser in their desktop, tablet or mobile phone. For editable content such as text files, MS Office documents, LibreOffice documents, etc., they should be able to edit the file directly in the web browser, if I give them the "edit" permission.

First thing I thought of was Google Drive, Dropbox, OneDrive, or similar cloud drive available in the Internet. However, those services will have stringent quota limitation, less flexible for me to control users and access rights, and does not have certain feature that I need.

Then, I looked into ownCloud, Nextcloud, and the like. They are a bit too complicated for both the users and administrator. They contain excessive features and functions that I don't need. Worse still, I found that they have little bugs here and there which I couldn't resolve nor found workable solution in the Internet.

Finally, I settled down with FileRun which run in LAMP environment. It is simple, easy to use, and has a nice user interface.


It even has special handling for photos and audio/music by making use of the metadata embedded in those multimedia files. I hope that in the future version, this can be extended to video files too.


Installation of FileRun to an existing LAMP platform is pretty easy too. There are 2 files to download:


After download, rename the FileRun zip file to just FileRun.zip without version number in its filename.

Upload both FileRun.zip and unzip.php to a web-accessible folder in your web server.

Use your web browser to access to unzip.php in your web server, and follow the step-by-step instruction to complete your installation.


You can even install FileRun in Synology DiskStation and RackStation NAS. Click here for the instruction to install FileRun on Synology network attached storage.

With FileRun, you can manage and organize your files, tag them for easier searching, bookmark certain files into your collections and/or starred folder.

You can share your folders and files to other users and groups in FileRun, and determine whether they can perform upload, download, make changes, share links, read comments, or add comments.

You can also create weblinks to share files or folders to be accessible by other FileRun users or external users without any FileRun account in your system.

You can put an expiration date for your weblink, limit its download, set a password before the linked file can be accessed, require user login before the linked file can be accessed, etc.


I find FileRun very suitable for simple e-library system for file sharing and content collaboration in self-hosted server. You can even access your files directly from Windows Explorer via WebDAV. It even has a Mozilla Thunderbird FileLink addon to enable you to send large file in your email.


Tuesday, August 11, 2020

Updated the firmware of my Samsung Xpress M2885FW printer to version 3.00.01.18

Despite Samsung printer business had been bought over by HP since 2017, there is still new firmware release for my Samsung Xpress M2885FW printer recently in mid-July 2020 to version 3.00.01.18.

You can download this latest firmware from HP Customer Support Website for Samsung Printers here. The filename is M2885_V3.00.01.18.zip with size of 17.2MB.

After unzip, you can find the following files in it.


If your printer is connected to your computer with USB cable, the firmware update is pretty easy.
  • Make sure the printer is idle with no printing/scanning/faxing job running.
  • Drag and drop the file SWUPGRADE-ON.prn to usblist2.exe.
  • After that, drag and drop the file M2885_V3.00.01.18.hd to usblist2.exe.
  • The firmware update process will start in the printer. The printer will reboot itself at the end of the process.
You can check for the firmware version running in the printer by accessing the printer's IP address using your web browser and login into its SyncThru Web Service and navigate to Maintenance > Firmware Upgrade.


Another way to update your printer's firmware is by clicking on the Upgrade Wizard button on the webpage as shown above, and select the file M2885_V3.00.01.18.hd from your computer.

Here is the changelog of the firmware for this printer for your reference.


Monday, June 29, 2020

Generating PHP codes for mobile-friendly web database applications with AppGini rapid development tool

AppGini by Bigprof Software is a rapid web application development tool for the PHP and MySQL web service stack.

It is very easy to use, and very handy to generate up-and-running mobile-friendly web database applications instantly at one mouse click, without the need of writing any programming code.

With AppGini, it is possible for you to save hundreds of man-hours spent in prototyping, programming, design and testing your web application.


AppGini is a Windows application. As such, it is best suit with Laragon as the WAMP development platform to receive the PHP codes generated by Appgini, so that you can immediately test out the generated web application within the same computer.

If you are using Linux or Mac OS, you can also install AppGini in your computer through PlayOnLinux or PlayOnMac.

Below are 2 of the screens in the generated web application, with sample data, using AppGini's default template. You can modify the looks and feels of the screen by choosing another theme of template and layout options.


The PHP codes generated by AppGini are pretty clean and neat.

In 1 or 2 man-days, by using AppGini, you should be able to produce a fully functional Northwind Orders system with ACL (access control) mechanism from zero. Imagine how many man-days you need to produce the same amount of PHP codes as shown below, by manual coding.


Northwind Orders system is used by Bigprof to demo the work produced by AppGini. You can access to its live demo system here, and can even download its generated source codes here. Beside Northwind, there are more open source web applications generated by AppGini which you can download here.

You don't even need to know about PHP programming in order to create web application using AppGini. Anyhow, you need to have basic knowledge on software development and concept of relational database to master the use of AppGini quickly.

Therefore, I found AppGini an ideal tool for educational purpose to teach and learn about web database CRUD programming concept, and also relational database concept, including the data structure, normalization, joining of tables, keys & constraints, etc.

Of course, AppGini is also ideal for software developer to quickly come out with something, then to further customize on the generated codes. This approach can really save a lot of time and effort.

AppGini is a trialware. You can click here to download AppGini free trial edition, which has no time limit of use, but has limitation on some key functions, including unable to save your AppGini project for future use.

If you like it, you can order its full version at the price of US$79.90 per user. I found that this price is one of the cheapest among its competitor products such as Scriptcase, PHPMaker, CodeCharge Studio, Dadabik, etc.

Friday, June 19, 2020

Update Microsoft Windows to version 2004 - Windows 10 May 2020 Edition

Microsoft Windows 10 May 2020 Edition (version 2004) is available now, free for update from existing Windows 10 to version 2004.

It is also free for upgrade from eligible older Windows 7, 8, 8.1 to this Windows 10 May 2020 Edition.

Existing Windows 10 users can search for this update in Settings > Windows Update > Feature Update and click on it to start the update process.


If you are not able to find the update there, you can also perform a manual update by downloading the Windows 10 Update Assistant from the link below:
 
https://www.microsoft.com/en-au/software-download/windows10

 
Just run the downloaded file and follow the step by step instruction to complete the update to Windows 10 May 2020 Edition.


Please take note of the following:
  • This update will download a large number of files from the Internet. It is best to run when your computer is connected to a fast and stable network with unlimited data plan or free WiFi.
  • The entire update process will take about 3-4 hours. Therefore, it is better to run it over the night while you go to sleep.
  • Windows 10 Update Assistant will create a folder in C:\Windows10Upgrade with a lot of files, consuming a lot of storage space. The best way to safely delete this folder after successful update to Windows 10 version 2004 is by uninstalling Windows 10 Update Assistant. That folder will be deleted along with the uninstall process.
  • There will also be a very large C:\Windows.old folder after the update. You can find it under Settings > System > Storage and click on it to delete it safely.

Thursday, May 7, 2020

Using Android phone's camera as webcam for PC and Mac with Iruin

Not long ago, I wrote about DroidCam which can turn the camera on your Android smartphone into webcam for your Windows or Linux computer, to be used in Skype, Zoom, and other applications that utilize a webcam.

The main limitation of DroidCam is that, right now, it does not work with Apple's product. You cannot use it to capture and stream video from iPhone or iPad, nor use it as webcam in iMac or MacBook.

Not to worry, because there are alternatives to DroidCam that can also work with Apple's product, such as Iruin.


Similar to DroidCam, in order to make use of the camera of your smartphone as webcam for your computer with Iruin, you will need to install the Iruin webcam app in your phone, and then install Iruin webcam software in your computer.
and then
Iruin is very easy and straightforward to use. It has a very clear-cut Settings page too.


It is simple, yet powerful. It's free version can support high resolution and even 4k video (3840 x 2160). I found its video brighter, clearer and finer than DroidCam too.


To use Iruin as your webcam, just select "Iruin Webcam" as your video camera source. Below is an example of how to set it in Zoom.


You might probably also be interested to read about:

Monday, May 4, 2020

How to get 16GB free VPN every month from Windscribe

Windscribe defines itself as "a set of tools that work together to block ad trackers and web beacons, restore access to blocked content and help you safeguard your privacy online". Basically, it is a VPN service with some additional privacy and security protection features such as the R.O.B.E.R.T.

You should consider to use Windscribe if you are looking for a VPN provider that provides at least 10GB free monthly usage to you, without time limit (lifetime validity), without any ads annoyance, with reasonably fast and stable connection, and rapidly improving with new features and functions as well as servers coverage.


Previously, Windscribe used to provide promo code to provide as much as 50GB or even 60GB free monthly usage, but those promo codes are no longer valid. Anyhow, you can still get 16GB and more free VPN every month, by following the steps below.

Click here to create a new Windscribe account, and you will get 2GB free monthly VPN. Note that it is a referral link to give you an additional 1GB VPN per month. If your Windscribe account is opened without a referral, you will only get 8GB free monthly VPN in the next step, instead of 9GB.

Verify your email address with Windscribe, and you will get an additional 9GB free monthly VPN. That will add up to a total of 11GB free VPN per month.

Login to Windscribe website and go to your Account Overview page, click the "Tweet 4 Data" button and post the promotional info to your Tweeter account, you will get another 5GB free monthly VPN. That's how you can reach 16GB free VPN every month.

If you want additional free data, become a referral by following the instruction here. For each successful referral with confirmed email, you will get an additional 1GB per month together with your friend.

If you like Windscribe, you can also upgrade your account to Pro by paying subscription, which will provide you with unlimited VPN data usage, much more servers and locations availability, accessible with same account from unlimited devices, and full features. You can click here to upgrade to Windscribe Pro account with special discount.

Windscribe can be installed in:
  • Computers: Windows, Linux and Mac OS
  • Smartphones and tablets: Android and iOS
  • Web browsers: Chrome and Firefox (will only protect web browsing activity)
  • Routers that support OpenVPN connections
Windscribe supports the following VPN connection modes, and by default will automatically pick the best mode for you:
  • IKEv2
  • OpenVPN TCP
  • OpenVPN UDP
  • Stealth - encapsulates OpenVPN in a TLS tunnel via Stunnel
  • Wstunnel - encapsulates OpenVPN in a WebSocket
Why you need VPN? There are many reasons, to name a few:
  • Protect your privacy from the website or server you visit by masking your actual IP address and location.
  • Stay anonymous to the websites you visited by various privacy tools provided by Windscribe in addition to the VPN connection.
  • Block unwanted ads, malware, etc. with tools provided by Windscribe.
  • Hide your Internet activity from the network devices of public WiFi, company's network device, ISP network device, etc. which might have interest to log and trace your Internet activity.
  • Escape certain kind of data throttling imposed by WiFi provider, school, company, ISP, etc.
  • Escape certain kind of QoS bandwidth throttling imposed by WiFi provider, school, company, ISP, etc.
  • Bypass censorship imposed by WiFi provider, school, company, ISP, government, etc.
  • Access to website, service and/or content that only made available to certain region.
  • Enjoy discounted price available to certain region for online purchasing.
  • Securely access to your internal resources by using Windscribe Port Forwarding.
  • Manually route your network path to oversea server to achieve faster and/or more stable connection by selecting a strategic VPN location.
You might need to make use of Stealth or Wstunnel modes mentioned above in order to escape throttling and/or bypass censorship in certain tough situation.

Hint: Click on the "Older Posts" link to continue reading, or click here for a listing of all my past 3 months articles.