Saturday, September 27, 2014

Restrict apps network access in Android smartphones with Firewall Plus

Do you want to block the mobile advertisement from appearing in the screen of your standalone (can work locally without network connection) apps or games?

Do you feel suspicious and insecure when you discovered there are network activities from some of the apps installed in your smartphone, even though you didn't open them, or the apps suppose to work locally without the need of connecting to the network?

Would you like to restrict certain apps that consume a lot of network data usage, such as e-Magazines, e-Newspapers, etc., so that they can only use WiFi connection to access the network, and not using your precious mobile data plan?

If you have already rooted your Android device, you can install the free Firewall Plus.


I found this Firewall Plus very straightforward and easy to use, and it has a very small file size of 239kb only.

It will list down all the apps in your Android device, which you can select to allow the apps to have WiFi access, or 3G/4G mobile access, or both, or none, respectively.

It has 2 modes, the Blacklist mode is useful when you want to allow majority of the apps to have full network access, and the Whitelist mode is useful when you want to disallow network access to all the apps by default.

Firewall Plus works on top of the built-in iptables firewall in Android.

If you haven't rooted your Android device, you can also try another app called NoRoot Firewall. NoRoot Firewall leverages on the VPN function of your Android device to perform its firewall function, which I think is less efficient than Firewall Plus.

By the way, if you have installed 3G Watchdog or its Pro version in your Android device to monitor your network usage, it is able to show you the usage by apps very clearly.


Of course, you can also make use of the Data Manager inside the Android Kitkat system to check for network usage by apps.


Tuesday, September 23, 2014

Reenabling external SD card access that is restricted in Android 4.4 (KitKat) with SDFix

If you have updated your Android smartphone to version 4.4.x (KitKat), you might find that access to your external SD card is now restricted by the system.

The system now comes with a file explorer that is having full read/write access to both your internal storage and external SD card storage. However, 3rd party file explorers lost the write access to the external SD card and can no longer create, move or edit files or folders in it.

Many apps can no longer save data and files in the external SD card, including your backup apps, multimedia apps, file transfer apps, etc.

This will bring problem to the operation of numerous apps. You might also face storage shortage if the internal storage of your phone is less than 32GB.

Luckily, you can reconfigure your Android smartphone to treat your external SD card the same way as before version 4.4, and let you get rid of the restriction that causes you hassle, trouble and problem.

There is only one condition: your Android smartphone must be rooted, as root access is required to change the affected system configuration file.

I use a free app called SDFix: KitKat Writable MicroSD by NextApp Inc. for my HTC One (M8) and Samsung Galaxy Note 8.0 (GT-N5100) after they've updated to Android 4.4.x. This app is simple, easy, and works like a charm.

You will need to reboot your phone for the change to take effect after the app changed the system configuration file. If the change is successful, you can proceed to uninstall the app as you only need to run it once.


Friday, September 19, 2014

Deepavali public holiday in 2014 changed from Thu 23-Oct to Wed 22-Oct

Malaysia Federal Government vide Gazette notification dated 6 December 2013 has declared 22 October 2014 (Wednesday) as the Public Holiday for Deepavali.

This superseded the earlier Gazette Notification of Deepavali which declared it to be on 23 October 2014 (Thursday).

Source references:

Thursday, September 18, 2014

ecoLiving Advance E27 LED light bulb

I need to change the light bulb in one of my pillar lights, and found this ecoLiving Advance LED light bulb (9 watts, 910 lumens, for E27 base) selling at promotion price of RM15.90 in Tesco.


I used to use energy saving CFL light bulbs, which cost around RM10-15 too. On the same day, Philips brand energy saving CFL light bulb (18 watts, 1040 lumens, for E27 base) was selling at the price of RM11.90 in Tesco, only RM4 cheaper.

Other brands of 9W E27 LED light bulb available in Tesco include Osram and Philips. They were priced at above RM40 in Tesco on the same day.

Since its cheap price, I decided to give it a try. So, this is my first purchase of E27 LED light bulb. Let's see it in action...


It is as bright as the 18W CFL energy saving light on other pillars beside it, yet it is able to save 50% of energy by operating at 9W only!

It also claims to have 1.5x longer lifespan (up to 25,000 running hours) than the CFL energy saving light bulb (10,000 running hours).

When the price of LED lightings become more and more affordable, I can foresee that they will replace the CFL energy saving lightings, which currently replacing the traditional fluorescent and incandescent lightings.

Malaysian Samsung Galaxy Note 8.0 (GT-N5100) received firmware update to Android 4.4.2 (Kitkat)

After a long waiting period, the Malaysian Samsung Galaxy Note 8.0 (GT-N5100) finally received its OTA firmware update to Android 4.4.2 (Kitkat) from previous Android 4.2.2 (Jelly Bean).


The build number of this update is: KOT49H.N5100XXDNH3, with Android version 4.4.2, baseband version N5100DXDNG1. Kernel version is 3.0.31-2637964 dated Fri Aug 29 2014.

This firmware incorporates Samsung Find My Mobile service, which you can perform remote control from the website http://findmymobile.samsung.com to:
  • Locate your device
  • Lock your device
  • Ring your device
  • Retrieve call logs
  • Wipe off your device
  • Unlock device's screen


Wednesday, September 10, 2014

Converting nano SIM card to micro SIM card or standard SIM card using Noosy SIM card adapter

During the good old days, all handphones use standard SIM card with the same size of 25mm x 15mm.

Then, certain high-end smartphones such as Apple iPhone 4, HTC One X, HTC One (M7), Samsung Galaxy S3, Samsung Galaxy S4, etc. started to use a smaller size micro SIM card of 15mm x 12mm. The standard SIM card couldn't fit in their micro SIM card slot, and need to be cut with a SIM card cutter, or you need to request for a new micro SIM card from your telco.

Not long after that, the later high-end smartphones such as Apple iPhone 5, HTC One (M8), Motorola Moto X, etc. started to use an even smaller size nano SIM card of 12.3mm x 8.8mm. Again, the standard SIM card or micro SIM card couldn't fit in their nano SIM card slot, and need to be cut with a SIM card cutter, or you need to request for a new nano SIM card from your Telco.

In some occasion, you might want to convert your smaller SIM card to a bigger one. For example, when your new smartphone is faulty and need to send back for repair, and you need to temporary fall back to your old smartphone which uses a bigger SIM card.

Luckily, there exist SIM card adapters that enable you to convert your smaller SIM card to a bigger one, similar to the concept of converting micro SD card to a standard SD card.

Noosy SIM card adapters come in a pack with 4 items:

  • 1 x Nano SIM to Micro SIM adapter
  • 1 x Nano SIM to Standard SIM adapter
  • 1 x Micro SIM to Standard SIM adapter
  • 1 x SIM tray ejector for iPhone, HTC One, etc.

Each pack only cost me RM1.80.


Monday, September 8, 2014

Favelle Favco (FAVCO, 7229) - business growing, share price yet to catch up

About 2 years ago, I mentioned about Favelle Favco (FAVCO, 7229) here.

Now, its share price already more than doubled up (29-Nov-2012 closing: RM1.47, 5-Sep-2014 closing: RM3.31, dividend paid between the period: RM0.18. Gain = 137.41%).

This stock counter caught my attention again, as its business continues growing over the period, but its share price topped at RM3.89 on 9 April 2014, after that dropped to RM3.24 on 9 May 2014, and has been side-lining until now. In fact, its share price dropped a bit during the last week in August 2014, and has been struggling between the range of RM3.25 to RM3.39 recently.

Below is its 3 year price chart, showing that despite its share price is laggard behind its business growth speed, but it is still keeping on moving up at a steady rate. In any month of the year, its share price in current year is always higher than previous year.


Now, lets see the changes in its fundamental over the past 2 years.


Traditionally, the 1st quarter is a slow period for FAVCO, which hopefully will improve in 2nd quarter, and becoming better in 3rd quarter, then slow down a bit in 4th quarter. This is reflected in its quarterly profit margin as shown in the table above.

The clients of FAVCO, who specialized in cranes, are mainly from Oil & Gas sector, and also from Construction (i.e. high-rise building), Marine (i.e. ship terminals), etc.

Its revenue derived from its outstanding order booked. Once the order booked materialized into revenue, the outstanding order booked will decrease. At the same time, new projects are secured with new Purchase Order (PO) received, which will then add on to the order booked figure subsequently.

FAVCO will announced their new substantial PO received in Bursa Malaysia Announcement website. PO with smaller value are not announced, but will be included in the outstanding order booked figure announced in the next quarterly report.

We can see that FAVCO's outstanding order booked has increased to above billion since the 3rd quarter of 2013. Over the past 2 years. every quarter in between the quarterly reports announcement, FAVCO had at least one announcement on new substantial PO received without fail. This mean they continue to get new business throughout the year, while fulfilling the secured projects on hand.


FAVCO announced their 2014Q2 report on 25 August 2014. This is a very good result, as its revenue and net profit growth are substantial, be it compared to last quarter or to same quarter in last year. It net profit broke a new record high. Its profit margin also gone above 10% for the 2nd time. However, its share price has not react to this good result, probably dragged by overall market sentiment.

Note that on 3 September 2014, FAVCO announced new substantial order booked amounting RM119.9 million. There are 2 more months to go before they announce the next quarterly report in November 2014. If within the next 2 months, they announce another new substantial order booked, then it will be confirmed that their outstanding order booked is breaking a new record high!

On 5 September 2014, FAVCO's share issued is 216.51 million. Its trailing 4 quarters net profit is RM84.228 million. We can calculate its EPS to be RM84.228/216.51 = 38.90 sen. With this, we can calculate its PE ratio on 5 September 2014 closing to be 331/38.90 = 8.5.

As long as FAVCO's business continue to grow, it is a matter to time for its share price to catch up and reflect its fundamental strength.


Disclaimer: This article is intended for sharing of point of view only. It is not an advice or recommendation to buy or sell any of the mentioned stock counters. You should do your own homework before trading in Bursa Malaysia.

Friday, September 5, 2014

HTC One (M8) users get 100GB free Google Drive storage (doubled from previous 50GB)

Today, I received an email from Google Drive with title the "Changes to your Google storage plan". Its content is as below:


Huray! HTC One (M8) users' free Google Drive storage is now increased from 50GB to 100GB! This includes existing users who have already activated the free Google Drive storage and had already received 50GB free storage, now it is doubled up to 100GB too.

This 100GB of Google Drive storage is on top of the existing free storage of 15GB, which is shared among Gmail, Google Drive and Google+ photos.

Thanks to HTC and Google!

Thursday, September 4, 2014

Upgraded my HTC One Android smartphone from M7 to M8

Last week, I traded in my HTC One (M7) for a new HTC One (M8). I am glad that after slightly more than one year of usage, the M7 still carries a good resell value, and I got my brand new M8 at the cost of RM1,000 only.

To date, the M7 is still a great Android phone. Anyhow, it is a good move to trade it in for a brand new M8 while it still has good resell value.

One of my main reason to upgrade my M7 to M8 is to get better cameras both front and back. M8 has duo back camera, and front camera is 5-megapixel (compared to 2.1-megapixel in M7). M8 camera has additional features too, such as the UFocus function.

Another main reason is the availability of the innovative HTC Dot View case for M8. I can check current time and temperature, make call, and answer call without uncover the M8 from the Dot View case. The M8 screen also auto wake up when I open the cover.

M8 is longer than M7 and is having a larger 5" display (compared to 4.7" in M7). However, the bottom part of its display is used by softkeys, and the actual display length of M8 is slightly less than M7 (meaning, M7 displays slightly more vertical content on its screen). This is due to both M7 and M8 are having the same resolution of 1920x1080, but the M7 has higher pixel density at 468ppi compared to 441ppi in M8. This is something that M8 loses out to M7!

As a result of lower pixel density, the text in M8 (of same font and size) appears larger than in the screen of M7.

M8 is slightly slimmer than M7, and comes with Corning Gorilla Glass 3 (claimed to be 3 times more damage resistant and 40% more scratch-resistant than Gorilla Glass 2 used in M7).

The aluminium build in M8 is more solid than M7. There will be wear and tear in M7 micro USB port and volume button. Its seems that the M8 design is more durable. IMHO, the position of power button and headphone port on M8 is also better than M7.

The 2600mAh Li-Po battery in M8 surprisingly charges much faster than the 2300mAh Li-Po battery in M7. With a larger battery capacity, the M8 can generally last longer in one charge cycle than M7.

M8 also comes with a micro SD card slot, enable you to expand its storage up to 128GB. You will need the tray eject pin to access the micro SD card holder, the same way as the nano-SIM card holder. Bear in mind that Android Kitkat has imposed some restriction on the use of non-internal storage in order to improve on security, which will limit the usage of micro SD card in the phone.

M7 is using micro-SIM card, while M8 is using nano-SIM card. As the size is different, you can't simply migrate over the SIM card from M7 to M8 without modification or replacement.

Processor wise, M8 is using a newer and faster quad-core Snapdragon 801 compared to quad-cord Snapdragon 600 in M7. In normal use, you won't feel much different in terms of speed between them. You will feel the different when using processor hungry apps, such as certain 3D games.

Both M7 and M8 received software update to Android 4.4.3 with Sense 6.0 recently. There isn't much different between them in terms of the OS and default software. M8 has some additional features such as Motion Launch which you can't find in M7.

M8 is using Boom Sound audio enhancement (which can't be turned off when using internal speakers), while M7 is using Beats Audio. Both are great and is a key HTC feature that makes a difference from other smartphones in the market.

I have already got some additional storage space in Google Drive by using M7. I received some more additional storage in Google Drive after upgraded to M8. This can also be considered as one of the major advantage of upgrading M7 to M8.

As a conclusion, it really worth it to upgrade HTC One from M7 to M8, while the M7 still has good resell value now. You will get the newest HTC flagship smartphone with slightly larger screen, better build, faster battery charging speed, new features (particularly major enhancement in camera functions), and innovative Dot View case.


Tuesday, September 2, 2014

Migrating the contacts and conversation history of SMS, Whatsapp and WeChat from old phone to new phone

When you want to migrate from one smartphone to another, one of your major concerns is probably how to move over the contacts and chat history of your SMS, Whatsapp, WeChat, LINE, Hangouts, Facebook Messenger, etc.

You shouldn't be worry about Google Hangouts and Facebook Messenger, because everything is stored in their cloud server in the Internet. You just need to remember your user account and password, and setup accordingly in your new phone, in order to regain access to your contacts and chat history of these 2 apps.

If you are using Android phone, it is strongly recommended to store all your phonebook contacts in your Google account. In this way, you can always get back your address book by setting the same Google account in your new Android phone. Besides, setting the same Google account enable your new Android phone to install all your previously purchased apps from Google Play Store without additional charges too.

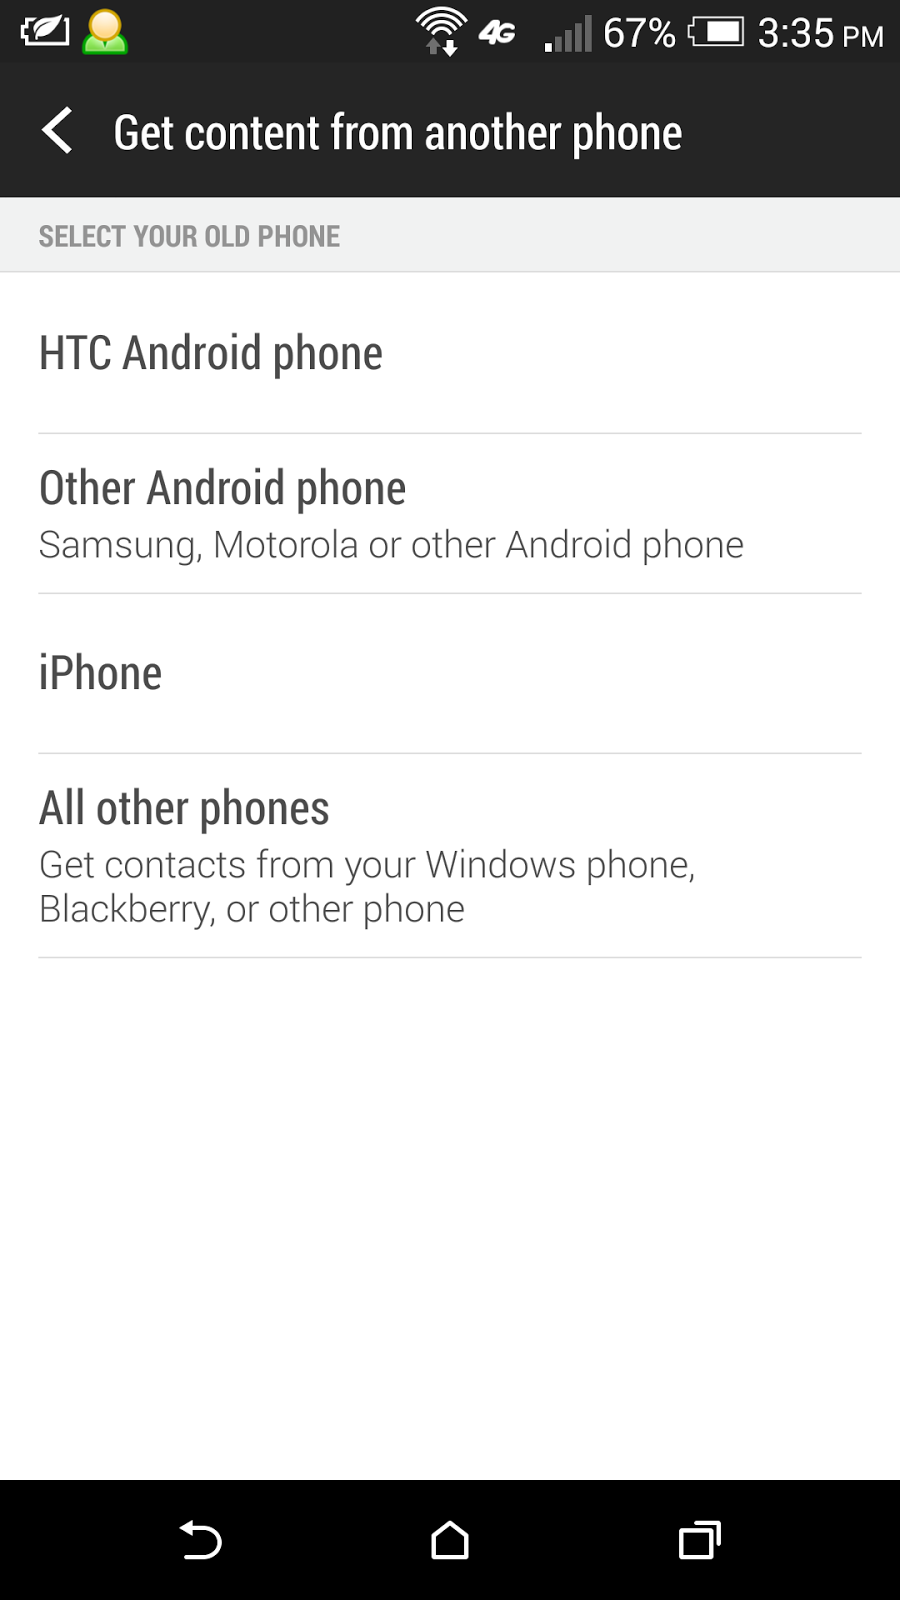
Your new phone should have a way to retrieve the SMS and phone calling history from your old phone. In the case of HTC smartphones with Android 4.4 and above, go to Settings > Get content from another phone for this purpose. You might need to install HTC Transfer Tool in your old Android phone to facilitate the data transfer.


For Whatsapp, backup your existing conversations in old phone with Settings > Chat settings > Backup conversations. Then, copy over the entire Whatsapp folder from your old phone's storage to your new phone.


After that, install Whatsapp on your new phone. Whatsapp will auto-detect the Whatsapp folder with backup data, and prompt you to restore your message history. Make sure you select Restore in this step, and your Whatsapp contacts, chats, group chats, attachments, etc. will all be restored. You can then continue using Whatsapp in your new phone with everything from the snapshot point of your latest backup in your old phone.

WeChat make use of their server for backup and restore. Go to Settings > General > Chat History Backup and select Back Up to backup your chat history.


Your backup will be stored over the Internet in their server for up to 7 days. If you don't restore your backup data within 7 days, it will be deleted from the server.

You will be given the option to password protect your backup data. The same password is required during restore process.

To restore, install WeChat on your new phone, go to the same place Settings > General > Chat History Backup and select Restore. You will get back your chats and group chats history.

In the case of LINE, there is no restore solution yet. After installing LINE in your new phone, you will be able to get back your LINE contacts, but you will start over your conversations from zero again.


How to cancel wrongly pressed lift (elevator) button

If you accidentally pressed one or more lift (elevator) buttons, or your kid is playing around with the lift buttons, or you just want to unselect a lift button, here is the tips.


All you need to do is double press the button, and its light will go off. If double press doesn't work in your lift (elevator), try a long press instead.

If you find this tips working and useful, feel free to share this article out to your friends.


Monday, September 1, 2014

Check TNB electricity bill payment status with myTNB app for Android and iOS

I just discovered that Tenaga Nasional Berhad (TNB) has released a mobile app called myTNB for both Android and iOS smart mobile devices.


You need to register an account in order to use myTNB. After that, you can link all the electricity bills under your name to this myTNB account.


Then, you are able to check the billing status of each of the bills. This is particularly useful for residential property owners to check and ensure their tenants have paid for the electricity bill.

Beside that, you can also use myTNB to check for new electricity supply application status, Renewable Energy payment advice, report faulty street light, etc.

However, the report faulty street light is not done through the app itself, but still using traditional SMS method, which might cost you SMS charge for sending to 15454.

Thursday, August 28, 2014

Updated my HiMedia Q5II Android TV box firmware to Caidy Custom Mango Hi Q v1.0.7

The official Mango Hi Q v1.0.7 for HiMedia Q5II Android TV box has been released about a month ago. It comes with some known bugs, and some bloatware that is undeletable.

I have chosen to update my HiMedia Q5II with the Caidy Custom firmware v1.0.7 which is lighter (by removing unnecessary components from the official firmware, including the bloatware) and with several enhancements and bug fixes.

Caidy Custom firmware v1.0.7 is available for the following models of HiMedia Android TV box:

  • EMMC version: HD600AII, Q5II, Q12, Q15, Q9
  • NAND version: HD600AII, Q5II
You can download this Caidy Custom firmware v1.0.7 for HiMedia TV boxes here.

Make sure you download the firmware that matches with the model number of your HiMedia Q-series dual core Android TV box. If the label on your box has the wording of "eMMC" (which is the newer version sold to the market since November 2013 onwards), download the firmware for EMMC version. Otherwise, download the firmware for non-EMMC version.

The update process is pretty simple. Just put the downloaded file in a USB thumb drive, then plug the USB thumb drive into one of the USB port of the HiMedia TV box, and perform the update from System Settings option.
I have to warn you that you will very likely encounter data lost during the firmware update process, as this update will factory reset your HiMedia TV box. Make sure you copy out and/or backup your apps and settings before you perform the firmware update.

After update, this is how your screen will look like. Note that the icons in the middle bar is fully user configurable.


If you want to add in Google Play Store, which is not included in this version of firmware, you can download the Gapp_V2.exe installation file here.

Put the file in a Windows computer within the same local network with your HiMedia TV box. Make sure your HiMedia TV box is switched on, then execute Gapp_V2.exe from your Windows computer.

The password is "newer1".

When prompted, key in the IP address of your HiMedia TV box, and press . Don't worry if you can't see the Chinese words on the console box, you just need to key in the right IP address, and Google Play Store should be installed to your HiMedia TV box when the process ended.

If you want to install YouTube, search for "YouTube for TV" in your Google Play Store.


Wednesday, August 27, 2014

Obtain read and write access to Linux ext4 partition from Windows using Paragon ExtFS

If you have an SD card or an external harddisk or any other storage which is formatted in Linux native ext2/ext3/ext4 partition, and you want to mount and have full read/write access to it from Windows, here is the solution! Better still, it is free for personal use!

Paragon ExtFS for Windows is a small utility that enable you to gain both the read and write access to ext2/ext3/ext4 file systems, which is not recognized nor accessible by stock Windows OS.

This is particularly useful when you want to use your Windows computer to read, write, delete, rename, move, or copy file in your SD card or external harddisk or any other storage that is formatted with the ext2/ext3/ext4 file system.

You can download Paragon ExtFS for Windows here.

You need to register on their website in order to obtain the Product Key and Serial Number required during installation. Don't worry, this product is free for personal use, and the information will be emailed to you without any charge.

When it is running, by can automatically detect the partition with the ext2/ext3/ext4 file system, and by default will auto-mount it as a storage drive.


The drive will be seamlessly accessible by Windows.


Note that Windows detected my 16GB SD Card with Ext4 file system and assigned it to Drive E. However, Drive E is inaccessible, and Windows will ask you to format it if you try to access to it, resulting in total data lost if you choose to format it to a Windows recognizable file system (FAT32/NTFS/exFAT).

Paragon ExtFS mounted it as Drive F, which is fully accessible just like other drives.

When you right click on Drive F and look into its Properties, you will notice that its file system is shown as DOKAN.


You can click here to learn more about the Dokan file system driver.

Monday, August 25, 2014

Updated the BIOS of my Lenovo Yoga 2 Pro laptop to Version 38

I have just updated the BIOS of my Lenovo Yoga 2 Pro laptop from Version 31 to Version 38.

You can download the latest BIOS update utility of Lenovo Yoga 2 Pro from their support website here.


Beside BIOS update, you can also download the driver update files from that website as well.

The BIOS update is pretty straightforward. Make sure that the battery level of the laptop is at least 80%, and it is plugged on to the AC power supply. Then, run the BIOS Update Utility.


The new BIOS will be flashed with the InsydeFlash utility from Windows 8.1. After that, the system will reboot itself, and the BIOS update will be performed.

You will eventually reach to a state that the keyboard backlit of the laptop is on, and the screen is blank. Wait for a while, then long press the power key of the laptop to switch it off. When you switch it on again, the new BIOS is now up and running.

There is no data lost for this BIOS update. Even the BIOS settings and passwords remain after the update.


Updated my HTC One (M7) to Android 4.4.3 (KitKat) with Sense 6.0

My HTC One (M7) received its OTA update from Android 4.4.2 (KitKat) to Android 4.4.3 (KitKat) yesterday (24 August 2014).


It seems that this update focuses on security fixes, particularly the fix for OpenSSL vulnerabilities (Heartbleed Bug and some other bugs).


Visually, there is no noticeable change from the previous version. The Software Information section in the phone informs us that:
  • Android version updated from 4.4.2 to 4.4.3
  • HTC Sense version updated from 5.5 to 6.0
  • Software number updated from 4.20.707.6 to 6.13.707.1
  • HTC SDK API level updated from 5.69 to 6.25
  • Kernel version remains as 3.4.10


Monday, August 18, 2014

How to get into the BIOS Setup Utility screen of Lenovo Yoga 2 Pro laptop

In order to get into the BIOS Setup Utility screen of Lenovo Ideapad series of laptops, you need to locate for a button called the Novo Button on the laptop.

In the case of Lenovo Yoga 2 Pro ultrabook, this Novo button is a small round button located beside the Power button.


While is laptop is powered off, press and hold this Novo button for a few seconds, and you should be able to see the Novo Button Menu with 4 options:
  • Normal Startup
  • BIOS Setup
  • Boot Menu
  • System Recovery
Select the 2nd option namely "BIOS Setup" and press . There you are, the BIOS Setup Utility screen of Lenovo Yoga 2 Pro!


In this BIOS Setup Utility, you can view some of the hardware information of the laptop, including its serial number. Most importantly, you can setup the BIOS passwords (administrator and user) and also the harddisk password here as a basic security measure to protect the data in your laptop.

My Lenovo Yoga 2 Pro 13-3332 multimode ultrabook laptop

I was searching for a new laptop suitable for home use recently. My selection criteria are:

  • Portable lightweight ultrabook not more than 1.4kg
  • Convertible to tablet with multitouch screen
  • At least 4GB RAM
  • Using SSD storage
  • Windows 8.1 operating system
  • Price slightly more than RM3000 (for optimum income tax relief)
I ended up with Lenovo Yoga 2 Pro 13-3332 (3332 is grey and 3333 is orange) multimode ultrabook laptop which has the following specs:
  • Intel Core i5-4200U processor
  • Integrated Intel HD Graphics 4000
  • Intel Wireless-N 7260 2x2 2.4Ghz 300Mbps WiFi adapter
  • Bluetooth 4.0
  • 13.3" QHD+ (3200x1800) LED screen with 10 points multitouch sensor
  • 8GB RAM
  • 128GB Samsung SSD
  • 2 USB ports
  • Keyboard with backlit
  • 2 years limited International Warranty Service (IWS)
  • Light weight of 1.39kg
I like the premium feeling of this Lenovo laptop, from the moment of its unboxing. The material used in its packaging, and the care taken to protect it in the box is really good. Even the sleeve that comes together with the laptop looks nice and classy.

The key unique selling point of this Lenovo Yoga 2 Pro laptop is of course its 360-degree flip-and-fold design. It is said to be a 75% laptop and 25% tablet, easily convertible into one of its 4 modes of Laptop, Stand, Tablet and Tent.

Its keyboard will only function in Laptop mode, and will be automatically locked in the other 3 modes. I find the keyboard a bit cramped, confined by its 13.3" form factor. I like the backlit feature of this keyboard, beautifully illuminating the keys in dark condition.


Tent mode has a small footbase and good for doing one-to-one presentation, small group discussion, watching movie, etc.

Tablet mode turns it into a 13.3" tablet, powered by the full 64-bit Windows 8.1 operating system.

I can't find any practical use of Stand mode yet. Stand mode is just like Laptop mode without the keyboard in front.

Its QHD+ 3200x1800 super-high resolution screen is superb. But having too high resolution sometimes is not good too. At that high resolution on a relatively small screen of 13.3", the font size need to be enlarged 250% or else will be too small to read and/or touch. However, certain applications are not well tested with this quad HD resolution, and might appear small, or the text overlapping after the 250% enlargement.


I ended up scaling it down to the HD resolution of 1920x1080 (1080p) with 125% font size enlargement setting, and all the applications look OK with this lower resolution (yet better than the 1366x768 resolution in many other laptops in the market).

With this lower screen resolution, its battery life improved too.

This Lenovo Yoga 2 Pro supports motion control and voice control, something fancy to play around with.

Being an ultrabook, this laptop only has 2 USB ports (1 USB 2.0 and another USB 3.0) and doesn't have a CD/DVD drive. Nowadays, we can easily use either USB thumbdrive or external harddisk to replace the CD/DVD, so not a big deal without the CD/DVD drive.

The storage capacity of its 128GB SSD is a bit small. In fact, quite a large portion of it already allocated as recovery partitions and some other system usage, leaving even smaller usable capacity of around 100GB only. Anyhow, this kind of storage capacity is still sufficient for normal use.


There is one important thing that I would like to warn all the Lenovo Yoga 2 Pro buyers. This laptop sold in Malaysia comes with 2 years international warranty, but if you don't register your purchase with Lenovo, its warranty actually started from the date when Lenovo shipped it to the distributor. That date is printed on its box, and could be a few months before your purchase.


You can check for its warranty information with the Lenovo Companion apps, which you can find in the Metro screen of the Windows 8.1 in your laptop. You can also check this warranty information online by visiting to: http://support.lenovo.com/us/en/warrantylookup


To update the warranty start and end date of your Lenovo laptop, you just need to send an email to  their Services Sales Registration team at nasr@lenovo.com with information of your laptop model number, serial number, date of purchase and attach with proof of purchase (the sales invoice). I received their reply with warranty date updated within 2 hours after I sent out my email to them.

I have been using this Lenovo multimode ultrabook laptop for more than a week now, my experience with it has been wonderful.

There is a higher end version of Lenovo Yoga 2 Pro with Intel i7 processor and 256GB SDD, but the price is also a bit high for that model.


Wednesday, August 13, 2014

4 channel RC Skywalker quadcopter aerocraft drone

My kid has a new toy, a remote control (RC) Skywalker quadcopter aerocraft drone which I bought at the price of RM110.


This is an ideal RC drone for beginners, as the quadcopter is protected by its cage, so that it is less likely to hit on something and break its blade(s). In the event of a crash landing, it is cushioned by the cage too.


With this kind of design, it can be set to flying mode or rolling mode by adjusting its battery position. In rolling mode, its cage acts as its wheel.

This is its remote control system.


The drone operates on a 3.7V 300mAh rechargeable battery, while its remote control system operates on some AA size batteries. Each charge can last the drone to fly for about 6-10 minutes. When its battery gone weak, the drone is intelligent enough to gradually land itself instead of a sudden crash.

The left RC stick controls its flying height and facing direction, while the right RC stick controls its movement (forward, backward, turn left, turn right). You can also see there are several fine tuning switches to adjust its position.

To take off, gently push the left RC stick upwards. Landing is more challenging. You cannot land too fast and have to slowly pull the left RC stick backwards, or else it will have a sudden drop and crash. Landing on a designated spot will need some practice, but it is not that difficult.

The more challenging part is when there is wind blowing. You'll need to control the drone to counter the wind and fly according to your desired direction.


Monday, August 11, 2014

Enhance Windows 8.1 usability with Classic Shell 4.1.0

I have replaced the IObit Start Menu 8 in my Windows 8.1 PCs with Classic Shell 4.1.0.

Classic Shell 4.1.0 is more stable, and more feature rich than IObit Start Menu 8. The Classic Start Menu in Classic Shell 4.1.0 can also display properly in high screen resolution of 3200x1800, but the IObit Start Menu 8 appears tiny in such high resolution screen.

You can download Classic Shell for free here.

The key component of Classic Shell is Classic Start Menu, which brings back the Windows Start Menu in Windows 8/8.1 similar to IObit Start Menu 8.

There are many settings you can play around in Classic Start Menu 4.1.0.


Besides, Classic Shell also includes Classic Explorer which will add a handy toolbar to Windows Explorer.


This Classic Explorer toolbar is configurable too.


The 3rd component is Classic IE, which adds the following functions to Internet Explorer:
  • Adds a caption to the title bar so you can see the full title of the page
  • Shows the security zone in the status bar
  • Shows the loading progress in the status bar


  • Gyro-sensing fly air mouse with mini QWERTY wireless keyboard

    I find that using the remote control of my HiMedia Q5II Android 3D smart TV + media player box to navigate its screen sometimes has some inconvenience, especially when I need to do typing using the on screen soft keyboard, or I have to navigate in mouse cursor mode.

    This inconvenience can be reduced by installing HiControl in my Android smartphone and/or tablet, and making use of the Android device's touch screen to perform the soft keyboard typing and also the point-and-click action.

    Recently, I bought a gyro-sensing fly air mouse with mini QWERTY wireless keyboard to work together with the remote control of the HiMedia Q5II box to have much better control to the system. It cost less than RM70.

    The size of this gadget is about the same as the remote control, as shown below.


    In order to use this fly air mouse-keyboard gadget, I just need to plug its USB dongle into on of the USB slot of my HiMedia Q5II box. It is plug and play and can automatically perform the necessary wireless pairing, then it can immediately function.

    This gadget turns into an air mouse when I press on the Android key at its center. The mouse cursor will shows on the TV screen, which I can control by hand movement.

    In any text input area, this gadget becomes handy with its QWERTY keyboard. Note that the original HiMedia remote control is still handy when come to typing numbers, and both of these 2 devices can work side-by-side.

    This gadget can also perform sound volume control just like the remote control. The remote control is still important, especially when come to turning on and turning off the TV box.

    Beside being a better input device that compliment the remote control, some of the TV games are designed to work with fly air mouse, making it the preferred game control device.

    During idle and when the TV box is switched off, this gadget will bring itself into sleep mode, conserving its battery usage.


    Friday, August 8, 2014

    Logitech Wireless Mouse M525 - my second wireless mouse

    I have just purchased a new laptop for my household, and decided to get the Logitech Wireless Mouse M525 as its input device companion.

    This is the second wireless mouse I bought for my household computers. I have a good experience with my first wireless mouse, the Microsoft Wireless Mobile Mouse 4000, except that it has a relatively short battery life of about 3-4 months only, despite I have a good habit to switch off the mouse everytime I shutdown my PC to conserve the mouse's battery usage.

    This Logitech Wireless Mouse M525 is about the same size with Microsoft Wireless Mobile Mouse 4000. Its scroll wheel and buttons are also functioning as good as Microsoft Wireless Mobile Mouse 4000, and both can work very well on glossy surface.

    However, the Microsoft Wireless Mobile Mouse 4000 has an additional left button, which I seldom use. The housing and cover material of Microsoft Wireless Mobile Mouse 4000 also looks more premium and has better feel. The cover of Logitech Wireless Mouse M525 is just too plastic.

    It is also easier to stow the USB transceiver at the bottom of Microsoft Wireless Mobile Mouse 4000. You need to open up the front cover of Logitech Wireless Mouse M525 to store its Unifying receiver into the mouse. The Microsoft Wireless Mobile Mouse 4000 power on/off switch is easier to slide too.

    Anyhow, the Logitech Wireless Mouse M525 also has many pros against Microsoft Wireless Mobile Mouse 4000. It claims to be able to have 3-year battery life! It will turn itself into smart sleeping mode while it is idling, to conserve the battery usage.

    It can operate with either one or two batteries. Additional battery will give longer battery life, at the slight trade off of making the mouse weight heavier.


    The mouse comes with 2 GP Alkaline AA batteries, which I've put aside, and use the Energizer brand instead.

    The mouse can work immediately in Windows 7/8 once you plug the Logitech Unifying receiver into the computer's USB port and switch on the Logitech Wireless Mouse M525.

    I'd recommend you to download and install the Logitech Setpoint software to get the best of this Logitech Wireless Mouse M525. Visit to http://www.logitech.com/en-my/support/wireless-mouse-m525 to download.

    Beside Logitech Setpoint, you can also download and install the Logitech Unifying software which lets you perform pairing and unpairing Logitech devices with the Logitech Unifying receiver. If you are using Windows 7, you can also download the Flow Scroll software to get a smoother scrolling experience in web browsers such as Google Chrome and Microsoft Internet Explorer.


    There are 2 types of installer available in the website. The Smart Installer with a smaller file size, and the Full Installer. I'd advise you to get the Full Installer. I tried the Smart Installer, which took a long time to run until I cancelled it.

    The Logitech Unifying receiver can pair up with up to 6 supported Logitech wireless devices. The paired devices will show up in Logitech Unifying software. You can check for their status, battery condition, and even perform firmware update with the software.


    The Logitech Setpoint software has more function than the Microsoft Mouse and Keyboard Center used by the Microsoft wireless mouse.


    There is a Game Mode Settings section for better gaming experience with the mouse. You can also configure the mouse to have application specific button settings.


    The Setpoint software can also show the mouse's battery usage condition.


    The Logitech Setpoint icon in Windows Taskbar notification area is also showing the battery condition in the mouse.


    In addition, it can also show the keyboard Caps Lock, Num Lock and Scroll Lock status, a handy feature for laptops that don't have any LED or indicator to show whether these keys are toggled on or not.

    Thursday, August 7, 2014

    My first purchase experience with Tesco Online Shopping

    Tesco is my favourite hypermarket for grocery shopping. Usually, I'll go to their physical store near my house.

    Tesco Online Shopping service has been made available to my area for quite some times. Now they are having promotion to provide free delivery service (normally they'll charge for RM10 delivery fee) and also free potato chips as gift to online shoppers.

    I just need to select the items to purchase from their website, tell them the delivery address, book a delivery time slot, and confirm the order. Payment will be made with credit card only when I receive the goods.

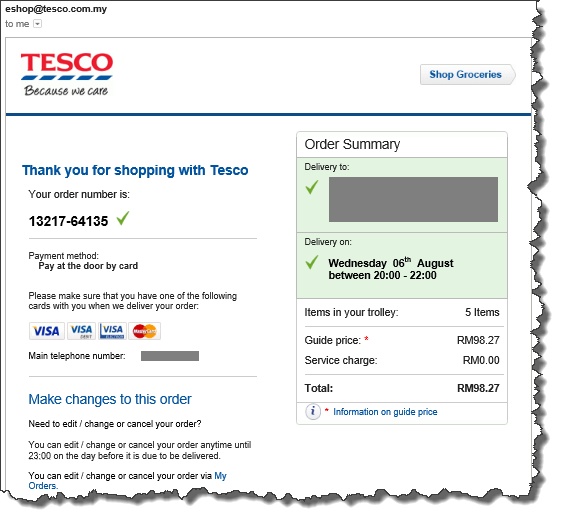
    They sent out a confirmation email to me within seconds after the order was placed. I was allowed to make changes to the order or to cancel the order one day before the delivery is due.


    Their delivery man called me to confirm there will be person waiting at home during the delivery time slot. The delivery van arrived pretty punctual. I was told that 2 of the items I ordered are out of stock. The rest of the items arrived in good condition, together with the free gift. I was charged for the actual amount and paid with on credit card on the spot.

    Buying with Tesco Online Shopping save me time and effort to have to go to their physical store. I also no need to worry about the long payment queue at the store's cashier counter. It is really convenient.

    However, here are a few drawbacks:
    • The nearest delivery time slot might not be available. In this case, you might need to pick for a time slot that require you to wait for some times before you receive the goods.
    • Tesco Clubcard vouchers and coupons cannot be applied for online purchase yet.
    • I am not sure whether the Tesco Clubcard points collection is applicable for online purchase or not. There is no place to key-in Clubcard number during online purchase, and there is no device to swipe the Clubcard for points collection during goods receipt.
    • I was not informed about the goods that are out of stock, until their delivery man arrived at my doorstep and inform me so.
    After all, this is a good experience of grocery shopping with Tesco Online.

    Tuesday, July 29, 2014

    Bookfest Malaysia 2014 @ KLCC

    During this Hari Raya holidays, I have visited to Bookfest Malaysia 2014 held at Kuala Lumpur Convention Center, which is crowded by overwhelming people.

    There are a few parking places nearby KLCC with a parking rate of RM5 per entry, including Wisma Central, and an open car park beside Avenue K shopping complex.

    Venue: Hall 1-5, Kuala Lumpur Convention Center, KLCC, Kuala Lumpur.
    Date: 23 July - 3 August 2014
    Time: 10am - 10pm
    Entrance fee: RM2.50. Free for children and elderly person.

    I feel the arrangement for ticket counter, entrance and exit for this Bookfest very awkward. The ticket counter is located far away from the entrance, and the exit is located at the center in between the English section (Hall 4 & 5) and Chinese section (Hall 1 & 2).

    You really can get very good discount for the books in this Bookfest, which has attracted a lot of book lovers going there. There are also lots of activities and talks ongoing everyday, which you can find the detail schedule here: http://www.bookfestmalaysia.com/event-schedule.php

    This event is a good chance for you to buy some books. Remember to keep the receipt for income tax relief to be declared in April next year :)


    Hint: Click on the "Older Posts" link to continue reading, or click here for a listing of all my past 3 months articles.