Thursday, December 21, 2017

Auspicious dates in 2018 for getting a baby or childbirth

Here is the list of auspicious dates in 2018 (year of Dog) for getting a baby (求嗣), which is produced based on the Chinese almanac Tong Shu.

The dates have good element(s) to embro/faetus. Traditionally, the dates are referred for conception planning (making love and expecting a baby to the family). Nowadays, people also make reference to them for Caesarian delivery of new born. (Click the image to enlarge)


Bear in mind that although the Tong Shu is a compilation of Chinese astrology and calendaring studies gathering wisdom of thousands of years, we should use it wisely and rationally, but not be too superstitious on it.

Auspicious dates for starting new job / post / assignment in 2018

For employees, especially those in leading/managing position, here is a list of auspicious dates  in 2018 for starting new job/post/assignment, including joining new company or joining new team in existing company.

It can be applied to first day reporting to new company/department/office/position, or going for the post to lead/manage a new business unit/team/project/programme. It can also be applied to assuming new job position after promotion/restructuring/relocation exercise.
It is produced based on the Chinese almanac Tong Shu.


Bear in mind that although the Tong Shu is a compilation of Chinese astrology and calendaring studies gathering wisdom of thousands of years, we should use it wisely and rationally, but not be too superstitious on it.

Wednesday, December 20, 2017

Auspicious dates for marriage proposal or engagement in 2018

Before becoming the life partner, marriage is proposed by lover and engagement is made.

Here is the list of auspicious dates for marriage proposal or engagement in year 2018 (year of Dog), which is produced based on the Chinese almanac Tong Shu. (Click the image to enlarge)


Bear in mind that although the Tong Shu is a compilation of Chinese astrology and calendaring studies gathering wisdom of thousands of years, we should use it wisely and rationally, but not be too superstitious on it.

Auspicious dates in 2018 for signing contract, register for marriage, etc.

Here is the list of auspicious dates in year 2018 for signing contract, signing offer letter, register for marriage, receiving religious baptism, and other similar agreement-related activities.

It is produced based on the Chinese almanac Tong Shu. (Click the image to enlarge)


Bear in mind that although the Tong Shu is a compilation of Chinese astrology and calendaring studies gathering wisdom of thousands of years, we should use it wisely and rationally, but not be too superstitious on it.

Auspicious dates for wedding / marriage in 2019

Many couples plan for their wedding more than 1 year ahead in order to have sufficient preparation time.

Here is the list of auspicious dates for wedding/marriage in year 2019 (year of Boar), which is produced based on the Chinese almanac Tong Shu. (Click the image to enlarge)


Bear in mind that although the Tong Shu is a compilation of Chinese astrology and calendaring studies gathering wisdom of thousands of years, we should use it wisely and rationally, but not be too superstitious on it.

If you are looking for auspicious dates for wedding / marriage in 2018 (year of Dog), click here.

Tuesday, December 19, 2017

Auspicious dates for renovation in 2018

Here is the list of auspicious dates for home or office renovation in year 2018, which is produced based on the Chinese almanac Tong Shu. (Click the image to enlarge)


Bear in mind that although the Tong Shu is a compilation of Chinese astrology and calendaring studies gathering wisdom of thousands of years, we should use it wisely and rationally, but not be too superstitious on it.

Auspicious dates for moving to new house / office in 2018

Here is the list of auspicious dates for moving to new house/office in year 2018, which is produced based on the Chinese almanac Tong Shu. (Click the image to enlarge)

 
Bear in mind that although the Tong Shu is a compilation of Chinese astrology and calendaring studies gathering wisdom of thousands of years, we should use it wisely and rationally, but not be too superstitious on it.

Auspicious dates for opening business in 2018

Here is the list of auspicious dates for opening business in year 2018, which is produced based on the Chinese almanac Tong Shu.

It can be applied to new business opening, or reopening of business after a break/holiday. (Click the image to enlarge)


Bear in mind that although the Tong Shu is a compilation of Chinese astrology and calendaring studies gathering wisdom of thousands of years, we should use it wisely and rationally, but not be too superstitious on it.

Monday, December 11, 2017

How to control 2 computers with a single Logitech M585 / M590 mouse and use it to copy-paste file from one computer to another

The Logitech M585 / M590 are multi-device flow wireless mice that can be paired with up to 2 computers at the same time either using the Logitech USB Unifying receiver or using Bluetooth. The main different between them is that M590 is a silent mouse while M585 will still produce click sound like other ordinary mice.

New user of the Logitech M585 / M590 mouse might have difficulty to figure out how to make the pairing with 2 computers, and how to make use of Logitech Flow to seamlessly move the mouse cursor from one computer to another.

This is because so far Logitech does not provide clear step-by-step instruction on how to perform the necessary setting. The printed instruction that comes with the mouse is like this:


Are you able to figure out what does these 7 steps mean?

Anyway, I managed to find out the way to do it by guessing on the above instruction and reading a few articles which scattered around Logitech's website and forum, each of them are like piece of brain teasing puzzle for us to link them together to figure out the ultimate answer.

If you also have a Logitech M585 / M590 mouse, I am going to share with you the know-how here.

There are 2 levels of using this Logitech M595 / M590 mouse in 2 computers:
  • Level 1 - you can pair the mouse with 2 computers at the same time, but using the mouse between them one at a time.
  • Level 2 - you pair the mouse with 2 computers at the same time, using the mouse between them one at a time, but the mouse control can flow seamlessly from one computer to another, and you can copy file from one computer and paste it to the other computer by just using your mouse.

How to setup for Level 1 - sharing one mouse between 2 computers?

Unlike ordinary mice which can only be paired with one computer at one time, your Logitech M585 / M590 mouse can be paired with either one or two computers at the same time.

The different is this:
  • For ordinary mouse, you can only use it in one computer. If you want to use it in another computer, you will need to unplug the USB receiver from the original computer and plug it into the USB port of the other computer. For mouse that works with Bluetooth without the need of USB receiver, you need to perform Bluetooth pairing with the computer before it can be used in that computer. If you want to use it in another computer, you perform the Bluetooth pairing with the mouse again, and the mouse need to forget the Bluetooth pairing of the original computer before able to make a new Bluetooth pairing.
  • For Logitech M595 / M590, it can pair with 2 computers at the same time, and it supports 2 different pairing methods: either using the Logitech Unifying receiver, or using Bluetooth. It is possible to pair with 2 different Logitech Unifying receivers (probably one is the Unifying receiver that comes with the mouse, the other is the Unifying receiver of another Logitech mouse, or you purchased an extra Unifying receiver from Logitech). It is also possible to pair with 1 Logitech Unifying receiver and 1 Bluetooth. It is also possible to pair with 2 different computers, both using Bluetooth respectively, without making use of Unifying receiver. (Note: Bluetooth pairing for Logitech M595 / M590 in Windows 7 is not supported. You can read this article for more detail on the supported operating system.)
Note that on top of the mouse, there are 2 LEDs, one is labelled as "1" and the other labelled as "2". When your mouse is currently working in Computer 1, the green LED 1 will light up. When your mouse is currently working in Computer 2, the green LED 2 will light up. There is a round button for you to switch between Computer 1 and Computer 2. Press one time, the mouse control will switch from Computer 1 to Computer 2, press it again to switch back the mouse control to Computer 1.

By default, the computer that plugged with the Unifying receiver that comes with the mouse is detected as Computer 1. You can also make Computer 2 to use the Unifying receiver of the mouse too.

The way to pair the mouse to Computer 1 and Computer 2 is as below:
  • Switch on the mouse, LED 1 will start to blink slowly. If it found a paired Computer 1, the LED will stop blinking and stay on for a while, then both the LED are off.
  • Press the round button, now LED 2 will blink slowly. If it found a paired Computer 2, the LED will stop blinking and stay on for a while, then both the LED are off.
  • To make a new pairing with Computer 1, long press the round button when LED 1 is on. Then LED 1 will blink faster. At this stage, any paired information for Computer 1 will be forgotten, and it is ready to make a new pairing for Computer 1.
  • To make a new pairing with Computer 2, use the same long press round button method when LED 2 is on.
To pair with a computer using Bluetooth:
  • While the desired LED (either 1 or 2) on the mouse is fast blinking, go to Bluetooth settings in the computer, search for the mouse, and perform the pairing. If you are using laptop, you can control the mouse cursor with your touchpad before your mouse take over its mouse control.
To pair with another Logitech Unifying receiver:
  • You will need to download and install Logitech Unifying Software.
  • Run the Logitech Unifying Software in your computer.
  • Click on the "Advanced..." button.
  • Prepare your mouse for pairing. Either LED 1 or LED 2 should be fast blinking before continue with next step.
  • Now, click the "Pair a New Device" in the Logitech Unifying Software Advanced View window.
  • Follow the instruction on screen to turn off your mouse, and then turn it on again.
  • The pairing should be complete at this step. You should be able to see the name of your mouse under the Unifying Receiver tree listing in Logitech Unifying Software.

If your Unifying receiver is paired with more than one mouse, all the mice can control the mouse cursor on the computer screen. The controlling mouse will have an orange Unifying badge shown in the Unifying receiver tree listing.

If you want to un-pair your old mouse, you can do so in Logitech Unifying Software by selecting the mouse and click the "Un-pair" button. This is optional.

At this stage, Level 1 setup is completed. When both Computer 1 and Computer 2 are turned on and within the wireless range of your mouse, you can switch your mouse to control one of them by pressing the round button. When only one of them is turned on, your mouse works just like other mice do.

The advantage of this Logitech multi-device function is that you only need one mouse for multiple computers. Logitech M585 / M590 supports up to 2 computers. Certain more advanced Logitech multi-device mice such as the M720 Triathlon can support up to 3 computers.

The disadvantage of Level 1 is that the switching of mouse control from one computer to another is not automatic. You need to press the round button. Don't worry, after you completed Level 2 settings, it will be fully automatic.


How to setup for Level 2 - seamlessly flow the mouse between 2 computers?

You need to complete the setting in Level 1 for Computer 1 and Computer 2 before coming to Level 2. Meaning, your mouse must have been paired with 2 computers.

In addition, for Level 2 to work:
  • Both Computer 1 and Computer 2 must be installed with Logitech Options.
  • Network connection can be either wired or wireless. It can be both computers connected using network cable, or one is wired and the other using WiFi, or both using WiFi.
  • Both of them must be connected to the same local area network (LAN). If there are VLAN segmentations, both of them must be in the same VLAN segment.
  • The following network ports must be accessible between them: TCP 443, TCP 59866, UDP 59867 and UDP 59868.
When you are ready:
  • Turn on both Computer 1 and Computer 2.
  • Run Logitech Options in both of them respectively.
  • Go to the Logitech Flow screen in Logitech Options of either one of the computer. It doesn't matter is Computer 1 or Computer 2.
  • Turn on Logitech Flow.
  • The computer will proceed to search for Logitech Flow in the other computer. If successful, the Logitech Flow in the other computer will automatically turned on.
You can see 2 side-by-side rectangles in the Logitech Flow screen. The left rectangle belongs to Computer 1, and the right rectangle belongs to Computer 2. The computer which the mouse is currently controlling will be coloured in cyan.

Click on the three dots at the top right corner of the rectangle, you can see its computer name.


There are options for you to disable or remove it from Logitech Flow operation as shown. If the computer is disabled, you can come back to the same place to re-enable it. If the computer is removed, you need to perform all the steps in this Level 2 to link it back to Logitech Flow.

Note that there are a few settings you can change for Logitech Flow.

Switch between computers:
  • Move to the edge: When your mouse cursor moves beyond the right edge of Computer 1, it will flow to Computer 2. When it moves beyond the left edge of Computer 2, it will flow to Computer 1.
  • Hold Ctrl and move to the edge: This can prevent you from accidentally flow to another computer by requiring you to hold down your keyboard's Ctrl key for the flow to happen.
Screen corners:
  • When enabled, flow will work even at screen corners.
  • When disabled, flow will not work at screen corners. This can prevent you from accidentally flow to another computer when you want to minimize a maximized window and move your mouse cursor to the corner.
Copy and paste:
  • When enabled, you can copy and paste text, images and files from one computer to another.
  • The method is to select the text, images or files in one computer, press Ctrl-C or right click and select Copy action, then flow your mouse control to the other computer, press Ctrl-V or right click and select Paste action.
  • This copy and paste action will lag if the file size is big.
  • Note that direct drag and drop is not supported by Logitech Flow yet.
Now, you can enjoy the wonders of your Logitech M585 / M590 with Logitech Flow.

Sunday, December 10, 2017

My Logitech M590 multi-device silent and flow wireless mouse

One of my wireless mouse started to have the common mouse problem of single click becomes double click. Therefore, I have recently bought a new Logitech M590 multi-device silent and flow wireless mouse.


Despite this Logitech M590 mouse has some advanced features that distinguish it from ordinary mouse, its packaging is not impressive at all. Its price is higher than ordinary mouse too, cost me RM99 to get it.

This Logitech M590 mouse is very identical to its sibling Logitech M585. The main different between them is that, M585 left and right buttons produce loud clicking sound just like other ordinary mice, while M590 left and right buttons are soundless and produce no clicking sound. Its other buttons also produce softer sound than ordinary mice. This is ideal for night owls who share the same room with roommate(s). Now you can use your computer silently at night without disturbing the sleep of your  roommate(s), provided you use this silent mouse together with a silent keyboard.

This mouse operates with a single AA battery, and comes together with a GP alkaline battery. Logitech claims that its battery life can last as long as 24 months (2 years), which is pretty impressive.

Beside the battery compartment, you can find its USB Unifying receiver after opening its back cover. It has an on/off switch at its back for you to lengthen its battery life by switching it off when not in use.


At the back of its packaging paper card, there is instruction on low to setup to link it with 2 computers using Logitech Flow, which I find is not very useful because it is very difficult to understand. It is only a 7 steps diagram without any explanation words!


Anyhow, I managed to figure out how Logitech Flow works and how to switch the mouse between 2 computers and use its feature to copy-and-paste clipboard content and files from one computer to another, which I will explain in detail in my next posting.

This mouse comes with 1 year warranty, and you can register it in this webpage.


After registration, you can proceed to download Logitech Options, the software for you to configure this Logitech M590 mouse. The Logitech Flow function is inside this Logitech Options.


In fact, after you plugged its Unifying receiver into your computer's USB port, switch on the mouse and turn on your computer, after you successfully logged in Windows, the system will automatically prompt you to download and install Logitech Options.

However, the installation of Logitech Options was not smooth. I have tried in more than one computers. The installation process of Logitech Options will take a very long time, and I only managed to get it successfully installed after I terminated its installation after 10 minutes, and run the installation program again. The installation will magically complete within 2 minutes during the second attempt.


Therefore, you need to download the installer from the above Logitech webpage, for you to perform the second attempt of installation, or you will need to spend unnecessary time and effort to locate the installer file used by the automatic installation process, which stays somewhere deep inside your hard disk.

This Logitech M590 mouse has altogether 6 buttons, as shown in the Logitech Options screen below. The middle button is used to switch between Computer 1 and Computer 2, which you cannot configure for other function. The other 5 buttons which are circled in the Logitech Options screen can be configured to have function according to your personal preference.


You just need to click on the circle, and after that select your preferred function from the menu.


In the Point & Scroll screen, you can set the mouse pointer speed, enable/disable smooth scrolling, and set the scroll wheel direction.


The Flow screen is where you configure the Logitech Flow function. There are 2 rectangles on the screen, the left one is your Computer 1, and the right one is your Computer 2. Once Logitech Flow is up and running, the mouse can seamlessly flow from the screen of one computer to another.


I will explain how to setup Logitech Flow in my next posting.

Beside pairing with its Unifying receiver, this Logitech M590 mouse can also paired with the Bluetooth receiver of your computer or tablet that supports low energy technology. Supported operating system for Bluetooth pairing includes:
  • Windows 8 or Windows 10 or later
  • Mac OS X 10.10 or later
  • Chrome OS
  • Android 5.0 or later
This is useful if you want to use Logitech Flow with 2 computers, but you only have 1 Unifying receiver that comes with the mouse.

If you have another Logitech mouse with Unifying receiver, you can use the Logitech Unifying Software to link this Logitech M590 with the Unifying receiver of the other mouse, as the Unifying receiver can support up to 6 Logitech devices. I will explain how to link Logitech M590 with another Unifying receiver in my next posting.

If your Unifying receiver is linked with more than one mouse, both the mice can control your mouse cursor on the screen at the same time.


If you plan to buy this Logitech M590 wireless mouse, here are some "catches" that you need to consider before making your decision:
  • This mouse can work in Windows 7, but it cannot be connected with Bluetooth to Windows 7 computer. In addition, Windows 7 might have problem recognizing the Logitech Unifying receiver that comes together with the Logitech M590 mouse. Anyhow, it can still function as a mouse in Windows 7 with its Unifying receiver,  despite with these imperfectness. Therefore, it is more advisable to use this mouse in Windows 8 or above. I haven't tested this mouse in Linux or Mac computer though. It should be able to work with Linux Kernel 2.6+, Chrome OS, and Mac OS X 10.10 or later.
  • This mouse does not come with Logitech Darkfield technology and will have difficulty working on glass surface. If you need this feature, can consider the Logitech MX Anywhere 2S mouse, which price is more than double to this Logitech M590.


Friday, December 8, 2017

Automate Flow: Auto enable Bluetooth to connect to car hands-free when you are driving, else disable Bluetooth

This is an example of Automate flow. To learn more about Automate for Android phones, click here.

It is always a good idea to disable the Bluetooth function of your Android phone until you want to pair it with another Bluetooth device, such as hands-free system, GPS, audio speaker, input device (keyboard, mouse, gamepad, ...), etc. This will help to conserve some battery usage of your phone.

However, if you are always wearing a Bluetooth smartwatch that paired with your smartphone, you will need to let the Bluetooth function of your phone to always stay on. In that case, this Automate flow might not be so relevant for your need.

Nowadays, driving laws in many places in the world prohibit holding your phone in your hand while driving. If you are caught with that, you could be imposed with penalty and fine. Therefore, you need a hands-free system to answer to phone calls while driving. Many modern cars already have built-in hands-free function in their audio system. Certain automotive GPS device such as Garmin DriveAssist, Garmin DriveSmart, etc. is also able to link with your smartphone through Bluetooth to provide hands-free and some other additional functions.

Well, if you always disable Bluetooth of your Android phone and manually enable it whenever you want to pair it with a Bluetooth device, it would be very tedious if you are a frequent driver. You will need to enable Bluetooth whenever you sit in your vehicle and started its engine, and disable Blueooth whenever you parked your vehicle and stopped its engine, otherwise you will not be able to use the hands-free function. This Automate flow will help you to automatically perform those action.

In addition, normally when we are in a vehicle on the road, there is no WiFi available. This flow will also help you to disable WiFi when it detected you are travelling in a vehicle. You can edit the flow and remove the "Disable WiFi" block in it if your vehicle does provide WiFi connection that you want to use.


The flow begins with a block to stay and wait until it detected your Android phone carried along with you is travelling in a vehicle. This is a very interesting Automate block. Beside "in vehicle", it can also detect whether you or your phone is:
  • On bicycle
  • On foot
  • Running
  • Still
  • Tilting
  • Walking
  • Unknown
It makes use of sensors of your phone to perform the guessing, and report back with a confidence level. The "in vehicle" block setting of the above flow is as below:

The flow will continue its further actions when it is at least 85% sure that you are in a vehicle. The detection interval is set at 2 minutes. If you want the flow to react faster, you can shorten this detection interval, but it might drain more battery at the same time.

Once it detected you are in a vehicle, it will disable WiFi function of your phone (Block 3).

It will then detect whether the battery level of your phone is above 30%. If it is below, whether your phone is plugged to a power source for charging. If both conditions are negative, it will disable Bluetooth and do nothing. I put 30% battery level as this should be sufficient to keep your phone on with Bluetooth paired for quite a long journey. You can adjust this minimum battery level requirement in Block 14 according to your situation. If your driving distance is most of the time pretty short, probably 15% minimum is good enough for you.

If battery level is OK, it will proceed to enable Bluetooth, wait for 10 seconds for your phone to pair with the Bluetooth device in the vehicle (which as a prerequisite, they must be successfully paired before), such as your car audio system hands-free, or your GPS. If the pairing is successful, it will keep the Bluetooth connection until it is disconnected. Disconnection will happen when your car audio system is switched off (when car engine turned off), or when you manually disable your phone Bluetooth function (in case you do not intend to use hands-free during that journey. For example, you are a passenger in your own car which one of your family member is driving for that trip).

It will wait for 3 minutes before going back to detect whether you are in a vehicle again. 3 minutes is a reasonable minimum time interval for you to leave your car and then to drive it again. That will be the estimated time to stop the car engine, pump the petrol, and resume driving. For other occasions, probably the interval is much longer. You can edit Block 13 to change this interval shorter or longer to suit your need too.

In the event Bluetooth pairing failed after the Bluetooth is enabled, you are very likely to be not in your own car, but in another vehicle either as passenger or driver. Since the hands-free function is not available to you in that vehicle, the flow will proceed to disable Bluetooth and wait for a longer 30 minutes (which you can edit Block 20 to change it to be shorter or longer). 30 minutes is an estimation that you will probably won't drive in your own car, since you are travelling in another vehicle at that moment.

In fact, you can remove both Block 13 and Block 20 and immediately go back to activity checking if you want. The 2 delay blocks are merely for the flow to take a break (and save some battery).

Thursday, December 7, 2017

Automate Flow: Auto enable WiFi when you arrive home and disable WiFi when you leave home

This is an example of Automate flow. To learn more about Automate for Android phones, click here.

It is always a good idea to disable the WiFi function of your Android phone until you want to connect to a WiFi network. This will help to conserve battery usage, and also prevent your phone from automatically get connected to certain open WiFi without your aware, which might be used to hack in your phone.

Normally, there are fix places with WiFi that you will definitely want to use, to conserve your mobile Internet data quota usage. Those places include your home and/or your work place.

This Automate flow will help you to automatically disable WiFi function of your phone after your leave your home, and automatically enable it back when you arrive your home. It will even inform you by voice so that you are aware when WiFi is automatically enabled and disabled by this flow.


Enabling WiFi function does not guarantee a successful connection, because sometimes your access point (AP) or wireless router might have problem in establishing the WiFi connection.

Therefore, after enabling WiFi, this flow will wait for 10 seconds, which should be long enough for normal WiFi connection to be established. It will then check if the connection is successful or not.

If the connection is successful, it will log down the name a.k.a. SSID (service set identifier) of the AP or wireless router your phone has connected to.

If the connection is not successful, it provides option for you to remain enable WiFi or to disable it. Regardless of your selection, you will still need to troubleshoot and find out why the WiFi connection cannot be established. It could be caused by your AP or wireless router is switched off, or hang, or WiFi function disabled, or DHCP IP address allocation full, or other possible issue. If your phone has never made a successful connection with the WiFi at the location before, or you have made your phone "forget" about it, the connection will also be not successful as well.

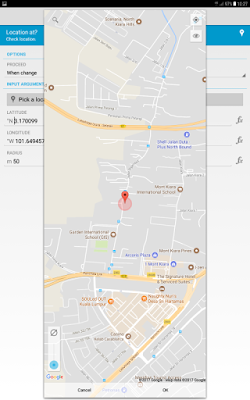
Before you can use this flow, you need to tell it where is your home. This can be done by tapping on Block 12 "When at location". The following screen will come out.

Tap on the "Pick a location on map..." button to bring out Google map. You can then search for your home by either tapping on the "target" icon if you are currently at home, or by tapping on the search (magnifying glass) icon and key in your home address for search, or by manually selecting the location by navigating the map and tap on the targetted place.


When you are done, tap on the OK button below to capture the location's coordinate.

The Radius setting determines the area that you consider your phone is at home. Normally, 50 meter radius as shown above is a good choice. You can set its value larger so that your WiFi is automatically enabled faster when your approaching home, and automatically disabled after you have travelled further away from your home.

You can use this same flow for other places with fixed WiFi, such as your work place. Just go through the same steps able to set the location before running it. You might also want to change the word from "home" to "office" in Blocks 14, 15, 16 and 17 of the flow.

With slight modification, you can even expand this flow to be used for multiple locations.

Wednesday, December 6, 2017

Automate Flow: Always go back to Home screen whenever phone is unlocked at launcher screen

This is an example of Automate flow. To learn more about Automate for Android phones, click here.

This is a very simple Automate flow with only 4 blocks (including the Flow beginning block).

Most if not all Android launchers support multiple screens for you to organize your apps and widgets into different screen as needed. One of the screens is your Home screen, which normally is where you put your mostly accessed apps and widgets.

When you are at the launcher screen without any opened foreground app, you can always go back to the Home screen by pressing your phone's Home soft key or Home button.

If most of the time, when you unlock your phone and start using it, you want to be at the Home screen regardless of which launcher screen you were at when your phone went to sleep and locked itself, this is exactly what this Automate flow will do.


This flow will wait until you unlock the phone, and check if you are at the launcher screen (meaning, no app is opened at the foreground). If yes, it will emulate pressing the Home button so that you will go to the Home screen automatically.

If you were running an app at the foreground (such as Whatsapp, browser, email, Facebook, etc.) when the screen was last locked, the flow will do nothing and you will return to the app screen after unlock.

In order for this flow to work properly, you need to set the correct launcher app of your phone in the "Is foreground app" block, because different Android phone vendor might provide their own launcher app to the phone. In addition, Android system also allows you to install and use 3rd party launcher app such as Nova launcher, Apex launcher, TSF launcher, etc.


You can tap on the "Pick activity..." button as shown above to select the launcher app you use in your phone.

The setting in the above screen is for Samsung TouchWiz launcher. For HTC phones, set the Package to "com.htc.launcher" and leave the Activity Class as empty field.

What if you never set any screen lock to your phone? In that case, you just need to change the "When device unlocked" block to "When screen is on" block.

Monday, December 4, 2017

Automate Flow: Switch your phone between Vibrate and Normal profile with customized mute

This is an example of Automate flow. To learn more about Automate for Android phones, click here.

Your Android phone is likely to have 3 general sound profiles:

  • Normal - ringer (for incoming calls) and notification will play a sound.
  • Vibrate - ringer and notification will mute. The phone will vibrate when there is incoming call.
  • Silent - ringer and notification will mute. There will be no vibration as well.
In fact, your Android phone has the following 6 types of sound, which you can set their volume individually (note: certain phone has paired the ringer and notification sound volume, so that the notification volume will always follow the ringer volume):
  • Ringer - for ringing tone sound
  • Notification - for notification sound
  • Media - for music and sound in apps, including Whatsapp, Facebook, Youtube, etc.
  • Alarm - for alarm sound
  • In-call - for phone conversation
  • System - for shutter sound of camera, screen lock/unlock sound, keyboard sound, etc.
When you switch your phone's sound mode from one to another among Normal, Vibrate and Silent, the volume of these 3 sounds will be changed accordingly: Ringer, Notification and System.

Note that the sound volume of Media, Alarm and In-call remains unchanged. This means when your phone is set to Vibrate or Silent mode, your instant messenger apps will remain unmuted and will still giving out sound, because Media sound remains unchanged.

You might want to also mute the Media sound when you set your phone to Vibrate or Silent mode, and un-mute the Media sound when you set it back to Normal mode.

Of course, there are apps that enable you to set additional customized sound profiles, but I am going to share with you how you can do it yourself by using a simple Automate flow.

The flow below will help you toggle between Vibrate and Normal sound mode. Since the Notification and System sound will follow when the Ringer sound changed, you just need to toggle the Ringer mode.

The beauty of this flow is on its next step. When you toggle the Ringer mode to Vibrate, it will also mute the Music audio. When you toggle it to Normal, it will unmute the Music audio accordingly.

To use this flow, run it once to enter Vibrate mode, and run it again to go back to Normal mode. The flow will display a message about the mode you have changed to, and end.

With this example, I'm sure you can easily modify it to toggle between Silent and Normal mode and save it as another flow.

You can also make it a single flow to toggle among Silent, Vibrate and Normal mode. That will require another block to check "Is ringer mode Vibrate?" when "Is ringer mode Normal?" returned a No. If this returns Yes, you might want to set ringer mode Silent, mute audio Music, and display "Silent mode" in the toast.

Making your Android phone smarter by programming task automation using Automate

Automate is a freemium Android app developed by LlamaLab that enables you to perform task automation in your smartphone.

With it, you can really make your phone much more smarter by running programs constructed using simple flowchart called Flows. All programming in Automate is done graphically by drawing flowcharts (without writing a single line of code) by joining building blocks, whereby each block will perform a single task.

A sample Automate flow looks like this:


Some of the examples that you can program your phone with Automate to do smartly:
  • Every morning when you wake up, greet you with a female voice with weather information and major stock markets closing index point. Pick up your calendar event and read out your appointments in the day.
  • When you are driving your car, auto enable Bluetooth and auto connect your phone to your car's Bluetooth hands-free function, and auto answer any incoming calls. When you leave your car, auto disable Bluetooth and resume manual phone answering.
  • When you are approaching home, auto send a Whatsapp message to your spouse that you are on the way and will arrive soon.
  • When you arrive home, auto turn on WiFi function and connect to your home WiFi. When you leave home, auto turn off the WiFi function to save battery.
  • Whenever you open Spotify app at home, auto enable Bluetooth and connect to your wireless speaker. When you open Spotify at other places, it won't do this and will play the music using your phone's speaker instead.
  • Whenever you enter into your favourite cinema hall, auto mute your phone and set it to vibrate mode. Unmute it when you leave the place.

Automate comes with several hundreds of ready made building blocks. There are basically just 2 types of block:
  • Action block which has a single output (example: Enable WiFi)
  • Decision block which has 2 outputs, 1 for Yes and 1 for No (example: Is WiFi enabled?)
For decision block, you can set the evaluation to be tested immediately (example: Is WiFi enabled?) or wait for the condition to change (example: When WiFi is enabled or disabled).

The ready made building blocks are grouped in the following categories:
  • Apps
  • Battery & Power
  • Camera & Sound
  • Concurrency
  • Content
  • Date & Time
  • File & Storage
  • Flow
  • General
  • Interface
  • Location
  • Messaging
  • Sensor
  • Settings
  • Telephony
Here is an example of available blocks inside one of the categories above (Camera & Sound).


To use Automate, you can either:
  • Just run the sample flows that suit you
  • Create your own flows and run them
  • Download flows shared by other users in the community
  • Download flows from the community, and modify them to suit your need
Automate comes pre-installed with several useful sample flows.


There is also a user community for its users to upload and share their flows with other users. You can upload your flows in the community too.

Community flows are categorized into the following groups:
  • Business
  • Communication
  • Education
  • Entertainment
  • Finance
  • Games
  • Health & Fitness
  • Home
  • Media & Audio
  • News & Magazines
  • Personalization
  • Photography
  • Productivity
  • Security
  • Shopping
  • Social
  • Sports
  • Tools
  • Transportation
  • Travel & Local
  • Tutorials & Examples
  • Weather
Below are some of the top rated community flows available for download:


A running instant in a flow is called a fibre. Each flow when executed will have one or more fibres.

The free version of Automate app is fully functional and ads-free, only with restriction of allowing up to 30 running blocks in all the running fibres. This is sufficient for most simple tasks. If you need to run more complex flows, or need to run a lot of flows concurrently, you can pay a small fee to upgrade to the Pro version.

If you configure Automate to run on system startup, all its running flows will resume from their previous running state even after a restart.

With Automate, you can make a lot of wonders in your phone, without writing a single line of code. All you need is constructing your logics with blocks and charting them into flows.

Thursday, November 30, 2017

Automatic incoming and outgoing calls recorder for Android phones

Have you ever encountered any situation that you wish to record down your phone conversation for future reference?

It could be a negotiation talk, or a sales order through phone, or any conversation containing message which you need to record down that typically you'll quickly search for paper and pen and asked the other party to repeat it. It could also be a scam call that you want to keep evident, or any other phone calls that you just want to save.

I use Automatic Call Recorder developed by Appliqato Software for this purpose. It is free for use (with ads), and you can also purchase the ads-free Pro version which will also unlock some of the unique functions not available in the free version.

Take note that there are quite a number of "call recorder" apps that can be found in Google Play Store. The one that I mention here is developed by Appliqato Software which has already achieved a few hundred million installation.


The beauty of this app is that once installed with automatic recording turned on by default, it will automatically record all your incoming and outgoing calls on its own without the need of prompting you. You can also temporary turn off this automatic recording function in its Settings.


Recorded calls will appear in its Inbox which you can replay and perform further action, such as save it permanently (will move from Inbox to Saved folder), jot down a title and notes about what is the call about (for your search reference), delete it, share the recorded audio to another app (such as sending to Whatsapp, Telegram, email, cloud drive, another phone through Bluetooth, etc.).


This call recorder can save the recording in either one of AMR, AAC, MP4 or WAV format. The default AMR format is suitable for voice recording, which produce relatively small file size. In case the recording sound volume is too soft, you can make configuration to increase the loudness.

You can configure the app to automatically save a copy of the audio record to your Google Drive or Dropbox, and you can specify for this synchronization to happen only when the phone is connected to WiFi.

Under Storage setting, you can specify how many number of recordings to retain in the Inbox, and the storage location path of your Inbox.


Under Filters setting, you can specify whose phone calls to record, and whose phone calls to skip recording. By default, all calls will be recorded.

In case you find the app failed to record some of the calls, it might be due to battery optimization function of your phone, which you can set to ignore battery optimization for this app.

Tuesday, November 28, 2017

My Snapware Eco Grip 600ml glass drinking water bottle

To keep myself well hydrated at work, I have bought a Snapware Eco Grip 600ml glass drinking water bottle at AEON department store. This drinking bottle with premium quality comes with a price slightly higher than normal plastic or aluminium drinking bottle. Luckily AEON was giving a 30% discount when I made the purchase.

Anyhow, its price is still comparatively cheaper than glass drinking bottle for some other brands.


This drinking bottle is FDA compliant, totally free of Bisphenol-A (BPA), and dishwasher safe too. It can be used to contain either hot, cold or warm water and beverage.

I prefer glass bottle than plastic or metal as glass is non-toxic and has non-porous surface that won't accumulate bacteria or residual. Besides, the glass is transparent in nature, easier for us to detect any contamination or change to the liquid inside the bottle. Glass material also won't have chemical reaction to the liquid it contains, which could be neutral, alkaline or acidic in nature. It also won't melt or release harmful chemical under direct sunlight.

The type of glass used for this Snapware product is borosilicate, which has higher resistant to thermal shock and less dense (weight lighter) than normal glass. Borosilicate glass is commonly used in laboratory glassware, medical devices and cookware. Its working environment can go as low as -20 degree Celsius to as high as 400 degree Celsius. However, being a glass material, it is not recommended for it to undergo a sudden huge temperature change within short period of time (don't take it out from a freezer and directly heat it up in a microwave oven).

Being a glass bottle, it is easy to break if not handled with care. The Snapware Eco Grip comes with a Neoprene sleeve with nylon strap. This non-slip sleeve covers most part of the glass bottle, protecting it from accidental breakage to a certain extend. It also provides a comfortable and easy grip, couple with the ergonomic bottle design.

Neoprene is the same material used in diving suit and certain swimming suit. It is waterproof and heat resistant in nature. This means you can hold the bottle without much problem even if the water inside is cold to freezing point or hot to boiling point.

The cap of this bottle is very easy to open and close, without the need of much twisting and turning compared to normal bottle cap. It is designed to be leak proof too.

Its size is just right, easy to put in bag and carry along. With only 600ml capacity, it won't feel heavy even when fully filled with water. Some people might prefer bigger capacity such as 1 litre, 1.5 litre or even 2 litre container, which will be heavier to carry. However, 600ml is not enough for whole day drinking. It needs refilling during half-day.

Snapware has another similar product called Eco Flip which is taller but thiner. Take note that the Eco Flip drinking bottle has even smaller capacity of 500ml only.

Friday, November 17, 2017

Malaysia schools terms and festival holidays (Chinese New Year, Hari Raya Aidilfitri & Deepavali) in 2018

Here are the Malaysia schools' term holidays in 2018 as announced by Ministry of Education (a.k.a. Kementerian Pendidikan Malaysia, KPM).

Schools in Group A (Johor, Kedah, Kelantan & Terengganu) will start their term holidays 1 day earlier than those in Group B (Perlis, Penang, Perak, Selangor, N.Sembilan, Melaka, Pahang, Sabah, Sarawak, KL, Putrajaya, Labuan).

As a result, Group A will have 1 more day of Year End Holidays than Group B.


As you can observe from the tables above, certain public holidays will fall within the school term holidays.

Below are the Malaysia schools' festival holidays in 2018 for Chinese New Year, Hari Raya Aidilfitri and Deepavali, as announced by Ministry of Education (a.k.a. Kementerian Pendidikan Malaysia, KPM).

Note that individual school can apply for additional off days  during these festival holidays period, which might subject to having replacement class for the additional off days applied.

The 2018 festival holidays for schools in Group A, which weekends fall on Friday and Saturday, are as follow:


The 2018 festival holidays for schools in Group B, which weekends fall on Saturday and Sunday, are as follow:

 
You might notice that the number of days for all these 3 festival holidays in 2018 are much shorter than 2017, which has 9 days for each of the festivals respectively.

Besides, since Hari Raya Aidilfitri in 2018 fall within the Mid-Year Holidays period, and also Hari Raya Qurban in 2018 fall within the Term 2 Holidays period, there will be no extra holiday for the schools during these 2 festivals.

For your knowledge and information:
  • Chinese New Year falls on the first day of the first month of a new Chinese lunar calendar year.
  • Hari Raya Aidilfitri (a.k.a. Hari Raya Puasa) falls on the first day in Shawwal (the 10th month in Islamic calendar year) after the last fasting month of Ramadan (the 9th month in Islamic calendar year).
  • Deepavali celebrated in South-India, which followed by the Indian race in Malaysia and Singapore, falls on Ashvina Krishna Chaturdasi which is the lunar day before the new moon (Amavasya) in the Hindu lunisolar calendar. The date is between mid-October to mid-November every year.

Tuesday, November 14, 2017

Fixed Lenovo Yoga 2 Pro laptop screen flickering at random time problem in Windows

This problem had been troubling me for quite a long time. Ever since a certain day, the screen of my Lenovo Yoga 2 Pro laptop running on Windows 10 will flicker at random time while I'm using it.

It seems to be related to a bug in its Intel HD Graphics display driver, but even though I kept on updating to the latest driver, the annoying screen flickering problem remained, until I performed the following setting.

The solution: disable Intel HD Graphics panel self-refresh function.

Your Windows account needs to have Administrator rights in order to successfully perform the following steps.

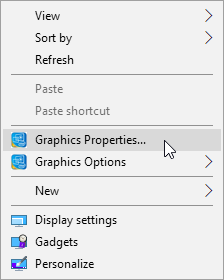
Step 1: Login to Windows and right click anywhere on your Windows Desktop.

Step 2: Click on "Graphics Properties..." in the pop-up menu.


Step 3: Select "Power" in the Intel HD Graphics Control Panel.


Step 4: Select "On Battery" in the left menu bar.

Step 5: Make sure Panel Self-Refresh is set to Disable.


Step 6: Click on Apply, then answer "Yes" to confirm saving the setting.

Hopefully, the screen flickering problem will be gone after this.

If you are also being troubled with the same screen flickering problem in your laptop which uses the Intel processor graphics accelerator, perhaps you can try out this solution and inform me whether it works for you or not.

Wednesday, November 8, 2017

Samsung printer business is now under HP

If you visit to Samsung printer support webpage now, you will find yourself eventually landing in HP website!


This is the indication of the completion of HP acquisition of Samsung printer business.

The two companies have been in competing position in the worldwide printer business for years. HP has been well-known in producing reliable printers for household and business use, while Samsung had been producing many award-winning printers that are affordable with up-to-standard performance and features in the same target segments.

In 2016, HP is the largest player in the worldwide printer market, while Samsung was the 10th.

In September last year (2016), the two companies announced this acquisition plan valued at US$1.05 billion. HP had explained the reason of this acquisition, being able to expand its portfolio and help to disrupt the US$55 billion A3 copier market with multi-function printers that are simple to use but have the same high performance level as that of copiers.


For Samsung investors:
  • Samsung had made the decision to dispose their printer business as they opined that this business is gradually declining.
  • As part of the agreement, Samsung will make a US$100~300 million equity investment in HP through open market purchases. 

For HP investors:
  • HP will gain access to more than 6,500 print patents from Samsung and a workforce of nearly 1,300 researchers and engineers that are experts in laser technology, imaging electronics and supplies and accessories.

For Samsung printers customers:
  • Samsung printers' customer support service will continue under HP.
  • All of Samsung’s existing printer products will continue to be sold under Samsung brand until the second half of 2019.
  • Samsung will keep on providing toners, parts and supplies for existing printers for another 5 years.
  • All discounts and programmes previously agreed between Samsung and customers will now be honoured by HP, and these will remain in effect through to all previously agreed end dates.

Tuesday, November 7, 2017

RACI and ARMI responsibility assignment matrix for GRPI teamwork

In teamwork (work done by more than one person) with clear goals, roles, processes, and interpersonal relationship (GRPI), such as a DMAIC (define, measure, analyze, improve, and control) project or a DMADV (define, measure, analyse, design, verify) project, the responsibility assignment matrix (RAM) can be used to clearly define the role and responsibility of each of the members in such teamwork.


One of the commonly used responsibility assignment matrix is the RACI matrix, which breaks down the teamwork into tasks, and map out who is responsible, who is accountable, who should be consulted, and who must kept informed for each of the tasks.

R - Responsible
  • The person who is assigned to carry out that particular task (the doer).
  • Each task must have at least 1 responsible person.
  • A task can have many responsible persons.
A - Accountable
  • The person who holds ownership of the task, and is responsible for its success or failure.
  • That person is authorized to make final decision on the task.
  • That person has the power to accept the completion of the task.
  • Each task can only have 1 accountable person.
 C - Consulted
  • Person who can be asked to provide opinion or input about the task while it is being worked on.
  • Normally a subject matter expert (SME).
  • The consultation should occur before decision or action is taken.
  • Each task can have either none, one, or more than one consulted persons.
  • If there are more than one, they should not be too many.
I - Informed
  • Person who needs to be kept informed that a decision or action has been taken.
  • Each task can have either none, one, or more than one persons to be kept informed.
  • If there are more than one, they should not be too many.
The RACI model can be extended to RASCI or RASIC by including a support role.

S - Support
  • Person who is able to help Responsible person in getting the task done.
  • The person possesses resource that can be shared out, or taking part in a supporting role.
  • Each task can have either none, one, or more than one support persons.

Beside RACI, the ARMI is another model that serves the similar purpose to define the level of support assigned to each stakeholders.

A - Approver
  • The person who sign-off a milestone and approve to move on towards the next milestone.
R - Resource
  • Persons who have the expertise or skillsets that are required in the project.
M - Member
  • Persons who are the project team member.
I - Interested Party
  • Persons who need to be informed about up-to-date status along the project.

Sunday, November 5, 2017

Top 30 property developers in The Edge Malaysia Property Excellence Awards 2017

The Edge Malaysia has just announced the Top 10 winners in their Property Excellence Awards 2017, which are:

  • 1. SP Setia Bhd (2016: #1)
  • 2. Sunway Bhd (2016: #3)
  • 3. Sime Darby Property Bhd (2016: #4)
  • 4. IJM Land Bhd (2016: #2)
  • 5. Eco World Development Group Bhd (2016: #6)
  • 6. UOA Development Bhd (2016: #7)
  • 7. Mah Sing Group Bhd (2016: #5)
  • 8. IGB Corp Bhd (2016: #9)
  • 8. IOI Properties Group Bhd (2016: #11)
  • 9. UEM Sunrise Bhd (2016: #10)
  • 10. Tropicana Corp Bhd (2016: #12)
Note that there are 2 developers ranked the 8th position in 2017. Most of the Top 10 winners in 2016 remain in the 2017 Top 10 list above, the only drop off is Gamuda Bhd - Property Division. IOI Properties Group Bhd and Tropicana Corp Bhd have successfully advanced into the list. Congratulations to SP Setia Bhd which managed to secure its 1st position for another year.

Following the Top 10 winners above, the subsequent Top 11-30 are:
  • 11. Eastern & Oriental Bhd
  • 12. MKH Bhd
  • 13. Matrix Concepts Holding Bhd
  • 14. Paramount Corp Bhd
  • 15. Malaysian Resources Corp Bhd
  • 16. OSK Holdings Bhd
  • 17. Glomac Bhd
  • 17. Selangor Dredging Bhd
  • 17. TA Global Bhd
  • 18. Sunsuria Bhd
  • 19. KSL Holdings Bhd
  • 19. WCT Land Sdn Bhd
  • 20. Land & General Bhd
  • 21. Hua Yang Bhd
  • 21. I-Bhd
  • 22. Wing Tai Malaysia Bhd
  • 23. Selangor Properties Bhd
  • 23. YTL Land & Development Bhd
  • 24. LBS Bina Group Bhd
  • 24. Malton Bhd
  • 24. SHL Consolidated Bhd
  • 25. Guocoland (Malaysia) Bhd
  • 25. Titijaya Land Bhd
  • 26. MCT Bhd
  • 27. Ivory Properties Group Bhd
  • 27. Ken Holdings Bhd
  • 27. Plenitude Bhd
  • 28. Symphony Life Bhd
  • 29. Eco World International Bhd
  • 29. MK Land Holdings Bhd
  • 29. Naim Holdings Bhd
  • 30. Tambun Indah Land Bhd

There are 2 winners of Outstanding Property Entrepreneur Award 2017:
  • Datuk Lee Tian Hock from Matrix Concepts Holdings Bhd
  • Tan Sri Ter Leong Yap from Sunsuria Bhd

There are 2 winners of Outstanding Property CEO Award 2017:
  • Datuk Khor Chap Jen from SP Setia Bhd
  • Sarena Cheah from Sunway Bhd - Property Division, Malaysia & Singapore

Tan Sri Ong Ka Ting is awarded with Outstanding Contribution to the Housing Industry Award 2017.

The following properties are awarded with Property Development Excellence Award 2017:
  • Mid Valley Megamall - Excellence in Suburban Family Mall
  • 1 Utama Shopping Centre - Excellence in Suburban Family Mall
  • Sunway Pyramid - Excellence in Suburban Family Mall
  • Pavillion Kuala Lumpur - International Luxury Shopping Mall
  • Regeneration of George Town - Excellence in Urban Regeneration

Hint: Click on the "Older Posts" link to continue reading, or click here for a listing of all my past 3 months articles.