Showing posts with label mobile phone. Show all posts

Tuesday, March 31, 2015

Check for Malaysia goods/services price reasonability with MyKira GST app

Just before Malaysia implement Goods and Services Tax (GST) on 1 April 2015, the Ministry of Domestic Trade, Co-Operatives and Consumerism Malaysia (a.k.a. Kementerian Perdagangan Dalam Negeri, Koperasi Dan Kepenggunaan, KPDNKK) has released an Android app called MyKira GST which enable us to check for the price reasonability of over 10,000 products and services in Malaysia.

The price is checked from the online database of KPDNKK and based on the location (parliament area) of selling.

To do the checking, you need to provide the name of the product/service, which has autocomplete search while key-in.


Then, specify the weight/size/packaging information, which is also having autocomplete search during key-in.


After that, key-in the price you see, and optionally its price before GST (old price) if you remember.

Then provide the information of the shop (premise) and area (parliament). There is a map showing your current location, which can help you in identifying the area you are in.

After that, tap on the submit button to do the checking. It will show you whether the price is within reasonable range, or too expensive (out of range) accordingly.


If the price is found to be out of range, you can tap on the e-Aduan button and immediately file a complaint to KPDNKK.


You can click here to download and install the MyKira GST app from Google Play Store to your Android phone or tablet.

Thursday, February 12, 2015

Win a Samsung Galaxy S6 or HTC One M9 or LG G Flex 2 in Choose Your Own Next Gen Android Giveaway

Pocketnow is currently holding The Choose Your Own Next Gen Android Giveaway for you to win a next generation Android smartphone.

 The winner gets to choose whichever of the following phones they want:

  • Samsung Galaxy S6
  • HTC One M9
  • LG G Flex 2
It only takes one step to win: submit your email address in the giveaway website. Click here to enter The Choose Your Own Next Gen Android Giveaway website.

Official Giveaway End Date: 20 March 2015 11:59pm (PST)

Friday, January 16, 2015

Fixed Samsung Galaxy Note 8 battery fast draining problem

My Samsung Galaxy Note 8 is using Digi data plan to access the Internet.

Since last week, its battery was draining very fast. Battery Monitor Widget Pro showed that even when it is idle and not in use, it lost battery charge at the rate of around 3.5% per hour. Within half a day, 50% of its battery drained off from fully charged, even when not in use!


The Statistics screen in Battery Monitor Widget Pro told me that it was the Android System that drained a lot of battery, but I need more detail to nail down the root cause.

I finally found the culprit with Better Battery Stats. In its Kernel Wakelock screen, I discovered the ril-fd wakelock was keeping my tablet awake most of the time, and it hardly gone into Deep Sleep mode.

A search in the Internet told me this ril-fd wakelock is related to a feature called Fast Dormancy, and it seems that some sort of flaw in Digi base station network has caused this Fast Dormancy feature to drain off battery in my tablet.

Finally, I managed to turn Fast Dormancy off by using FastDormancy Toggle for i9300. Yes, my Samsung Galaxy Note 8 is N5100, but this app seems to work well with other Samsung mobile devices running on Android 4.x as well.

In order to use FastDormancy Toggle for i9300, your Samsung mobile device need to be rooted. After toggling the Fast Dormancy on/off, you need to restart the device and charge the battery up to 100%.

Now, My Samsung Galaxy Note 8 is back to normal, draining battery at the rate of around 0.27% per hour when not in use.


I am running on stock ROM with build number KOT49H.N5100XXDNJ2 (Android version 4.4.2). It is rooted, as I need to gain back full access to its SD card. Now, the root access also enables me to toggle the Fast Dormancy feature to get rid of battery draining problem.

Sunday, December 28, 2014

Comparison of the new Celcom First Basic plan with OPTIMISER and existing Celcom First plans

Celcom has just launched a new postpaid plan for smartphones with voice and data component, which has an OPTIMISER mechanism to provide flexibility for subscriber to use more data or more voice and SMS within a billing cycle.

Under the plan allocation, the subscriber is given a quota of 2 GB Internet data usage, 2 GB Celcom WiFi usage, 100 minutes voice call, and 100 SMS.

Once you have used all of your allocation above, OPTIMISER will automatically adjust to give you complimentary additional quota of either Internet or calls and SMS. You can either get an additional 2 GB of Internet data usage + 2 GB of Celcom WiFi usage, or additional of 150 minutes voice call + 150 SMS.

If your OPTIMISER allocation is also fully utilised, you will be charged 15 sen/minute for voice calls thereafter, and 15 sen per additional SMS. You can also get additional 1 GB Internet quota at the cost of RM15.

Lets compare this new Celcom First Basic plan with the existing Celcom First Prime plan with mAdvance data (probably no longer available for new subscription now), and the Celcom First One 5 GB data plan.


In the table above, you will notice that the Internet data quota increases from plan to plan, starting from 2 GB to 5 GB. When you get more Internet data quota, you will at the same time have less voice and SMS quota as a trade off.

It seems that the new Celcom First Basic plan with OPTIMISER is pretty good if you use more data than voice/SMS, but occasionally might need to use more voice/SMS in a particular month.

Anyhow, the Celcom First One 5GB plan is still the cheapest one if don't make a lot of calls and send very few SMS. I think nowadays we use more Whatsapp, Line and WeChat rather than sending conventional SMS/MMS, don't we?

If you are existing Celcom First Prime subscriber with mAdvance data plan, you can make use of the table above to consider whether you need to switch over to the new Celcom First Basic plan with OPTIMISER, or to stay along with your existing plan.


Saturday, September 27, 2014

Restrict apps network access in Android smartphones with Firewall Plus

Do you want to block the mobile advertisement from appearing in the screen of your standalone (can work locally without network connection) apps or games?

Do you feel suspicious and insecure when you discovered there are network activities from some of the apps installed in your smartphone, even though you didn't open them, or the apps suppose to work locally without the need of connecting to the network?

Would you like to restrict certain apps that consume a lot of network data usage, such as e-Magazines, e-Newspapers, etc., so that they can only use WiFi connection to access the network, and not using your precious mobile data plan?

If you have already rooted your Android device, you can install the free Firewall Plus.


I found this Firewall Plus very straightforward and easy to use, and it has a very small file size of 239kb only.

It will list down all the apps in your Android device, which you can select to allow the apps to have WiFi access, or 3G/4G mobile access, or both, or none, respectively.

It has 2 modes, the Blacklist mode is useful when you want to allow majority of the apps to have full network access, and the Whitelist mode is useful when you want to disallow network access to all the apps by default.

Firewall Plus works on top of the built-in iptables firewall in Android.

If you haven't rooted your Android device, you can also try another app called NoRoot Firewall. NoRoot Firewall leverages on the VPN function of your Android device to perform its firewall function, which I think is less efficient than Firewall Plus.

By the way, if you have installed 3G Watchdog or its Pro version in your Android device to monitor your network usage, it is able to show you the usage by apps very clearly.


Of course, you can also make use of the Data Manager inside the Android Kitkat system to check for network usage by apps.


Tuesday, September 23, 2014

Reenabling external SD card access that is restricted in Android 4.4 (KitKat) with SDFix

If you have updated your Android smartphone to version 4.4.x (KitKat), you might find that access to your external SD card is now restricted by the system.

The system now comes with a file explorer that is having full read/write access to both your internal storage and external SD card storage. However, 3rd party file explorers lost the write access to the external SD card and can no longer create, move or edit files or folders in it.

Many apps can no longer save data and files in the external SD card, including your backup apps, multimedia apps, file transfer apps, etc.

This will bring problem to the operation of numerous apps. You might also face storage shortage if the internal storage of your phone is less than 32GB.

Luckily, you can reconfigure your Android smartphone to treat your external SD card the same way as before version 4.4, and let you get rid of the restriction that causes you hassle, trouble and problem.

There is only one condition: your Android smartphone must be rooted, as root access is required to change the affected system configuration file.

I use a free app called SDFix: KitKat Writable MicroSD by NextApp Inc. for my HTC One (M8) and Samsung Galaxy Note 8.0 (GT-N5100) after they've updated to Android 4.4.x. This app is simple, easy, and works like a charm.

You will need to reboot your phone for the change to take effect after the app changed the system configuration file. If the change is successful, you can proceed to uninstall the app as you only need to run it once.


Thursday, September 18, 2014

Malaysian Samsung Galaxy Note 8.0 (GT-N5100) received firmware update to Android 4.4.2 (Kitkat)

After a long waiting period, the Malaysian Samsung Galaxy Note 8.0 (GT-N5100) finally received its OTA firmware update to Android 4.4.2 (Kitkat) from previous Android 4.2.2 (Jelly Bean).


The build number of this update is: KOT49H.N5100XXDNH3, with Android version 4.4.2, baseband version N5100DXDNG1. Kernel version is 3.0.31-2637964 dated Fri Aug 29 2014.

This firmware incorporates Samsung Find My Mobile service, which you can perform remote control from the website http://findmymobile.samsung.com to:
  • Locate your device
  • Lock your device
  • Ring your device
  • Retrieve call logs
  • Wipe off your device
  • Unlock device's screen


Wednesday, September 10, 2014

Converting nano SIM card to micro SIM card or standard SIM card using Noosy SIM card adapter

During the good old days, all handphones use standard SIM card with the same size of 25mm x 15mm.

Then, certain high-end smartphones such as Apple iPhone 4, HTC One X, HTC One (M7), Samsung Galaxy S3, Samsung Galaxy S4, etc. started to use a smaller size micro SIM card of 15mm x 12mm. The standard SIM card couldn't fit in their micro SIM card slot, and need to be cut with a SIM card cutter, or you need to request for a new micro SIM card from your telco.

Not long after that, the later high-end smartphones such as Apple iPhone 5, HTC One (M8), Motorola Moto X, etc. started to use an even smaller size nano SIM card of 12.3mm x 8.8mm. Again, the standard SIM card or micro SIM card couldn't fit in their nano SIM card slot, and need to be cut with a SIM card cutter, or you need to request for a new nano SIM card from your Telco.

In some occasion, you might want to convert your smaller SIM card to a bigger one. For example, when your new smartphone is faulty and need to send back for repair, and you need to temporary fall back to your old smartphone which uses a bigger SIM card.

Luckily, there exist SIM card adapters that enable you to convert your smaller SIM card to a bigger one, similar to the concept of converting micro SD card to a standard SD card.

Noosy SIM card adapters come in a pack with 4 items:

  • 1 x Nano SIM to Micro SIM adapter
  • 1 x Nano SIM to Standard SIM adapter
  • 1 x Micro SIM to Standard SIM adapter
  • 1 x SIM tray ejector for iPhone, HTC One, etc.

Each pack only cost me RM1.80.


Friday, September 5, 2014

HTC One (M8) users get 100GB free Google Drive storage (doubled from previous 50GB)

Today, I received an email from Google Drive with title the "Changes to your Google storage plan". Its content is as below:


Huray! HTC One (M8) users' free Google Drive storage is now increased from 50GB to 100GB! This includes existing users who have already activated the free Google Drive storage and had already received 50GB free storage, now it is doubled up to 100GB too.

This 100GB of Google Drive storage is on top of the existing free storage of 15GB, which is shared among Gmail, Google Drive and Google+ photos.

Thanks to HTC and Google!

Thursday, September 4, 2014

Upgraded my HTC One Android smartphone from M7 to M8

Last week, I traded in my HTC One (M7) for a new HTC One (M8). I am glad that after slightly more than one year of usage, the M7 still carries a good resell value, and I got my brand new M8 at the cost of RM1,000 only.

To date, the M7 is still a great Android phone. Anyhow, it is a good move to trade it in for a brand new M8 while it still has good resell value.

One of my main reason to upgrade my M7 to M8 is to get better cameras both front and back. M8 has duo back camera, and front camera is 5-megapixel (compared to 2.1-megapixel in M7). M8 camera has additional features too, such as the UFocus function.

Another main reason is the availability of the innovative HTC Dot View case for M8. I can check current time and temperature, make call, and answer call without uncover the M8 from the Dot View case. The M8 screen also auto wake up when I open the cover.

M8 is longer than M7 and is having a larger 5" display (compared to 4.7" in M7). However, the bottom part of its display is used by softkeys, and the actual display length of M8 is slightly less than M7 (meaning, M7 displays slightly more vertical content on its screen). This is due to both M7 and M8 are having the same resolution of 1920x1080, but the M7 has higher pixel density at 468ppi compared to 441ppi in M8. This is something that M8 loses out to M7!

As a result of lower pixel density, the text in M8 (of same font and size) appears larger than in the screen of M7.

M8 is slightly slimmer than M7, and comes with Corning Gorilla Glass 3 (claimed to be 3 times more damage resistant and 40% more scratch-resistant than Gorilla Glass 2 used in M7).

The aluminium build in M8 is more solid than M7. There will be wear and tear in M7 micro USB port and volume button. Its seems that the M8 design is more durable. IMHO, the position of power button and headphone port on M8 is also better than M7.

The 2600mAh Li-Po battery in M8 surprisingly charges much faster than the 2300mAh Li-Po battery in M7. With a larger battery capacity, the M8 can generally last longer in one charge cycle than M7.

M8 also comes with a micro SD card slot, enable you to expand its storage up to 128GB. You will need the tray eject pin to access the micro SD card holder, the same way as the nano-SIM card holder. Bear in mind that Android Kitkat has imposed some restriction on the use of non-internal storage in order to improve on security, which will limit the usage of micro SD card in the phone.

M7 is using micro-SIM card, while M8 is using nano-SIM card. As the size is different, you can't simply migrate over the SIM card from M7 to M8 without modification or replacement.

Processor wise, M8 is using a newer and faster quad-core Snapdragon 801 compared to quad-cord Snapdragon 600 in M7. In normal use, you won't feel much different in terms of speed between them. You will feel the different when using processor hungry apps, such as certain 3D games.

Both M7 and M8 received software update to Android 4.4.3 with Sense 6.0 recently. There isn't much different between them in terms of the OS and default software. M8 has some additional features such as Motion Launch which you can't find in M7.

M8 is using Boom Sound audio enhancement (which can't be turned off when using internal speakers), while M7 is using Beats Audio. Both are great and is a key HTC feature that makes a difference from other smartphones in the market.

I have already got some additional storage space in Google Drive by using M7. I received some more additional storage in Google Drive after upgraded to M8. This can also be considered as one of the major advantage of upgrading M7 to M8.

As a conclusion, it really worth it to upgrade HTC One from M7 to M8, while the M7 still has good resell value now. You will get the newest HTC flagship smartphone with slightly larger screen, better build, faster battery charging speed, new features (particularly major enhancement in camera functions), and innovative Dot View case.


Tuesday, September 2, 2014

Migrating the contacts and conversation history of SMS, Whatsapp and WeChat from old phone to new phone

When you want to migrate from one smartphone to another, one of your major concerns is probably how to move over the contacts and chat history of your SMS, Whatsapp, WeChat, LINE, Hangouts, Facebook Messenger, etc.

You shouldn't be worry about Google Hangouts and Facebook Messenger, because everything is stored in their cloud server in the Internet. You just need to remember your user account and password, and setup accordingly in your new phone, in order to regain access to your contacts and chat history of these 2 apps.

If you are using Android phone, it is strongly recommended to store all your phonebook contacts in your Google account. In this way, you can always get back your address book by setting the same Google account in your new Android phone. Besides, setting the same Google account enable your new Android phone to install all your previously purchased apps from Google Play Store without additional charges too.

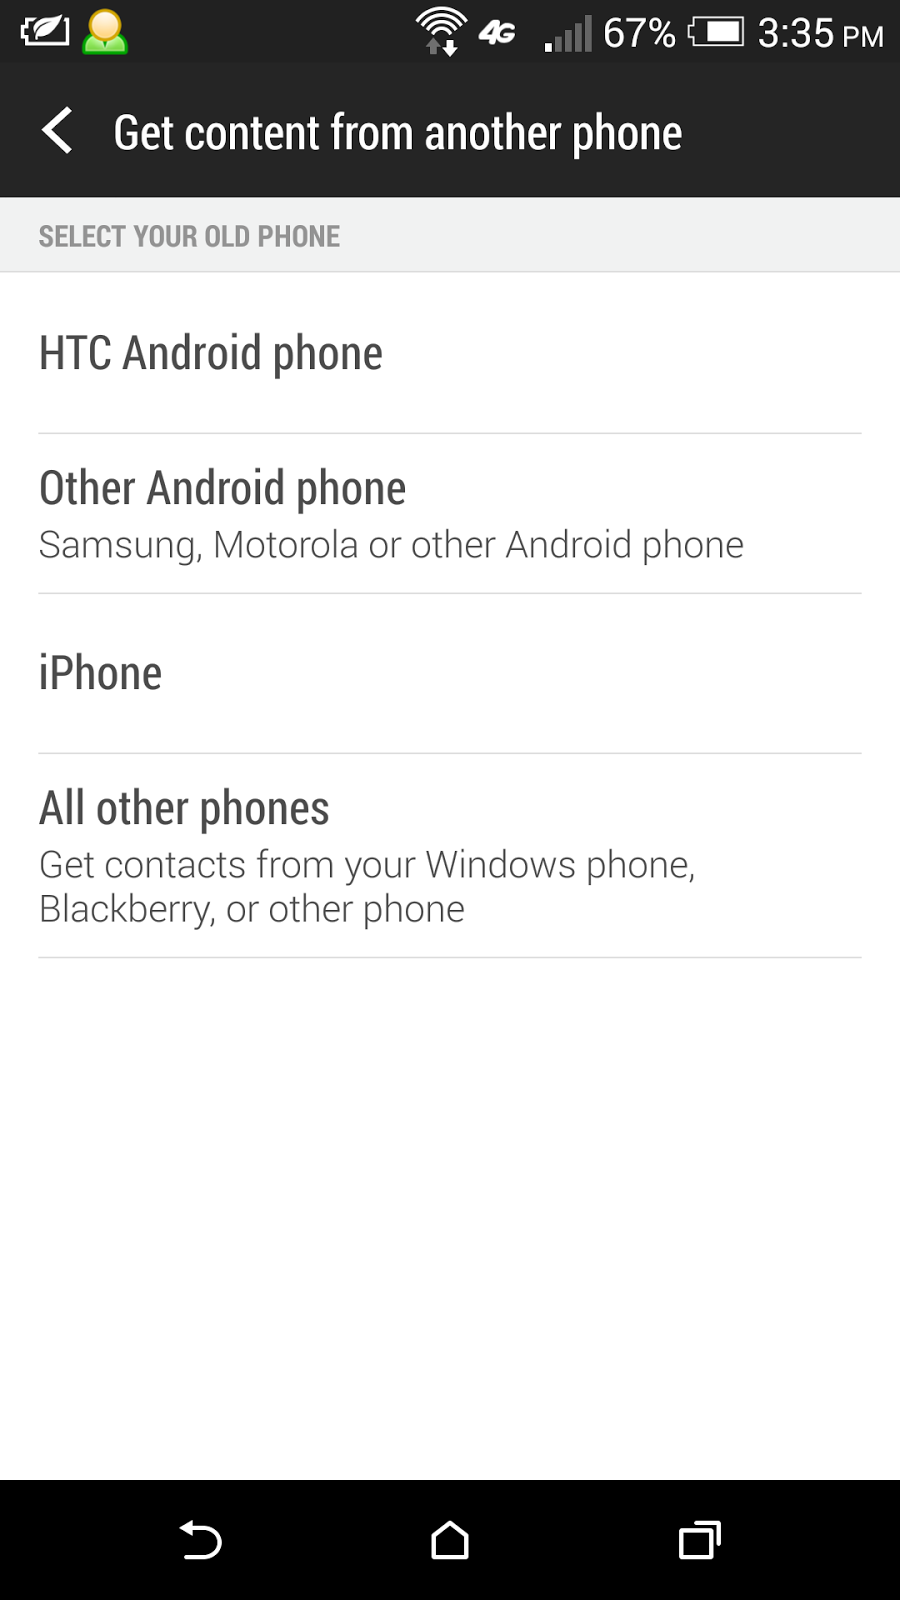
Your new phone should have a way to retrieve the SMS and phone calling history from your old phone. In the case of HTC smartphones with Android 4.4 and above, go to Settings > Get content from another phone for this purpose. You might need to install HTC Transfer Tool in your old Android phone to facilitate the data transfer.


For Whatsapp, backup your existing conversations in old phone with Settings > Chat settings > Backup conversations. Then, copy over the entire Whatsapp folder from your old phone's storage to your new phone.


After that, install Whatsapp on your new phone. Whatsapp will auto-detect the Whatsapp folder with backup data, and prompt you to restore your message history. Make sure you select Restore in this step, and your Whatsapp contacts, chats, group chats, attachments, etc. will all be restored. You can then continue using Whatsapp in your new phone with everything from the snapshot point of your latest backup in your old phone.

WeChat make use of their server for backup and restore. Go to Settings > General > Chat History Backup and select Back Up to backup your chat history.


Your backup will be stored over the Internet in their server for up to 7 days. If you don't restore your backup data within 7 days, it will be deleted from the server.

You will be given the option to password protect your backup data. The same password is required during restore process.

To restore, install WeChat on your new phone, go to the same place Settings > General > Chat History Backup and select Restore. You will get back your chats and group chats history.

In the case of LINE, there is no restore solution yet. After installing LINE in your new phone, you will be able to get back your LINE contacts, but you will start over your conversations from zero again.


Monday, September 1, 2014

Check TNB electricity bill payment status with myTNB app for Android and iOS

I just discovered that Tenaga Nasional Berhad (TNB) has released a mobile app called myTNB for both Android and iOS smart mobile devices.


You need to register an account in order to use myTNB. After that, you can link all the electricity bills under your name to this myTNB account.


Then, you are able to check the billing status of each of the bills. This is particularly useful for residential property owners to check and ensure their tenants have paid for the electricity bill.

Beside that, you can also use myTNB to check for new electricity supply application status, Renewable Energy payment advice, report faulty street light, etc.

However, the report faulty street light is not done through the app itself, but still using traditional SMS method, which might cost you SMS charge for sending to 15454.

Monday, August 25, 2014

Updated my HTC One (M7) to Android 4.4.3 (KitKat) with Sense 6.0

My HTC One (M7) received its OTA update from Android 4.4.2 (KitKat) to Android 4.4.3 (KitKat) yesterday (24 August 2014).


It seems that this update focuses on security fixes, particularly the fix for OpenSSL vulnerabilities (Heartbleed Bug and some other bugs).


Visually, there is no noticeable change from the previous version. The Software Information section in the phone informs us that:
  • Android version updated from 4.4.2 to 4.4.3
  • HTC Sense version updated from 5.5 to 6.0
  • Software number updated from 4.20.707.6 to 6.13.707.1
  • HTC SDK API level updated from 5.69 to 6.25
  • Kernel version remains as 3.4.10


Saturday, July 26, 2014

Converting your handphone / MP3 player to mini radio station with FM Transmitter

If your car CD player is capable of replaying MP3 music, you'll need to burn the MP3 files into a finalized CDR disc, which has a capacity of up to 680MB only.

If your car audio system has a USB port to play MP3 music, you'll need to copy the MP3 files to a USB thumb drive and plug it into the USB port of the car audio system.

What if your car audio system doesn't support the above 2 ways of playing MP3 music?

Well, you can convert and burn your MP3 files into an audio CD, which can store about 10 songs, and play it with your car CD player.

There also exist a kind of FM Transmitter that plug into your car's cigarette lighter socket, which you need to copy your MP3 files to an SD card and slot it into the FM Transmitter. Then, you can tune your car radio to the same frequency with the FM Transmitter in order to listen to the music.

But I have a better choice. I use the kind of FM Transmitter as shown below which can turn your handphone, MP3 player, or any kind of gadgets that support audio output to a universal 3.5mm headphone jack.


This FM Transmitter turns your gadget into a mini radio station with broadcast range of about 15 meters only. It supports devices with the 3.5mm headphone jack including handphone, MP3 player, voice recorder, tablet, laptop, etc.

The audio transmitted out can then be received and played by any radio device within the range. This could be your car radio, a normal radio, a Hi-Fi, a handphone with FM radio function, etc.

This FM Transmitter is able to transmit high-fidelity stereo sound with the digital PLL (phase locked loop) technology. It supports full range of FM transmitting frequency (87.5MHz-108.0MHz). It has stereo isolation of >= 38dB.

You can use it to output any kind of audio from the connected device, with audio frequency range of 100Hz-15,000Hz.

It has its own built-in 120mAh Li-ion battery, which can be recharged with its micro-USB port.


Its usage is similar to the cigarette lighter FM Transmitter. Just tune your car radio to the same frequency with this FM Transmitter in order to listen to the music.


Pretty cool isn't it?

Saturday, February 8, 2014

Updated my HTC One to Android 4.4.2 (KitKat) with Sense 5.5

My HTC One received its OTA update from Android 4.3 (Jelly Bean) to Android 4.4.2 (KitKat) yesterday (7 February 2014).


The Sense UI version remains as 5.5, so there is not much changes to the UI from previous version in this update.

Here are some of the noticeable changes found in this update:
  • The battery bar in the battery icon changed colour from green (as in Android 4.3) to white.
  • There is a new icon for the Quick Settings screen called HTC Mini+ which can configure the phone to pair up with a HTC Mini+ device.

  • In Settings > Wireless & Networks, we can set the Default SMS app for the phone.

  • BlinkFeed can restrict auto refresh to use WiFi only. Can also configure for offline news reading. Its menu is now accessed by swiping from left side of the BlinkFeed screen.

  • New Location settings screen. The GPS toggle is controlled by the Mode setting here. Anyhow, you can still toggle GPS sensor on/off with the Quick Settings icon as it is still available as before.
  • Change in Gallery app and Music app.
  • Camera screen showing estimated video time and number of photos that can be taken with current storage available. The notorious purple-tint problem is still there, but seems to have improved from previous version (HTC One with Android 4.3 Jelly Bean has the worst purple-tint issue, worse than 4.2 and 4.4)
  • Built in support for Google Cloud printing. You can find a new Printing item in Settings menu.
  • New settings for Do Not Disturb found inside Sound settings.
  • Can switch over to QWERTY keyboard from the T9 keyboard in call dialer, and vice-versa.

Wednesday, January 15, 2014

Lazada launches iOS app for iPhone / iPad with RM30 voucher given to downloaders

A good news for Apple mobile devices users!

Lazada, the e-commerce online shopping website in Southeast Asia (Malaysia, Indonesia, Thailand, Vietnam, Phillipines) that is established by the famous German-based international online business incubator Rocket Internet GmbH, is going to launch their Lazada iOS app for iPhone/iPad on 16 January 2014.

Lazada online shopping website at http://www.lazada.com.my was launched in Malaysia in April 2012. Initially, they faced quite a lot of hiccups and customer complaints, particularly in year 2012. My recent 2 purchases with them (one done in year 2013, one in 2014) convinced me that they have improved a lot, because I received my goods promptly with friendly email and SMS delivery status update, and the whole buying experience is good.

Lazada has already launched their Android app in June 2013. To date, the Lazada app for Android received more than 100k installs since August 2013, but yet to hit the 500k installs target.

In conjunction with the launching of Lazada iOS app, you will get a RM30 voucher if you download the app from Apple iTunes App Store and install it on your Apple mobile device.

Click the ads below to download the Lazada iOS app.


Note that the offer is valid for 3 days only for downloads between 16-18 January 2014. The RM30 voucher can only be used via the iOS app. The terms and conditions for this promo is available after you clicked on the ads above.

Lazada plans to surprise three lucky shoppers who have made a purchase through the new app by giving away three vouchers worth RM500. This lucky draw is eligible to shoppers purchasing using the app from 19 to 31 January 2014.

For Android users, you can also download the Lazada App for Android here.

If you want to shop using the Lazada e-commerce website, please click the Lazada ads on the right of this webpage.

The pros and cons of WiFi frequencies 2.4GHz and 5GHz

Nowadays all WiFi access points (APs) or wireless network routers work on the 2.4GHz band of wireless frequency, while the newer dual-band devices also support the 5GHz band.

The WiFi standards that work on 2.4GHz band are:

  • 802.11b (speed is up to 11Mbps)
  • 802.11g (speed is up to 54Mbps)
  • 802.11n (speed is up to 150Mbps for 20MHz channel width, 300Mbps for 40MHz channel width)
The WiFi standards that work on 5GHz band are:
  • 802.11a (speed is up to 54Mbps)
  • 802.11n (speed is up to 150Mbps for 20MHz channel width, 300Mbps for 40MHz channel width)
  • 802.11ac (speed can reach 6.8Gbps with 8 antennas running at 160Mhz channel width)
For the dual-band WiFi AP or router, you can turn on either one of the frequency bands, or turn on both of them at the same time.

The pros / advantages of 2.4GHz band:
  • Has a wider signal coverage area.
  • Better penetration through walls and physical barriers.
  • WiFi b/g/n supported by all wireless devices
The cons / disadvantages of 2.4GHz band:
  • As most of the WiFi devices are using this band, it could be congested with a lot of interference if there are a lot of WiFi devices nearby.
  • Out of its 13 available channels, only Channel 1, 6, 11 are not overlapping.
  • Might get interference from microwave ovens, Bluetooth devices, wireless keyboard/mouse, cordless phones, etc. which are also operate on 2.4GHz frequency band.
The pros / advantages of 5GHz band:
  • At the mean time, few WiFi devices are using this band, so it is less congested with much lesser interference.
  • Has 23 non-overlapping available channels.
  • Supports much higher network speed with 802.11ac standard.
The cons / disadvantages of 5GHz band:
  • Has smaller signal coverage area.
  • Poor penetration power through walls and physical barriers.
  • Older wireless devices might not be able to work on this band.
  • Might get interference from radar which also operates on 5GHz frequency band.

Below is the WiFi signals detected in a shopping mall. You can see how congested is the 2.4GHz band and how clear is the 5GHz band. Congestion and interference can cause wireless connection problems such as intermittent connection lost, slow speed, unable to establish connection with AP, etc.


I am sure you will get similar result at your office or in your residence when your neighbours are also using WiFi.

If you have mobile devices that can work on 5GHz band and you have a dual-band AP/router, you might probably want to turn on both of them to get the best of both worlds.

Monday, January 6, 2014

Pro features in Timely Alarm Clock App for Android set free by Google after they acquired Bitspin

It is officially announced that Google has recently acquired Bitspin, the small Switzerland company founded by some ETH Zurich's computer science graduates.


Bitspin produces the famous beautiful Android app called Timely Alarm Clock, which has accumulated more than 1 million downloads within a year.

Timely is available for free in Google Play store, and now its in-app purchase features are also made free. Good news to all that haven't purchased the in-app features, and bad news for those who already spent some money on the app.

Wednesday, January 1, 2014

JuiceSSH the free SSH client for Android developed by Linux system admins

SSH client is an essential tool for us to have remote access to the command line console of Linux/Android/Unix system, be it a server or network device that we manage, or our own personal computer, or a TV box, etc.

In Windows system, most of us use PuTTY or similar SSH client to remotely connect to our Linux/Android/Unix system. Beside Windows, there are PuTTY for Symbian, Windows Mobile, iPhone, ... but where is the PuTTY for Android?

Nowadays we tend to carry a smartphone, perhaps together with a tablet with us, more often than carrying a laptop. In order to practically work on the text-based SSH terminal, the smartphone need to have a large screen, and smartphone that fulfil this requirement is very likely an Android phone. Perhaps the tablet that we carry with us is also an Android tablet. Therefore, the market demand for a good SSH client for Android is definitely there, and JuiceSSH that I'm going to introduce here is among the best I found so far.

With a good SSH client in our Android device, we can access to the server, network equipment or computer anytime, anywhere for emergency troubleshooting, configuration, administration, etc.

JuiceSSH is an all-in-one terminal client for Android. Beside Secure Shell (SSH), it also supports Mobile Shell (MOSH), Local Shell and the unencrypted Telnet. Support for file transfer with SCP and SFTP is in the pipeline. With Local Shell support, you can get into the command line console of your Android device.


JuiceSSH is developed by Paul Maddox (a Linux system architect) and Tom Maddox (a system administrator). Being frequent SSH users themselves, I believe they know well about what their users want. For example, JuiceSSH has a popup keyboard on top of the Android keyboard for the command line commonly used Esc key, arrow keys, PgUp, PgDown, etc.


JuiceSSH has a full colour terminal that supports UTF-8 characters (including Chinese, Japanese, Korean, etc.). It also supports copy and paste within the session. It will open the web browser when an URL shown on its screen is tapped.

If you deal a lot with Linux/Android/Unix system, this is a good tool for you in your Android devices.


Saturday, December 21, 2013

UTOO S5 (10,000mAh) Li-polymer power bank is available now

Remember the UTOO S2 (3000mAh) and S3 (5000mAh) Li-polymer power bank that I wrote about recently? Now there is another UTOO S5 (10,000mAh) joining the family.


The UTOO S5 resembles the UTOO S3, but is thicker with double the charge capacity to 10,000mAh. It also has 4 LEDs in front, and with attached charging cable at its side.

With double capacity, we anticipate the S5 needs to have longer recharging time than the S3. UTOO says that the S5 is equipped with unique capability that can speed up the charging process safely, and the recharging time can be as fast as 7 hours only.

With double capacity, we also can have more spare power for our electronic gadgets, particularly smartphones with large screen, and also tablets.


Hint: Click on the "Older Posts" link to continue reading, or click here for a listing of all my past 3 months articles.