Thursday, June 30, 2011

Case-Mate Barely There case for HTC Incredible S

The famous Case-Mate Barely There is a kind of hard plastic shell for mobile phone to protect the phone from scratch, minor impact/drop, etc.

As its name suggested, it fits to the phone perfectly and we can barely feel its existence especially when see from distance.

I have been putting Case-Mate Barely There case on my HTC Incredible S phone the next day after I got the phone. It is very easy to put on and also very easy to take off.

To let you have a better idea of how it looks like, I have taken picture of the case putting together with the naked phone side-by-side.

The front:


And the back:

This is how the phone looks like after putting on the case:


As you can see, Case-Mate Barely There fits nicely to the phone, maintaining the slim profile of HTC Incredible S and provide good access to all the ports, sensors, speakers, buttons, cameras and functions of the phone.

Case-Mate Barely There also provides good protection to the main camera of the phone. As you can see from the 2nd photo above, the back camera's glass surface of HTC Incredible S will have contact to the table surface it lies on when you put the phone facing up. Imagine that glass surface keeps on knocking your table whenever your phone vibrates. Take a look at the 3rd photo, and you will find how Case-Mate Barely There protects the back camera.

The top edge of Case-Mate Barely There is of same level with the power button of HTC Incredible S. This will prevent accidental pressing the power button (and turn on the screen, which in turn drain out your battery) when your phone is in your pocket. However, this also makes pressing the power button a bit harder than naked phone.

The price of Case-Mate is quite expensive. I bought it at the cost of over RM60. However, you will find it worth the price considering its nice design, good quality and the "barely there" feeling.

The packaging of Case-Mate Barely There is bundled together with Case-Mate clear screen protector. However, you will soon find fingerprints and smudge developed on that screen protector. Therefore, my phone is using Clarivue ultra-thin matte anti-glare screen protector instead.

Sunday, June 26, 2011

Fixing Android unable to connect to WiFi network problem with FXR WiFi Fix And Rescue

Have you ever encountered these kind of WiFi network connection problem with your Android device?

  • Your Android device unable to detect the presence of a particular WiFi router/AP although SSID is broadcasted and all other wireless devices can detect and connect to the WiFi without problem
  • Your Android device's failed to obtain IP address from the WiFi router/AP and unable to start, although the WiFi DHCP service is running well with other wireless devices
  • Your Android device's WiFi service just unable to start
Normally, situations as above come at a sudden, and before that, your Android device has no issue at all connecting to that particular WiFi all the while.

Sometimes, rebooting the Android device can fix the problem, and you'll be able to connect back to the WiFi again. However, the same problem might also come back again.

I've encountered such annoying problem between my Android phone and my home WiFi router, and I finally fixed it using a free tool called FXR WiFi Fix And Rescue.


It is a one button fix solution. Just click the "Fix My WiFi" button and the tool will attempt to fix your WiFi problem in your Android device for you. You will lost all your WiFi settings, including all the saved WiFi connection passwords, along the process. However, this is still much better than having to do a full factory reset to the Android device.

It worth to give it a try before going for factory reset or sending the Android device to repair center.

Saturday, June 25, 2011

App: Use Business Calendar for Android to sync Google and Facebook calendars

Do you find the Calendar app that comes with your Android phone not impressive enough? Do you want a calendar app that can show as much information as possible in a single screen in a well-organized and readable way, especially in the Month view?

So far, I came across 2 Android calendar apps that meet this requirement, and able to sync with Google Calendar. They are Business Calendar for Android and CalenGoo.

I prefer Business Calendar by Mikado Software of Germany because its price is cheaper than CalenGoo, there is a free Lite version of it, and most importantly, its user interface is very much alike Google Calendar accessed with desktop web browser. It also has a more business professional look-and-feel than CalenGoo.

Click here to see some screenshots of Business Calendar.

Business Calendar is able to access and sync with the same set of calendars as the HTC Calendar app, including PC Sync (that will sync with the calendars in your PC through HTC Sync program), multiple Google Calendars as well as Facebook Calendar. Apparently, it shares the same calendar database with HTC Calendar that comes together with the phone.

Beside Month view, it has Multi-day (Week) view, Day view and Agenda view. Its Month view uses popup to show event details, allowing you to access the information easily within the same screen. Its Multi-day view supports multi-touch zoom-in and zoom-out gesture.

One of the thing I like about Business Calendar is it comes with highly customizable widgets of various size from 2x1 to 4x4 (altogether 12 of them), allowing us to access and manipulate the calendar directly from Android home screen.

Monday, June 20, 2011

App: Setting Profiles in Android phone with MyProfiles

Profile setting and management has been a must-have feature in all mobile phones since long time ago, even before smart phones available in the market. This function allows us to quickly change multiple settings in the phone to specific need, such as set it to Silent Mode in cinema, Battery Saving Mode at night, etc.

However, this basic function doesn't come by default in Android, and we have to install the 3rd party application from Android Market in order to have such function in our Android phone.

I find MyProfiles developed by Fancy01 Inc. in Taiwan to be the best in terms of user friendliness, easy to use and good user interface, although it isn't the one having the most comprehensive features. Its operation doesn't consume much battery too.

MyProfiles lets us define an unlimited set of profiles and name them accordingly. Here are the profiles I set in my phone.


MyProfiles provides 40 over icons for us to choose and associate to the profiles we set, which is pretty sufficient.

For each of the profiles, we can define the settings of:
  • Sound volume for ring tone, media, alarm, notification, in-call and system
  • Sound effect / music for ring tone, alarm and notification
  • Vibration
  • SMS notification handling
  • Auto answering
  • Auto speaker on
  • Screen display timeout
  • Auto lock timeout
  • Airplane mode
  • WiFi
  • Bluetooth
  • Mobile network
  • Auto Sync
  • WiFi hotspot
  • GPS
  • WiMAX
  • Mobile data connectivity
  • Display brightness
  • Screen auto-rotate
  • ... and more
After the Profiles is setup, they can be switched into until the next toggle, or switched temporary for a period of time, then fall back to the settings before the switch.

The temporary mode will be handy in situation such as: we know a movie will be ended in 2 hours time, so we set our phone to be in Silent Mode for 2 hours and let it auto-revert back to its previous state.

We can also schedule for a certain profile to be triggered during certain time period.


Currently, MyProfiles still lack of features such as location based auto profile switching, car motion (> 20 km/h) auto profile switching, battery state profile switching, cable connection (and/or charging state) profile switching, etc.

MyProfiles development is pretty dynamic, with new release coming out at least once every week. Fancy01 is also very responsive to emails sent to them.

MyProfiles comes in 2 versions, the free MyProfiles Lite and the paid MyProfiles. Its price at US$1.49 (increased from US$0.99 since 28 April 2011) isn't expensive and very affordable.

If you own an Android phone and haven't found a suitable profile management app yet, or you find your current profile management app too difficult or tedious to use, I recommend MyProfiles to you.

Sunday, June 12, 2011

Battery consumption between GSM (2G) mode and WCDMA (3G) mode

I notice that the battery life of my phone can last longer when it is in GSM (2G) mode than WCDMA (3G) mode.

Here is a simple observation of its battery consumption pattern. I switched it to GSM mode (Settings > Wireless & networks > Mobile networks > Network Mode > GSM only) during day time, and switched it to WCDMA mode (Settings > Wireless & networks > Mobile networks > Network Mode > WCDMA only) before I slept, and switched it back to GSM mode again the next day. Along the whole period, there is no phone call.

Here is the battery consumption pattern I get:


and here is the same graph shown in landscape view:


It is very obvious that when the phone is on WCDMA mode, its battery consumed faster.

This is an HTC Incredible S upgraded to Gingerbread Android (version 2.3.3). I do notice that when it is in GSM mode, the signal is pretty stable (I can always get a full bar), and when it is in WCDMA mode, the signal is not that stable (there are frequent occasions of losing one bar or two bars). Probably the stability of the signal is one of the major factor in battery consumption.

Anyhow, it is a known fact that the phone will consume less battery when it is in GSM mode rather than WCDMA mode, and it is among the tweaking of battery saving apps such as Juice Defender.

App: Yahoo! Mail for Android is a battery sucker

Yahoo! Mail for Android is an app developed by Yahoo! Inc. to access Yahoo! Mail accounts directly from the smart phone.


There are quite some feedbacks in Android Market complaining that this app is slow, but I didn't experience any obvious slowness in my HTC Incredible S.

Despite that, I've uninstalled Yahoo! Mail because it consumed too much battery, and I couldn't find any setting to fine tune its battery consumption, such as controlling its sync behaviour.

Before I installed Yahoo! Mail, my phone will consume about 7% of battery at night during my sleep. After installed Yahoo! Mail, I noticed the battery consumption had gone to 14%, doubling up the original, and after I uninstalled it, the battery consumption now gone back to 7% during sleep again.

Looks like Yahoo! need to pay more attention to their QA before releasing the app.

Thursday, June 9, 2011

Solution for Samsung Galaxy Tab unable to turn on problem

If you own a Samsung Galaxy Tab, have you ever encountered the problem of unable to turn it on after you off or reboot it?

The symptom could be:

  • You press the Power button. No matter how long you pressed and how many times you pressed it, nothing happen. Your Samsung Galaxy Tab remains dead with a black screen.
  • You press the Power button. It vibrates. But then it is dead again.
  • You press the Power button while charging. It shows the battery charging icon for a while, then it is dead again. 
  • You press the Power button. It freezes during boot up.
If you encounter this kind of problem, don't give up yet! Try this:

Touch any part of the screen with one finger, at the same time press the Power button. Wait for a while (and pray - might take up to 2 minutes). Your Samsung Galaxy Tab might come back to life again.

Sunday, June 5, 2011

HTC Android 2.3.3 (Gingerbread) built-in battery reading graph

There are several 3rd party battery metering apps which can draw graph based on battery reading, but if you have recently updated your HTC smartphone to Android 2.3.3 (Gingerbread), your phone actually has a pretty nice built-in battery reading graph within the system. This feature is found in Gingerbread version of HTC Incredible S, HTC Desire HD, etc.

Go to Settings > About phone >Battery > Battery use and you'll see the screen similar to as below.


Note that on top of the screen is a slanting slope with information telling you how much time your phone is on battery since last charged. In fact, that slanting slope is your phone's battery reading graph. Right below the graph you will be able to see some blue marks. Don't worry, they are not screen display problem, but are actually indicators when battery is used by phone activities. If you charged your phone, you will also see green bar plotting the battery charging period.

Tap on it and you will get a clearer graph. The blue battery usage marks are further break down to the respective activity.


If you turn your phone to landscape orientation, this screen will also adjust itself to landscape view.


I think, with this nice battery plotting feature, you don't need to use any 3rd party battery metering apps anymore.

Friday, June 3, 2011

App: Keep an eye on apps that access your private data with Lookout Privacy Advisor

There are quite a number of private data stored in our smartphone, including our identity, contact details, location tracks, address book details, phone call logs, SMS messages, etc.

Do you want to keep an eye on the apps installed in your Android smartphone, to know what kind of private data they are able to access? In fact, these apps get access to our private data because we allowed them so during installation.

Anyhow, we don't want the apps to access our private data unless really needed. For example, SMS application such as Handcent need to access our mobile number, address book and SMS messages in order for it to function, but it should not access our location tracks unnecessarily.

Lookout Mobile Security (Premium Edition) for Android has a handy tools called Privacy Advisor that can scan through all the installed apps in our phone and provide us the insight of what kind of private data they are able to access.


After the scan, Privacy Advisor  will report how many apps has access to our Track Location, Identity Info, Messages and Contacts respectively.


It will list out all the apps with such private data access, and provide detail explanation of the findings.


If we click the "App Info & Options" button, it will go to the phone's application management function, which we have the option to uninstall the app if we want.

I find this feature pretty useful, but it is not available in the free version of Lookout Mobile Security.

Thursday, June 2, 2011

App: NetQin Android Booster aka Mobile Guard

If you are using an Android phone, I would like to introduce you NetQin Android Booster (a.k.a. Mobile Guard), which is a utility that can automatically free up memory, monitor network and power usage, prolong battery time, etc. This is an ads supported free app, which you can find in the Android Market.

If you are using S60 Symbian phone, there is also a Symbian version of NetQin Mobile Guard, but there are lots of different from this Android version.

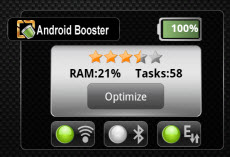
Android Booster comes with a handy widget. With it, you can watch the battery level in percentage, quickly toggle the WiFi, Bluetooth and Mobile Data Network. There is also a one button quick optimizer to clean up running apps and free up memory and save some battery usage.


Although the new Android 2.3.3 (Gingerbread) in HTC Incredible S already has a quick setting page to toggle the WiFi, Bluetooth, Mobile Network, etc., it still involves a few steps to reach there, and I find Android Booster really handy for switching these connections on/off. Samsung Galaxy Tab also has handy WiFi and Bluetooth toggle by pulling down its Notifications, but lack of Mobile Network toggle.

Tap on "Android Booster" will open up the app itself, and tap on the battery will bring you direct to the Battery Consumption Tracker screen of the app.

When you open up the app, you will be shown the Overview screen, which displays the memory usage, mobile data network usage and battery remaining. The same "optimize" button as in the widget is also found here.


The Utilities screen lists down all the functionalities of Android Booster.


Task Manager lists out the running apps and their memory usage, and you can kill them here if you want. This is similar to the famous Advanced Task Killer apps. So with Android Booster, you don't need another Task Killer apps anymore.


Network Manager displays your data plan consumption and WiFi usage, which you can counter check with 3G Watchdog Pro. This is not as comprehensive as 3G Watchdog Pro, but will give you basic information about your network bandwidth usage.


Power Manager (a.k.a. Battery Consumption Tracker) will tell you what is the item that consume the battery most.


If you tap on Applications, it will further tell you which app consume the battery most.


Application Manager enables you to see the listing of installed system apps and 3rd party apps. Tap on the app and you'll be able to run it, show its detail info, and even uninstall it if it is a 3rd party app.


File Manager lets you access the file system of your memory card. You can view the folders and files, and perform functions such as delete, rename, copy, move, share, create new folder, etc.


Call / SMS Manager is another app by NetQin which can block unwanted calls and/or SMS, and also hide out secret SMS and/or call logs.

Location Privacy Manager teaches you how to switch off the option to disable Google from collecting location data from your phone.

As you can see, Android Booster is feature rich, and it is free (but you will see Ads bar at the bottom).

Tuesday, May 31, 2011

The dual-core HTC Sensation to debut in Malaysia on 1 June 2011

There is news from Cubic Platforms that the dual-core HTC Sensation smartphone will be made available to Malaysia from 1 June 2011.


The HTC Sensation put emphasis on its multimedia capability, plays video and music with SRS virtual surround sound, and able to record full HD video with stereo sound. Its official retail price is RM2,299, slightly higher than the HTC Desire HD.

Specification:
  • 4.3-inch Super LCD with qHD (540 x 960) resolution
  • 1.2GHz dual-core Qualcomm MSM 8260 Snapdragon processor
  • Adreno 220 GPU
  • Android 2.3 (Gingerbread) OS
  • HTC Sense v3.0 UI
  • 1 GB internal storage, 768 MB RAM
  • 8 MP main camera with dual-LED flash
  • VGA front camera
  • Bluetooth v3.0 with A2DP
  • Comes with 8 GB microSD card
  • 1520 mAh Li-ion battery
You may be able to see it at Cubic Platforms, Sunway Giza, Kota Damansara.

Thursday, May 26, 2011

Updating HTC Incredible S from Android 2.2.1 (Froyo) to Android 2.3.3 (Gingerbread)

The OTA (Over-The-Air) Android 2.3.3 (Gingerbread) of HTC Incredible S smartphone has been made available to Malaysia today (26 May 2011) morning.

You can manually check for the update now, or wait for the automated update alert appear on your HTC Incredible S smartphone sooner or later.

Although this update will not cause any data or setting lost to your smartphone, it is always a wise choice to perform a backup using tools such as MyBackup (or the paid MyBackupPro) or Titanium Backup (or the paid Titanium Backup Pro) prior to the update, just in case...

Before the update, my HTC Incredible S is running on Android 2.2.1 (Froyo) software number 1.38.707.1.


After the update, it is now running on Android 2.3.3 (Gingerbread) software number 2.12.707.5 with HTC Sense 2.1 (sadly, not the newer 3.0 yet).


Manual update is pretty easy. Just go to Settings > About phone > Software updates and click on the "Check now" button. You should be able to get the update notification as below.


After the download, you'll come to a confirmation screen to apply the update to your phone.

If you answer OK to Install now, your phone will be rebooted and the update process will begin. It takes a while to complete. Then the phone will reboot again, and your phone is now powered with Android Gingerbread!

Sunday, May 22, 2011

Download and read the complete HTC Incredible S User Guide

HTC Incredible S comes with a small printed Quick Guide, which is definitely not sufficient enough for new Android smartphone user to learn about the phone features and get the best of them.

Well, the complete HTC Incredible S User Guide of 214 pages does exist, and you can freely download it from the Internet.


This comprehensive user guide covers all the content in the Quick Guide, plus many more, including:
  • Basics
  • Getting started
  • Personalizing
  • Phone calls
  • People
  • Keyboard
  • Messages
  • Accounts and sync
  • Social
  • Email
  • Calendar
  • Clock and weather
  • Internet connections
  • Web browser
  • Bluetooth
  • Camera
  • Photos, videos and music
  • HTCSense.com
  • Maps and location
  • More apps
  • Security
  • Settings
  • Update and reset
  • Trademarks and copyrights
  • Index
Click here to download the complete HTC Incredible S User Guide.

Friday, May 20, 2011

How to check if your HTC smartphone is genuine original (under SiS warranty)

Since SiS Corporation is the sole distributor of HTC smartphones in Malaysia, the HTC phones imported by SiS to Malaysia and under their warranty are generally called "genuine original set". Those imported by other vendors, not going through the official HTC distribution channel, and not under HTC/SiS warranty (probably warranty by the import vendors themselves), are generally called "AP set".

Because there is a price difference between genuine original set and AP set, if you are buying a genuine original set (which is normally more expensive than AP set), you might want to check if your HTC smartphone is really a genuine original set, officially supported and warranty by HTC through SiS.

You might also want to ensure that you are getting a brand new unopened set, instead of otherwise a display set, etc.

Here is the way to check it. A new HTC genuine original set must fulfil all the criteria below:

  • The packaging box should be sealed with SiS sticker (photo as below)

  • The phone's serial no. and IMEI no. should be the same as printed on the box and at the back of the phone (in battery compartment)
  • You can check if the serial no. and IMEI no. is under SiS warranty here
  • Inside the box, there should be 2 stickers with same serial no. and IMEI no. for you to stick on the warranty card
  • All accessories should be sealed in plastic bag, except the battery charger. There should be a cut opening on the battery charger's plastic bag, for SiS to paste the warranty sticker onto the charger
  • Beside the charger, there are also SiS warranty sticker on the phone and on the battery
  • The battery is already inside the phone, but the circuit is blocked with a piece of plastic, which you need to remove in order for the battery to function
  • The battery should be partially charged
  • At the side of the box, you can find a sticker providing instruction about HTC/SiS online product warranty registration (photo as below)

  • At the other side of the box, you can find another sticker about free introductory training provided for the phone
  • If you are getting an HTC Incredible S phone, the free 8GB microSD memory card should be pre-installed in the phone's memory slot
  • You can register the HTC phone for warranty here. Need to scan and upload your receipt of purchase during the registration process

    Thursday, May 12, 2011

    Dynaquest Monthly Digest will stop publishing by August 2011

    I have been subscribing to Dynaquest's Monthly Digest for years, and have been using it to shortlist and analyse my stock picks. It is sad to know that this publication will come to an end.

    Founded by Dr Neoh Soon Kean (梁孙健), Dynaquest has been publishing precious fundamental analysis information of the Malaysian stock market, including the Stock Performance Guide (SPG), the Second Board Guide (SBG, which has ceased publication few years ago), Monthly Digest and the expensive Stockbase.

    Contents of Monthly Digest includes:
    • Summary of marketwide information
    • Ranking of companies by PER & DY
    • Ranking by discount to NAB/Share
    • Ranking by Market Capitalisation
    • Ranking by combination of PER, DY, PX/NAB and ROE
    • Valuation of TSR and warrant
    • Valuation of REITs
    • Dynaquest's selected stocks
    • EMAS index vs Sectoral indices
    • EMAS index vs Major Global indices
    • Entitlements information
    • Summary of updates for the month
    • Financial statistics
    • Weekly price charts
    Although there are a few competitors to this publication, those competitors are yet to close up the gap in getting close to Monthly Digest's comprehensiveness, up-to-date info, detail and usefulness.

    Existing subscribers of Monthly Digest are given 3 options to:
    • Get a refund for remaining subscription paid
    • Continue receiving Financial Statistics part of Monthly Digest in PDF format
    • Convert to Stockbase subscription
    Stockbase is a set of updated KLSE public listed companies' information and fundamentals, selling at a few thousand ringgit per year. This will be too expensive for retail investors.

    Wednesday, May 11, 2011

    Tweaking Ubuntu 11.04 easily with Ubuntu Tweak

    Ubuntu Tweak is an open source tool licensed with GPL v2, designed to make easy to configure your Ubuntu Linux system and desktop settings using its user friendly GUI interface.

    It is developed by Tualatrix Chou (周鼎), a 24 years old Chinese guy who also founded HZLUG (Hangzhou Linux User Group).

    Features of Ubuntu Tweak includes:

    • Display Basic System Information (Distribution, Kernel, CPU, Memory, etc.)
    • GNOME Session Control
    • Auto Start Program Control
    • Quick installer for popular applications
    • Lots of 3rd-party sources to keep applications up-to-date
    • Clean unneeded packages or cache to free disk space
    • Show/Hide and Change Splash screen
    • Show/Hide desktop icons or Mounted Volumes
    • Show/Hide/Rename Computer, Home, Trash or Network icon
    • Tweak Metacity Window Manager's style and behaviour
    • Compiz Fusion settings, Screen Edge Settings, Window Effect Settings, Menu Effect Settings
    • Set the Shortcuts to archive quicker access your favourite applications
    • GNOME Panel Settings
    • Nautilus Settings
    • Advanced Power Management Settings
    • System Security Settings
    • and many more...

    For example, many of us prefer to have the Window Titlebar buttons on the right instead of on the left. You can easily set this with Window Manager Settings in Ubuntu Tweak.

    You can download the DEB installation package of Ubuntu Tweak from its website. To install it after download, just double click on the DEB file.

    After installation, you can find Ubuntu Tweak inside the System category of Applications. Click the Applications launcher on the side bar of Ubuntu 11.04 Unity Desktop, drop down the search selector which default to All Applications and select System. Alternatively, you can search for "Ubuntu Tweak" by key-in its name in the application search box.

    Friday, May 6, 2011

    Deloitte Technology Trends 2011 Report - The natural convergence of business and IT

    Deloitte has released their annual Technology Trends report for 2011, taglined "The natural convergence of business and IT".

    This report examines the ever-evolving landscape of technology put to business use. Although it is written from the perspective of the CIO, it also informs business executives on exciting new possibilities to apply technology to address their most pressing business challenges.

    10 important trends were identified in this report, clustered in 2 categories.

    1. (Re)Emerging Enablers are trends that many CIOs and technology executives have spent time, thought and resources on in the past.

    They are:

    • Visualization
    • "Almost-Enterprise" Applications
    • Cyber Intelligence
    • CIOs as Revolutionaries
    • The End of the "Death of ERP"

    2. Disruptive Deployments are trends that present significant new opportunities to improve business processes, rethink operations or even enter into new business models. The technologies themselves are not necessarily disruptive, but when when deployed, could disrupt the cost, capabilities, or even the core operating model of IT and the business.

    They are:
    • Real Analytics
    • Social Computing
    • User Engagement
    • Applied Mobility
    • Capability Clouds
    Among the list, the convergence of Social and Mobile computing plays significantly.

    Click here to download the 68 pages Deloitte Technology Trends 2011 Report.

    Monday, May 2, 2011

    How to switch from the new Ubuntu 11.04 Unity Desktop to the classic GNOME Desktop

    The newly released Ubuntu Linux 11.04 has a new default Unity Desktop interface, which brings different experience from the classic GNOME Desktop in all its previous releases which you are already familiar with.

    If you dislike this new Unity Desktop for whatever reason, here is the easy way for you to revert back to the Ubuntu classic desktop.

    When you are at the Ubuntu login screen, click on the user to login, and you will be able to see the taskbar at the bottom of the screen as shown below. One of the item on the taskbar is the session selector.


    Change the session from the default "Ubuntu" to "Ubuntu Classic" and proceed with the login, your desktop will now changed from the new Unity Desktop to the traditional Ubuntu GNOME Desktop. You just need to apply this setting once, and it will be the default for all subsequence login.

    If your Ubuntu is set to automatically login the default user, you can get to the login screen by logout the user.

    Ubuntu Linux 11.04 (Natty Narwhal) released

    Ubuntu Linux 11.04 (Natty Narwhal) has just released on 28 April 2011.

    This version brings some new experience to the user.

    The installation process involves less number of step.


    Its default desktop interface is a new Unity Desktop instead of the traditional GNOME Desktop. The experience is now more Macintosh alike. You can notice the sidebar on its left, which doesn't found in previous version of Ubuntu. It took me a while to figure out where to access to my favourite applications in this new desktop.


    The default office productivity suite has also shifted from OpenOffice.org to LibreOffice.

    If you want to revert from the new Ubuntu Unity Desktop to the traditional Ubuntu GNOME Desktop, click here to find out the easy method to do so.

    Sunday, April 24, 2011

    Cooling Unifi Broadband Termination Unit (BTU) using Vztec NC2165 notebook cooler

    The black Huawei brand Unifi Broadband Termination Unit (BTU) has a metal casing. This BTU is supposed to work 24x7, and when you touch on its metal surface, you will feel some heat.

    I use a Vztec NC2165 notebook cooler as its cooling solution. After installed, when you touch the BTU metal surface again, you will feel it is cool.


    This Vztec NC2165 is USB powered. You can find one USB port in front of the Dlink DIR-615 Unifi Residential Gateway (RG), which can be a good choice for its power source. Alternatively, you can use any available USB port as its power source.

    There are many USB powered notebook cooler in the market, most are just too big for this Unifi BTU, and their fan(s) might not match with the place of the BTU ventilation holes on top. As you can see in the picture, this Vztec NC2165 just suit perfectly, and it cost only RM15.

    If you are also using Unifi HSBB, I recommend this inexpensive BTU cooling solution for you.

    Saturday, April 23, 2011

    Cleaning camera lens with LensPen miniPro II

    How do you normally clean the dirt, dust, grease, fingerprint, etc. on the camera lens of your digital camera and/or handphone? Using special cleaning fluid? Using brush? Wiping with microfibre? Wiping with cloth? Wiping with tissue paper? Wiping with your shirt? Never clean and let it be?

    Regardless how you do the cleaning, I believe the bottom line is:

    • The glass surface, as well as other parts of the device, won't be hurt or scratched
    • The cleaning must be effective
    I use a Canadian product called LensPen miniPro II to clean the camera lens of my digital camera as well as my handphone. It is very effective and inexpensive (selling at RM23 only).


    LensPen miniPro II contains 2 cleaning parts. At one end, there is a retractable ultra fine brush to brush away dust and other particles deposited on the lens. At the other end, it has a special cleaning tip to wipe the lens. It is claimed that this special tip can do more than 500 times cleaning.

    LensPen miniPro II has a compact size, easy to carry around or put in the camera bag. Its cleaning tip is small enough to be used for compact digital camera and the handphone camera lens. There are also LensPen products with larger cleaning tip for bigger DSLR lens. There is also LensPen MicroPro to clean even smaller lens surface.

    To let you have a better picture of its length and size, here is my LensPen miniPro II putting together with my Canon PowerShot S95 digital camera.

    Friday, April 22, 2011

    Luminance histogram and RGB histograms in digital camera

    One of the nice features in digital camera that cannot be found in traditional camera is the ability to display histogram.

    Histogram shows the distribution of brightness in an image horizontally, and the amount of brightness vertically. A typical histogram looks like mountain as below. It is a handy tool to evaluate the exposure.


    If you see the peaks are gathered on the left, the image is dark; and if you see the peaks are gathered on the right, the image is bright.

    In normal situation, we would like the peaks to be in the middle, so that there is no under-exposure (too dark) or over-exposure (too bright). However, there are situations when dark is OK (e.g. shooting the Earth Hour scene) and there are situations when bright is OK too. Anyhow, you can make use of histogram to assist you in adjusting the exposure value of your picture.

    Canon PowerShot S95 camera is able to show histogram in Shooting Modes and Playbank Modes. Histogram is not available in Auto modes (you won't need it, as the camera is taking care of the exposure adjustment for you), and is available for P, Tv, Av, M modes.

    Canon PowerShot S95 has two customizable shooting displays, and the default setting for each of the shooting modes is different. You can use the Custom Display setting to turn histogram on or off for either one or both of the shooting displays. You can switch between the custom displays using the DISP. button.

    Histogram can also be shown in Playback screen of Canon PowerShot S95. You need to switch to the Detailed Information Display playback screen in order to see the histogram of the picture. You can rotate among the available playback screens by pressing the DISP. button. You can set the default playback mode with the Review Info option.
    Canon PowerShot S95 is able to display the RGB histograms of the picture in Detailed Information Display screen. You can toggle RGB histograms on and off by pressing the "Up" button when you are in Detailed Information Display.


    The RGB histograms show individual graph for each of the Red, Green and Blue colour captured by the camera in the picture. This will be good piece of information to judge the colour and white balance of the picture.

    Tuesday, April 19, 2011

    Shooting modes of Canon PowerShot S95 - from fully automatic to fully manual (part 2 of 2)

    In the 1st part of this article, I wrote about the shooting modes of Canon PowerShot S95 digital camera when you dial its mode dial clockwise from Auto (inclusive). Now I would like to share about what I learnt about the shooting modes of this camera when you dial anticlockwise from Auto.


    P-mode (Program mode)

    P-mode is very close to Auto mode as opposed to Manual mode, in the sense that the camera will automatically adjust the aperture and shutter speed for you. One of the major reason for using P-mode (and above) is the ability to save the picture in RAW format for post processing.

    In P-mode, you can decide on the image brightness/darkness by controling the ISO level. You can also make correction to the white balance.

    Normally, we like to keep the ISO level as low as possible to produce better quality photographs. That's why we want to take control over ISO level adjustment rather than using Auto-ISO.

    ISO level controls the light sensitivity of the camera's image sensor. If the ISO level is too low, you might get camera shake (blur) in the photos. If the ISO level is too high, you will get a lot of digital noise (grains).

    Canon PowerShot S95 supports ISO levels from 80 until 3200.

    P-mode is handy when quick adjustment is needed to shoot the precious moment that won't wait.


    TV-mode (Time Value, Shutter Priority mode)

    TV-mode allows us to control the shutter speed, which determine how long the camera's image sensor is exposed to light.

    You can use longer shutter speed to capture trailing motion effect, and shorter shutter speed to freeze the moving objects.

    Canon PowerShot S95 supports shutter speed as fast as 1/1600 second and as slow as 15 seconds. You need TV-mode to set for slower shutter speed less than 1 second.


    AV-mode (Apperture Value, Apperture Prioirty mode)

    The aperture controls the depth of field of the photo.

    Wider aperture enable you to produce photos of shallower depth of field, with clear focus object and blur out its background. Smaller aperture creates deeper image, with more sharpness across the whole picture.

    AV-mode is best when shooting macro (close up) photography with wide aperture. It is also suitable to shoot for landscapes and sceneries with small aperture.

    Canon PowerShot S95 supports apperture value from f/2.0 to f/8.0. The smaller the f-number, the larger will be the aperture. One of the selling point of S95 is its f/2.0 capability.


    M-mode (Manual mode)

    This is the fully manual mode for the professionals. In Manual mode, you take full control to adjust the aperture (rotate the front dial) and shutter speed (rotate the control dial). You can also decide on the ISO level.

    As opposed to the P-Mode, the exposure reading is displayed on the LCD screen, and change accordingly when you adjust your aperture and shutter speed.


    C-mode (Custom mode)

    This is a place for you to instantly get back your favourite settings. You can make the adjustments and settings to the camera, then save them by using the "Save Settings" menu options. When you come to C-mode, you'll get back the settings and adjustments.

    Shooting modes of Canon PowerShot S95 - from fully automatic to fully manual (part 1 of 2)

    Canon PowerShot S95 is my first high end digital camera. Before this, I use a Kodak EasyShare LS743 point-and-shoot digital camera which doesn't have so much features (it is my 1st digital camera purchased in 2004 and is 7 years old now).

    So, what I'm going to write down here is something new I just learnt in order to know how to use my PowerShot S95. If you are also a rookie photographer like me, probably this information might be useful to you too.

    You can find the Canon PowerShot S95 camera's shooting mode dial on its top right. This is the dial to control among fully automatic, semi-automatic, and fully manual modes of photographing. It is also the place to switch between photographing and video-graphing.


    AUTO mode

    This is the fully automatic point-and-shoot mode to let the camera decide and adjust itself on almost everything to get a good quality picture (in the camera's A.I. points of view), and you cannot take control most of the settings in this mode. In Auto mode, your main concern is the focus (or focuses) of the image. Canon PowerShot S95 supports 9-point face detection AiAF, and also 1-point AF at the center.

    This is a good mode to start with, before you familiar with the camera features and functions. You can straightaway start shooting photos with this mode right after you get it, even without reading its manual or knowing its controls and settings.

    It seems that you can only save the photo in JPEG and cannot save it in RAW mode. Photo saved in RAW mode allows you to do post processing using Canon Digital Photo Professional software provided in the CD that bundled in the box with the camera.

    Photo saved in JPEG image is 8-bit image and RAW mode is 14-bit image. This means more colour information is saved in RAW mode.

    Low light (Candle) mode

    This is a point-and-shoot mode used to take photos in dim environment. The camera will automatically use a wider aperture and higher ISO level for the picture. (Normally, we should use ISO level as low as possible to reduce noise in the picture)

    It is ideal to capture dark situations, especially when you don't want to use the flash light. Example will be birthday cake with lighted candles in a dark indoor.

    Scene (SCN) mode

    This is a point-and-shoot mode to tell the camera to optimize itself specific to the subject you want to shoot. Sometimes, the camera Auto mode has no idea what type of subject you are photographing, and you can get better pictures using SCN mode instead of Auto.

    The modes available for Canon PowerShot S95 are: portrait (shooting people), landscape (shooting scenery), kids & pets (capture the moment while they are moving around), beach (people in bright surrounding), underwater (aquatic life, with higher ISO shot), foliage (trees and leaves), snow (people in white snowy background), and fireworks (higher ISO shot).

    Besides that, you can also make special effect to your photos in SCN mode. The effects available for Canon PowerShot S95 are: Super Vivid, Poster Effect, Sepia, Black/White, Color Accent, Color Swap, High Dynamic Range, Miniature, Fish-eye, and Nostalgic.

    In addition, you can produce panoramic (long) photos using software, by merging the continuous shot of Stitch Assist pictures.

    Video mode

    One of the nice features of Canon PowerShot S95 is its capability to shoot 720p HD video.
    There are 3 picture quality options for video shooting in this camera:
    • 1280x720, 24 frames/second (fps). You'll probably need a Class 4 or higher SDHC Card to get a smoother movie with this setting.
    • 640x480, 30 fps
    • 320x240, 30 fps
    Special effects available for Canon PowerShot S95 video shooting are Miniature Effect, Color Accent, and Color Swap.

    ... continue reading on Part 2

    Saturday, April 16, 2011

    Good deal to buy Canon PowerShot S95 premium compact camera @ PIKOM PC Fair 2011

    I have been eyeing for Canon PowerShot S95 premium compact digital camera since its launch. This is a good camera close to DSLR quality and standard with an easy-to-carry light-weight compact body. The camera is made in Japan (not made in China) and its official list price is RM1549.

    This Canon PowerShot S95 camera received a lot of good comments and recommendations in the Internet. You can use it as a point-and-shoot in its fully automated mode, and there are also many manual controls for you to play around as if using a DSLR. If you don't play around with lenses (which will probably burn a hole in your pocket), perhaps S95 is good enough for you to take some good pictures.

    Today I found a good deal in PIKOM PC Fair 2011 at KL Convention Centre, and finally bought it at the price of RM1299 using credit card. There are several exhibition booths selling this Canon PowerShot S95 camera, all selling at the price of RM1399 with different free gift goodies, and I only found one willing to sell at RM1299. The booth is located at Exhibition Hall 4.

    Here is what I get at the cost of RM1299 (using credit card).

    • Canon PowerShot S95 digital camera with all standard accessories in its box (made in Japan and with Canon Genuine DNA sticker)
    • 1+1 years warranty
    • Canon screen protector
    • Canon camera's protective case for PowerShot series
    • Toshiba 8GB SDHC memory card (5 years warranty)
    • Canon digital alarm clock and MP3 player
    • No-brand 170mm small tripod
    • Fahrenheit (飞轮海) concert 2DVD pack
    • Fahrenheit (飞轮海) recycle bag
    Actually, the following are standard goodies that all Canon booths in PIKOM PC Fair 2011 will give. The rest need to bargain to get.
    • 1+1 years warranty
    • 8GB SDHC memory card
    • Canon digital alarm clock and MP3 player
    • Fahrenheit (飞轮海) concert 2DVD pack
    • Fahrenheit (飞轮海) recycle bag
    Forseeing that the recent earthquakes in Japan will probably affect its production and supply, I think the PIKOM PC Fair now is a good time to still get a good deal to buy made in Japan product(s) like this one.

    Friday, April 8, 2011

    Use Unifi HyppTV to preview new and upcoming cinema movie trailers

    With Unifi HyppTV, now it is very easy for us to know the new and upcoming movies coming soon or currently on screen in local cinemas. We can even instantly and freely preview the movie trailers.

    Cinema Movie Trailers is the first option inside the Unifi HyppTV iNTER@CTIVE menu.


    It will list down the new and upcoming movies to be on screen in local cinemas, and also allows us to preview those movies' trailer.


    Nice feature isn't it? I wonder why Astro doesn't have such feature, although TGV and GSC are both under the same group with Astro.

    Sunday, April 3, 2011

    Checking the HSDPA/3G/EDGE/GPRS coverage area of Celcom, Digi & Maxis

    Before you sign up for a new data plan with either Celcom, Digi or Maxis, I think it is wise for you to check up their HSDPA broadband coverage availability in your favourite areas. Otherwise, you might regret to later find out your frequent visit area only has low speed GPRS coverage.

    All Celcom, Digi and Maxis provide a "coverage map" for you to check for their broadband data service coverage easily. Celcom and Digi provide a more detail and precise map, while Maxis map is not so detail.

    The URLs to check for their HSDPA/3G/EDGE/GPRS coverage online are:

    Below are their HSDPA broadband coverage around SS2 area.

    Celcom:

    Digi:

    Maxis:

    Three of them also let you search for the coverage area using location keywords. The  keyword search webpage of Celcom and Digi is the same URL as above, while the keyword search webpage of Maxis is http://www.maxis.com.my/3G/coverage_search.asp.

    Hint: Click on the "Older Posts" link to continue reading, or click here for a listing of all my past 3 months articles.