Wednesday, April 29, 2020

My Tx8 3.5mm AUX to Bluetooth 5.0 converter for audio transmitting / receiving

My Ruizu X02 MP3 player is without Bluetooth output function, and I think it would be good to add Bluetooth function to it, so that it can output audio to wireless earbuds, Bluetooth speaker, soundbar, etc.

There are cheap AUX to Bluetooth converters available, some even priced below RM20. Based on their product description and customer review, the follow shortcomings are quite common to them:

  • Single function of either Bluetooth receiving or transmitting only.
  • Poor and short distance connection.
  • Sound is lagging behind due to low transmission rate.
  • Battery only works for short hours before recharging needed.
  • Product quality not so good with high faulty rate after some times of use.
Anyhow, I managed to find this Tx8 2-in-1 Bluetooth transmitter and receiver, at the cost of below RM30, with the following features:
  • Supports Bluetooth 5.0 for better audio data transmission quality.
  • Can work for 8-12 hours before battery recharge is needed.
  • Transmission distance exceeding 33 feet.
  • Able to remember the paired devices.

It is very compact in size, easy to carry along. It even has a fixed folder design. It comes with USB charging cable, AUX cable, RCA cable, and a user manual.


I have purposely put my Logitech M590 mouse beside to give a better idea about its size.

By connecting the Tx8 with cable to the audio output of MP3 player, computer, handphone, tablet, TV, and any other devices with AUX audio output port, the Tx8 can transmit the audio wirelessly through Bluetooth connection to wireless earbuds, speaker, sound bar, Hi-Fi system, car audio system, etc.

On the other hand, by connecting the Tx8 with cable to the audio input of a speaker, radio, sound bar, and any other audio devices with AUX or RCA input, the Tx8 can receive the audio wirelessly through Bluetooth connection from handphone, tablet, computer, TV, media player, smart watch, etc.

The Bluetooth pairing is pretty fast, and the connection is pretty stable.

If you are looking for similar gadget with an affordable price, you can consider this one.

Saturday, April 18, 2020

Raspberry Pi - fully working computer at the cost of RM300++ (best for home use during and beyond MCO period)

During current Movement Control Order (MCO) period, there are quite a lot of schools have resorted into online teaching and learning mechanism. There are also quite a lot of companies practicing work-from-home (WFH) concept.

However, this raised a question: what if the family does not have a computer at home? And, what if the family only has one computer at home, but needs to be shared by parents who need to WFH and also multiple children who need to learn from home?

Well, you can buy a fully working computer online, including additional computers needed for all your family members, at the cost of RM300++ each, in the condition that you have a screen (either computer monitor or TV) at home, and Internet access (either phone's hotspot sharing or broadband Internet).

The full set Raspberry Pi (recommended for Version 4 model B with 2GB RAM) with all its required accessories, is a fully working computer at the cost of about RM300-RM360 only. Beside its low cost, it also consumes minimal amount of electricity and requires minimal storage space due to its small size.


It is good enough for normal online learning, doing assignments with office suite (word processor, spreadsheet, presentation slides, database, etc.), and some entertainment including games.

With about RM360, you can buy the following full set of computer:
  • Raspberry Pi 4 Model B with Quad core CPU and 2GB RAM - RM174
  • Casing for the Raspberry Pi 4 Model B - RM25  (*1)
  • Official Raspberry 15W power adapter - RM35
  • Micro-HDMI to HDMI cable - RM10
  • Wired earphone - RM15 (*2)
  • 16GB micro SD card preinstalled with NOOBS - RM36 (*3)
  • Logitech MK220 wireless keyboard & mouse - RM65 (*4)

*1: The casing is an optional item. Without the casing, the Raspberry Pi will be a naked computer board as shown in the image above. With the casing, it will look like below:

*2: If you connect the Raspberry Pi to your TV using HDMI cable, you can make use of the audio output from your TV. You need an earphone or speaker, either wired or Bluetooth, to listen to the audio from Raspberry Pi if you are using a monitor without audio output.

*3: Raspberry Pi makes use of micro SD card as its "harddisk". You can also buy a blank micro SD card, which is much cheaper, and download NOOBS for free from Raspberry's website. That will require some basic computer knowledge to download and install NOOBS into the micro SD card. NOOBS is an installer that will prepare the SD card for Raspbian (including partitioning, etc.), and automatically download and install the operating system into it.

*4: Alternatively, you can also use cheaper USB wired keyboard & mouse to further reduce the cost.

The recommended operating system will be Raspbian, a scaled down version of Debian Linux. It has fully functioning Chromium or Vivaldi web browser, LibreOffice resembling the Microsoft Office, and tonnes of installable free softwares in Raspbian repository. This is good enough to access to Google suite of applications (Gmail, Google Drive, Google Docs, Hangout, ...), watch online & offline video, listen to online & offline music, access to learning portal and other websites, attending audio/video conferencing, etc.

There are also programming tools and graphic design software available in Raspbian for learning purpose.

In fact, you can install a full LAMP stack in Raspbian and turn your Raspberry Pi into a web application server as well.

The Raspberry Pi 4 Model B also supports webcam and voice input with additional module, which will need additional cost to buy and some technical skill to assemble.

Beside Raspbian, there are other choices of operating system that works with Raspberry Pi too, including Microsoft Windows 10 IoT Edition, which you can explore if you are enthusiastic with them.

Thursday, April 16, 2020

Huawei Watch blood oxygen saturation (SpO2) measuring feature

Blood oxygen saturation (SpO2) is a feature in the latest Huawei and Honor smart watches.

Image from Huawei's website

This feature is available in the Huawei Watch GT2 sold in China, but had somehow been disabled in that model sold in the international market. Anyhow, this feature has now been enabled to Huawei Watch GT2 sold outside China as well, following its firmware update version 1.0.6.26 and above (latest firmware version as of now should be 1.0.6.32).


SpO2 represents an estimation of oxygen levels in a person’s bloodstream. According to description in Huawei's website, "blood oxygen saturation (SpO2) is one of the important vital signs that can reflect the oxygen supply of the body. Very low levels of SpO2 can result in serious symptoms such as lack of energy, fatigue and light-headedness."

Under normal conditions, a healthy person should have an SpO2 level between 90 and 100.

The heart of an average adult normally pumps about 5,000 ml of blood per minute to the tissues and organs of the body, delivering about 1,000 ml of oxygen per minute to the body. Body function will be affected if the oxygen is at low level, causing hypoxemia and even hypoxia problem.

There are 2 types of hypoxemia. Acute hypoxemia occurs over a relatively short period of time, while chronic hypoxemia is ongoing over a longer period.

Common symptoms of acute hypoxemia include: shortness of breath, rapid breathing, wheezing, cough, confusion, headache, fast heart rate, and bluish colour in skin, fingernails and/or lips.

Common symptoms of chronic hypoxemia include: pulmonary hypertension, cor pulmonale (enlargement of right-side of the heart), heart failure, and polycythemia.

People who are having a higher risk of hypoxemia should regularly check their SpO2 level. You are one of them if you are:
  • always on a busy work schedule
  • working or living in a stressful environment
  • working in a situation that needs to use a lot of brain everyday
  • located in a place of high-altitude (with low atmospheric pressure)
  • elderly people (with decreased body function)
  • snoring a lot or having sleep apnea problem (might cause respiratory obstruction)
  • having heart defects
  • having lung conditions, including asthma, emphysema, bronchitis, corona virus infection, etc.
Huawei SpO2 sensor technology makes it easy to measure SpO2 level, anytime, at any place. Clinically, SpO2 level is measured using arterial blood gas (ABG) test, pulse oximeter, etc.

To measure SpO2 with a Huawei / Honor watch or band that supports the feature, just keep your arm still, fasten the strap tightly, and make sure the screen is facing up. Then, swipe on the screen for the SpO2 function, and start your measurement. It will take about 1 minute to complete.

Sunday, April 12, 2020

Using Android phone's camera as webcam for computer with DroidCam

You need a webcam in order to do video conferencing, or to do vlogging, or to perform online talks, ...

You might have a desktop computer with a monitor that without a camera (which is usually the case), or you need a better camera than the one on your laptop (which usually has a low resolution), or you need a replacement for your malfunctioned laptop camera, or for whatever reason that you need a webcam for your computer, wait a minute and read this before you go and purchase a physical webcam, because you can turn your Android phone into one.

DroidCam is a solution to let you make use of the camera on your Android phone to become the webcam of your computer running on either Windows or Linux operating system.

It has a pretty low hardware requirement, so you can easily turn your old Android phone with a functioning camera into your webcam. Of course, it is even better when you run it on Android phone with better specs.

All you need to do is download and install DroidCam Wireless Webcam by Dev47Apps from Google Play Store, and then download and install DroidCam client into your computer.

Beside video, DroidCam is also able to optionally stream audio from the microphone of your phone to your computer.

DroidCam can connect and stream to your computer either through WiFi, USB or HTTPS connection. WiFi is the preferred one, as it is the easiest to setup and use.

When you run the DroidCam app in your phone, you should be able to see its connection information, including the internal IP address of your handphone, and the DroidCam server port.


By default, DroidCam is using the back camera of your phone (which usually has a better spec than the front camera). You can switch it to the front camera in DroidCam setting.


If you run the DroidCam Client in your computer with the IP address and port number as shown on the DroidCam app in your phone, and click the Start button, you should be able to see the video captured by your phone's camera in DroidCam Client.

For example, before clicking the Start button in DroidCam Client, there is no webcam video shown in Skype. It will show a blue or green background.


After clicking the Start button, Skype will immediately captures the webcam video.


Note that Skype install through Microsoft Store is not working with DroidCam. If you encounter this problem, just uninstall Skype and install the Skype desktop version from the URL given below. It should work then:
On your DroidCam screen in your phone, you can also find 2 HTTPS links.

The first link is accessible from your web browser such as Google Chrome, and it will open up the DroidCam web client.


The second link is accessible with video streaming client, such as VLC Media Player. The setting for VLC Media Player is as below:


DroidCam has a feature to allow you to protect your HTTPS access with username and/or password.


DroidCam is free for use, with in-app ads support. You can also buy DroidCamX Wireless Webcam Pro in Google Play Store to remove the ads and to get more features.

You might probably also be interested to read about:

Thursday, April 9, 2020

Logitech MK220 wireless keyboard and mouse combo - work well with Raspberry Pi Zero W

The Logitech MK220 is a combo of Logitech wireless keyboard K220 and Logitech wireless mouse M150, both sharing the same USB receiver communicating using 2.4 GHz band with effective connection range of up to 10 meters or 33 feet.


The keyboard is powered by 2 AAA size batteries, while the mouse is powered by 2 AA size batteries. The batteries in the keyboard can last as long as 24 months, while the batteries in the mouse can last for about 6 months.

The keyboard is very compact in size, makes it easy to carry around and also need less space to store. Despite its compact size, it has full size keys of the same size like normal keyboards, except for the first row of function keys which are only half the size of the other keys. This keyboard is pretty quiet. It is also spill resistant.

The mouse is of the same size like other normal mice. It doesn't have fancy features, just 2 buttons and a scroll wheel.

I can't find any power on/off switch on both the keyboard and mouse. I think they are designed to be always on, and will go into standby mode when connection is not made with the USB receiver.

This Logitech MK220 is plug-and-play to Windows, Linux and Android systems. I find this combo pretty ideal to be used as input devices for Raspberry Pi.


It works flawlessly with my Raspberry Pi Zero W, by connecting its USB receiver with a micro-USB to USB converter to the Raspberry Pi's micro-USB port.

Wednesday, April 8, 2020

Managing your SSPN-i account with Bank Islam - including money top-up, withdrawal and transfer (online website & ATM)

Do you know that if you have a savings/current account with Bank Islam (BIMB), you can link your SSPN-i account(s) to your ATM card that linked with your savings/current account, and then you can manage your SSPN-i account from Bank Islam's online banking website and/or ATM machine.

However, you cannot manage your SSPN-i account with Bank Islam's mobile app yet, as the function is not available in the app.

You can apply to link your SSPN-i account with your Bank Islam ATM card either at the teller counter or at the ATM machine.

After successful linkage with SSPN-i, you will be able to see the SSPN-i option in the My Accounts menu.


This function will display your up-to-date SSPN-i information, including:
  • Linked account number
  • Depositor's name
  • Beneficiary's name
  • Beneficiary's IC number
  • Available balance
  • Current balance
You can also see SSPN-i option in the Funds Transfer menu. Note that fund transfer involving SSPN-i will incur a bank service charge of RM0.50 per transaction.


The types of fund transfer you can do online including:
  • From your savings/current account to your SSPN-i account (top-up)
  • From your savings/current account to 3rd party SSPN-i account (top-up others)
  • From your SSPN-i account to your savings/current account (withdrawal)
  • From your SSPN-i account to 3rd party savings/current account (withdrawal to others)
  • From one SSPN-i account to another SSPN-i account (transfer)
 

Similar functions of SSPN-i top-up, withdrawal and transfer can also be done at Bank Islam's ATM machine.

This is a pretty convenient and useful service for you to manage the money in your SSPN-i account(s) by yourself using online method or visiting to the ATM machine, without the need to go for counter service (in the bank, PTPTN office/agent, UTC center, ...)

Friday, April 3, 2020

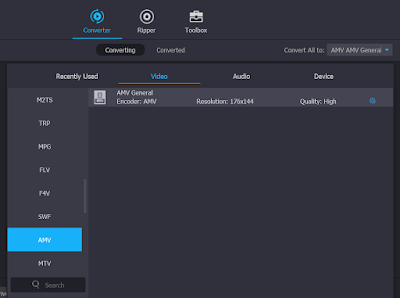
Using Vidmore video converter to convert MP4 / MKV / MOV / WMV / AVI / FLV video to AMV format

AMV is a kind of compressed motion JPEG (M-JPEG) video format, commonly used in MP3 and MP4 players.

For example, the Ruizu X02 MP3 player can only play one type of video file, which is AMV. I would need to convert music video (MV) in the format of either MP4, MKV, MOV, WMV, AVI, FLV, etc. into AMV before my Ruizu X02 MP3 player can play the video without any issue.

There are several websites in the Internet that claimed to be able to online convert uploaded video file into AMV format. There are also several video converting software that claimed to support conversion to AMV format. I have tried some of the popular one, but all of them failed as the AMV file produced by them end-up with "invalid video format" error when I tried to play in my Ruizu X02 MP3 player.

Finally, I managed to find one video conversion software that works, which is Vidmore video converter, and it is surprisingly very easy to use for AMV file conversion.


Vidmore is a freemium software, in which the free version only allows conversion of video of length not more than 5 minutes. This is good enough for music video conversion, because most of the songs are less than 5 minutes long.

Another restriction to the free version is that, you can only convert 1 file at a time. This is also OK for me, as I only need to convert a small amount of MV to put into my Ruizu X02 MP3 player.

To perform the conversion, set the "Convert All to" selection to "AMV AMV General" and leave all the settings as default. Leave the resolution setting to be 170x144.


Then, open the video file one at a time, and click on the Convert All button to perform the conversion.

The output AMV file should be able to be played in the Ruizu X02 MP3 player.

Thursday, April 2, 2020

How to update latest firmware to Ruizu MP3 player

I have mentioned that the default firmware in Ruizu X02 MP3 player is not so user friendly, as its navigation is a little bit weird. For certain function, you need to press its left and right button to navigate up and down on the screen. This has been fixed in its latest version of firmware. The new firmware also brings in additional functions to the Ruizu X02 MP3 player, such as the 3 additional games.

New firmware for Ruizu MP3 players, be it X02 or other model of their range of products, can be downloaded from their official website.

You can click here to reach the Ruizu X02 MP3 player product page, and the click on the Newest Firmware tab to download the latest firmware file.

Alternatively, you can also click here to reach the Manual & Firmware page of Ruizu range of MP3 player products, search for the right model of your MP3 player on the screen, click on its photo, and then select Firmware to download the latest firmware file.


In order to perform the firmware update to your Ruizu MP3 player, you will need a computer installed with the firmware update application called Actions Multimedia Product Tool v2.07 which you can click here to download it. After download, just uncompress the file and install it.

The steps to perform firmware update to Ruizu MP3 player is pretty easy.
  1. Download the latest firmware from Ruizu's website. Make sure the firmware file belongs to the matching model of your MP3 player.
  2. Uncompress the downloaded firmware file in your harddisk.
  3. Connect your Ruizu MP3 player to the computer with a USB data cable.
  4. Launch the Actions Multimedia Product Tool v2.07 application.
  5. The software should show 1 USB Device Detected on its screen. If there are more than one, make sure you select the correct destination, which is your MP3 player.
  6. Load in the uncompressed firmware file.
  7. Uncheck the FLASH_ERASE checkbox. If you didn't do this, the internal storage in your MP3 player will be formatted, and all the files you stored in it will be erased.
  8. Click on the firmware update button to perform the update.
  9. When finished, you can then safely disconnect your MP3 player from your computer.


Hint: Click on the "Older Posts" link to continue reading, or click here for a listing of all my past 3 months articles.