Showing posts with label home idea. Show all posts

Monday, July 24, 2023

My CyberPower CL1000EVR Automatic Voltage Regulator (AVR)

A few months back, when I upgraded my CyberPower UT800EG UPS with APC BV1000I-MSX 1kVA/600W Easy UPS for power protection to my desktop PC and network equipment, I've relocated the old CyberPower UT800EG UPS to my living room to provide power protection for my TV, IPTV box and cordless phone.

Later, I decided to retire the old UPS and to protect my TV, IPTV box and cordless phone with a more proper Automatic Voltage Regulator (AVR).

Advantages of replacing the old CyberPower UT800EG UPS with a CyberPower CL1000EVR AVR:

  • At the cost of below RM100, the CyberPower CL1000EVR AVR is cheaper than the UPS.
  • Generally, AVR has a very long lifespan of easily more than 10 years, while UPS has a much shorter lifespan.
  • The battery in the UPS can only last around 2 years. After that, it would need to be replaced for the UPS to continue function as designed. Faulty battery could also be a potential cause of fire hazard.


As printed on its packaging box, this CyberPower CL1000EVR AVR is able to perform:
  • Output voltage regulation with surge protection and AVR function (prevent overvoltage as well as undervoltage)
  • Overload protection with circuit breaker


It is pretty small in size, about the same as a household UPS. This is how it looks like:


At its back, it has a power switch and 4 universal power outlet sockets.


The seller has attached a flyer of CyberPower range of products in UPS, AVR and surge protector, which I find is pretty useful in providing comparison information among them.


Surge protector power extension could be an even cheaper option, but bear in mind that:

  • Surge protector can only protect overvoltage spikes but not undervoltage.
  • Surge protector cannot regulate the voltage waves.
  • Surge protector normally makes use of varistor to capture the spikes. The varistor itself has a limited lifespan, and it sacrifices itself to capture the spikes. For each spike it captures, its lifespan will reduce tremendously.
If you want to have the maximum power protection for your expensive electrical equipment, you can make use of a combination of surge protector, AVR and UPS by connecting the AVR to surge protector, and connecting UPS to AVR, then connecting your devices to the UPS.


Sunday, March 19, 2023

Upgraded my CyberPower UT800EG UPS with APC BV1000I-MSX 1kVA/600W Easy UPS

My CyberPower UT800EG 800VA/400W UPS has been serving me well for more than 3 years, and it is still functioning well.

It has never failed to protect my Dell XPS 8930 desktop, my Asus RT-AX86U router and Unifi BTU from sudden blackouts and also voltage spikes during thunderstorms.

Anyhow, I anticipate its internal battery, which is not user serviceable, has already reached more than half its lifespan.

Not to take the risk, I decided to get a new UPS, and I found this APC BV1000I-MSX 1000VA/600W Easy UPS as its upgrade.


This APC BV1000I-MSX Easy UPS has 4 universal power outlets (the CyberPower UT800EG only has 3), and it has a larger capacity of 1000VA/600W which is able to provide longer battery runtime. It also has a higher surge suppression rating of 156 Joules (compared with CyberPower UT800EG's 125 Joules).


While transporting, its battery stays disconnected. Before use, we need to connect its battery by using its yellow coloured battery connector at its back. Detailed instruction is available in its user manual.

Same with CyberPower, this APC UPS also comes with 2 years warranty, which registration can be made online.

I have reallocated my CyberPower UT800EG UPS to my living room to provide power protection for my TV, IPTV box and cordless phone.

Even though its battery might run flat in the next 2-3 years time, I think it can still serve as a good AVR to protect those appliances in my living room.


Sunday, January 1, 2023

The differences between Panasonic X-Premium (XU-XKH series) and X-Deluxe (XPU-XKH series) inverter R32 aircon

I have just retired all the old Panasonic non-inverter air-cons in my house, which had served my family for more than 16 years, to the current generation of Panasonic inverter R32 aircons powered by nanoe X technology.


Now, I can feel the advantages of using inverter aircon compared with the traditional non-inverter type, which are comfort and cost saving.

The inverter type of aircon can precisely control the room temperature at fixed level, so that it is not so warm and not so cold, just nice to feel "not warm" and comfort at around 25.5℃. Unlike the traditional non-inverter aircon which I always feel cold at midnight, and I always had to set timer to turn it off around 3am, because it just couldn't keep the temperature constant at 25.5℃ and might fall lower during midnight.

From the Panasonic Comfort Cloud app that linked with the aircons at my house, I can see that the aircon consumes more electricity when it first turned on and the difference between room temperature and my desired temperature is still having a gap. Once it reached the desired temperature, the electricity consumption will reduce a lot.

On average, my inverter aircon consumed about 1 to 2 kWh per day. I keep it on almost 24 hours per day, most of the time without aircon function but with air sterilizer function, and a few hours with aircon function.

I also noticed that my 1 HP aircon actually consumed slightly more electricity than my 1.5 HP aircon. I think this is because the lower HP inverter aircon needs to work harder to bring the temperature down to 25.5℃, while the higher HP on can do the same more effectively. Once it reached the desired temperature, the electricity consumption is almost the same regardless it is 1 HP, 1.5 HP or 2 HP aircon.

Based on this observation, I think it is better to buy inverter aircon that is one level higher than the traditional non-inverter aircon for the same room size, i.e. if you are using 1 HP non-inverter aircon for the room, you can buy 1.5 HP when changing to inverter one. That will most probably be able to save you more in your electricity bill.

Before I bought my new aircons, I had actually done some study to compare between the Panasonic X-Premium (XU-XKH series) and X-Deluxe (XPU-XKH series) inverter R32 aircon. I think my findings might be useful for you if you are also wondering which one to buy.

Their similarities:

  • Both models use R32 gas.
  • Both models are having the highest 5* energy star rating.
  • Both models have ECO Mode with Artificial Intelligence (A.I.) that can save more electricity when turned on.
  • Both models have built-in WiFi remote control, on top of using the normal infrared remote controller. You can install the Panasonic Comfort Cloud app in your handphone to link with your aircon and control its functions, as well as monitor its usage, temperature readings (indoor and outdoor) and electricity consumption.


  • Both models have built-in nanoe-G ionizer that can produce 3 trillion negative ions per second. nanoe-G charges air particles (i.e. dust, dirt, smoke, liquid droplets, etc.) as small as PM2.5 with negative electricity and catches them with its air filter. The charged air particles not caught by the filter are also heavier and will drop on the floor by themselves. In this way, the air is cleaned up.
  • Both models also have built-in nanoe X module that releases hydroxyl radicals into the air. This is able to kill bacteria, viruses & mould, and also deactivate pollen, allergens & PM2.5 dusts. In this way, it is able to sterilize the air and also remove odour.
  • The nanoe-G and nanoe X functions can work independently without turning on the aircon function. Their electricity consumption is very minimal. Of course, they can also work when the aircon function is turned on at the same time.


Their differences:
  • Although both the XU-XKH series and XPU-XKH series have nanoe X module, the one in XU-XKH series is Generator Mark 2, which is able to produce 9.6 trillion hydroxyl radicals per second, while the one in XPU-XKH series is Generator Mark 1, which is able to produce 4.8 trillion hydroxyl radicals per second. Therefore, the nanoe X function in the X-Premium series is double effective than the one in X-Deluxe series.
  • Only the X-Premium series has iAUTO-X function, which can cool the air more faster.
  • Only the X-Premium series has humidity sensor, that lets the aircon keep the room humidity at below 60% level at night for better sleep quality.
  • The aerowings in X-Premium series have a new design that enable them to blow the cool air further more.


Thursday, December 8, 2022

The best aircond temperature setting for different rooms in your house

It always has been a frequently asked question for most of us to find out the optimal temperature to set for our air-conditioner, particularly the inverter type which is good in maintaining the room temperature at the degree we want, to strike a balance between cost & energy saving and our comfort level.


According to Panasonic, the industry leader in aircond manufacturing, the best aircond temperature setting is as follows:

  • Bedroom: 24-25 ℃ (most comfortable temperature range for sleeping)
  • Living room: 25.5 ℃ (best temperature to achieve both comfort and saving)
  • Dining room: 25.5 ℃ (best temperature to achieve both comfort and saving)
  • Study room: 22 ℃ (optimal temperature for your brain to focus and think)

Click here for source of information.


Thursday, June 16, 2022

How much housing loan can you afford with your monthly fixed income?

Recently, we talked about which models of car can you afford with your monthly fixed income?

Now, let's apply the same method to find out how much housing loan can you afford with your monthly fixed income, for your own residence (not for investment purpose)?

Certain residence types, such as single-storey linked house, double-storey linked house, town house, semi-D, bungalow, etc. do not need to pay monthly maintenance fee and sinking funds. Even some of the gated and guarded ones involve monthly security fee, the amount is minimal compared to those that require payment of maintenance fee and sinking funds, such as apartment, condominium, SOHO, etc.

As the maintenance fee and sinking funds is a form of monthly commitment to own the property, we need to consider these 2 commitments in our calculation.

The formula is pretty simple: your monthly house loan instalment should not exceed 1/3 (one-third) of your net monthly fixed income.

As such, for properties without maintenance fee and sinking funds, your affordability will be as follow:


and for properties with maintenance fee and sinking funds, your affordability will be as follow:


Assumptions and conditions:
  • Net income = Salary - EPF contribution - SOCSO - EIS - income tax PCB
  • Employee's portion of EPF contribution = 11%. Although currently the employee can opt to contribute only 9% monthly to EPF, we use the normal rate at 11% for this budgeting purpose.
  • Housing loan instalment upper limit = 1/3 of net income, which is the same as your car loan instalment upper limit. If you are serving both housing loan and car loan at the same time, a maximum of 2/3 of your net income will be committed to these 2 loans.
  • Maintenance fee and sinking funds: normally within the range of RM300-RM400. We take RM350 for calculation here. These 2 fees will cause a deduction of RM350 in your available fund allocation, and affect your residence affordability of about RM86.5k in selling price.
  • Housing loan assumption: taking 90% loan, at interest rate of 3.5%, 30 years instalment plan. Although nowadays quite a number of financing institutions are still offering housing loan interest rate of 2.x%, and provide instalment period of up to 35 years, since we are foreseeing a hike in interest rate is happening now, it is reasonable for us to take interest rate at 3.5% for our calculation. 
  • Price of residence = the price of residence that you are affordable to buy for your own stay, based on the assumptions and conditions above.
You might probably be interested to also read about:

Sunday, May 29, 2022

The 3 generations of timer switch plug used in my household

Timer switch plug is a kind of gadget that can easily convert a normal wall socket into programmable timer socket. 

I have been using it for quite a long time, from one generation to another.

Some scenarios of using timer switch plug include:

  • To supply electric power to TV and audio-visual devices in the morning, so that they are well standby to be turned on instantly, and to cut off the power at mid-night.
  • To switch off the air purifier when you go to work, and to switch it on when you back home.
  • To turn on the light at night, and turn off in the morning.
  • To turn off the wall charger power 2 hours after charging.
  • etc.
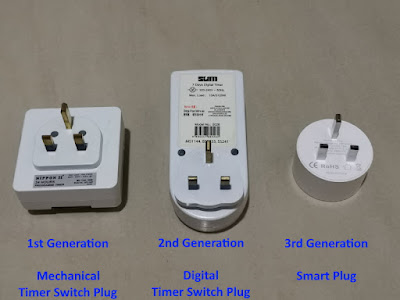
Here are some photos of the 3 generations of them (front view, side view and back view):


Surprisingly, all the 3 generations are selling at almost the same price in the market now.

The 1st generation only support programmable timing interval of 15 seconds time period, and you can decide during that particular 15 seconds it should be turned on or turned off by toggling its key position to be up or down.

It will rotate and repeat its setting every 24 hours. It has no clock to keep track on the actual time. In the event there is a power blackout, it will stop rotating, and therefore after the power resume, its setting will be offset and you might need to readjust its setting.

The 2nd generation, a digital one, is more advanced. It has an internal clock, powered by an internal rechargeable battery, and its programmable period is up to a week.

With this capability, and its programmable timing interval of 1 second, it is possible for you to set it to turn on and turn off at different timing for each day in the week.

The 3rd generation, a smart plug which I am using now, is even more advanced. You need a mobile app (either Smart Life or Tuya Smart) to control it.

The smart plug connects with the corresponding mobile app via 2.4GHz WiFi network that is connected to the Internet. There is a gateway server in the cloud that link it to your mobile app.

One mobile app can be used to control multiple smart plugs.


Scheduling the time for it to be switched on and switched off is a basic function, available in the app.

On top of that, the smart plug also has the capability to monitor and record down the electric power consumption of the devices attached to it.


Together with the sensors in your handphone accessible by the mobile app, it is possible to program for scenario-based automation, such as:
  • Turn off when you are away (your handphone detected location is leaving the smart plug)
  • Turn on when you are back (your handphone detected location is near to the smart plug)
  • Turn on/off at sunrise/sunset, which will be on different timing during different season
  • Turn on/off when it rains (it can get the weather information from your phone)
  • etc.


It even can integrate with some voice control assistants, including Alexa, Google Assistant, SmartThings, IFTTT, etc. so you can actually speak to your voice assistant and ask it to be turned on/off with your voice command.


Saturday, April 23, 2022

Converted my Asus RT-AC86U router into AiMesh node and linked it to my new Asus RT-AX86U router to form home AiMesh system

Recently, I purchased a new Asus RT-AX86U router to replace my 4-years-old Asus RT-AC86U router. The main reason being I want to take advantage of the RT-AX86U's WiFi AX (a.k.a. WiFi 6) capability for some of the newer devices in my household.

What should I do with my old Asus RT-AC86U router after I have successfully replaced it? Well, I converted it into an AiMesh node to form a stronger, stabler home WiFi with larger coverage area, by creating an AiMesh system with the 2 routers.

Initially, I faced difficulty in getting my RT-AX86U to discover my RT-AC86U AiMesh node via wireless network, in order to add it into my home AiMesh system. I managed to resolve the issue by using a network cable.

Here are the steps to form an AiMesh system, with RT-AX86U as the AiMesh router, and RT-AC86U as the AiMesh node.

  • Make sure both the routers have already been updated to the latest firmware version. I am using  AsusWRT-Merlin firmware for both the routers, and the current latest version for both of them is 386.5_2.
  • Use a network cable to connect your PC or laptop to one of the LAN ports of the old RT-AC86U router. This is for you to use your browser to access the router's configuration web interface. Alternatively, you can also use WiFi connection to access the router's configuration.
  • Go to Administration > Operation Mode and select AiMesh Node. Click the Save button to confirm your selection.

  • Wait for your router to reset and restart itself into an AiMesh node, ready to join an AiMesh network.
  • Use your network cable to connect the WAN port of your AiMesh node directly to one of the LAN port of your AiMesh router.
  • Now, login to the configuration web interface of the AiMesh router, which should be the new router that links your home network to the Internet.
  • Click on the AiMesh button at the bottom of the Network Map page. The right panel will switch to AiMesh function.

  • Click on the Search button to search for your AiMesh node.
  • You should be able to find the old router as the search result almost immediately. If you don't use a network cable to join the routers together, but trying to use wireless connection instead, you might have trouble in finding the AiMesh node.
  • Follow the screen instruction to setup your AiMesh system. This process will take some time (about 1-2 minutes).
  • Once the AiMesh system is successfully established, you will be able to see the content inside the AiMesh function of the new router.
  • Congratulations. If you reach this step, your AiMesh system should be established. Now you can remove the network cable joining the 2 routers, and they should continue to link up with each other using WiFi connection.
  • Put your AiMesh node router to the location where you want to place it, and you are done.
You might want to configure your DHCP to give a fixed internal IP address to your AiMesh node router. You can find out its MAC address used to join the AiMesh system by clicking on its icon under the "List of AiMesh nodes in your AiMesh system" section, then click on More Config.

In future, you can update the latest firmware to your AiMesh node(s) from the AiMesh router's configuration page, under Adminstration > Firmware Upgrade.

#WorryFreeWiFi #ExtendableRouter


Monday, March 14, 2022

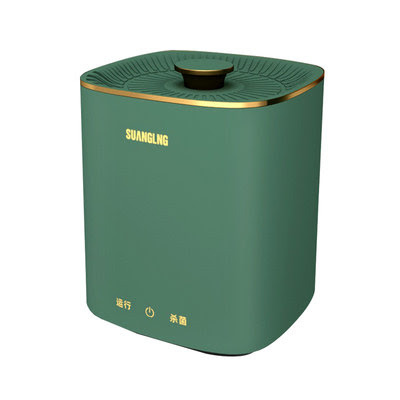
My Youpin Suanglng JC-B18 2.5 litres mini washing machine

Do you remember my portable ultrasonic turbine mini washer that I bought at the price of slightly above RM40 that I used it to wash the mopping cloth of my Roborock S7 robot cleaner?

Unfortunately, I have to tell you that it cannot last long, and started to malfunction after about 3 months of daily usage. Maybe its motor is too weak to handle daily usage, and now it could hardly spin.

It is still a very good mini washer, probably for occasional use, such as when you're travelling.

Anyhow, I have found a more robust replacement for it, which is my Youpin Suanglng JC-B18 2.5 litres mini washing machine, which cost me around RM150.

This mini washing machine has a higher power motor than my previous mini washer, operating at 12V 10W.

It has its own bucket with touch power button. Other than the washing function similar to my previous mini washer, it also has voilet ray and ozone bubbles to sanitize virus and bacteria.

See it in action below:


Note that its bucket is pretty small, at the size of 165mm x 165mm x 187mm only.

Other than mopping cloth, it is also suitable to wash handkerchief, socks, underwear, baby clothes, saliva napkin, and other small items.

Hopefully this Youpin Suanglng JC-B18 mini washing machine can last for 2 years or more.


My Hericaine Twister R-6053 rechargeable portable dry and wet vacuum cleaner

It seems that vacuum cleaners nowadays have become more and more portable, light-weight, and more importantly affordable.

My Hericaine Twister R-6053 rechargeable portable dry and wet vacuum cleaner just cost me slightly above RM50 only, with full set of necessary components, and even with a 30cm x 30cm microfibre mopping cloth as free gift (not in the photo).


I like its carrying bag, which can store all of its components, making it very easy to store and to carry along. Everything in the photo above just has a total weight of less than 1kg.

I use this to vacuum my car, as well as tabletops, cupboards, cabinets, keyboards, desktop rig (outside and inside), printer, screens, corners, air-cond outlets, etc.

It is pretty small in size, and it operates with its own rechargeable battery without any power cord, making it easy to reach out to any place and any corner that you want to vacuum.

Upon full charge, it can operate up to 30 minutes. Its recharging time is quite long though, taking about 3 hours for a full recharge.

It has a pretty decent suction power of 3200kpa, able to suck in items such as paper clips and even small coins without much problem.

I like its wet vacuuming capability, enabling you to suck away spilled water on cushion, for example.

Its HEPA filter is washable and reusable. This HEPA filter is also sold as replacement item at the cost of around RM13.


Friday, March 4, 2022

My Okura 2-in-1 foldable aluminium ladder with clothes drying hanger rack

I believe every household needs a ladder for the purpose of ceiling fan cleaning, replacing faulty light bulbs, air-cond filter cleaning, reaching up to things at higher place, etc.

Your ladder would probably sit in your storeroom most of the time, until the moment you need to use it.

What if you have a ladder that has additional function to use it more often, such as being a clothes drying hanger rack?

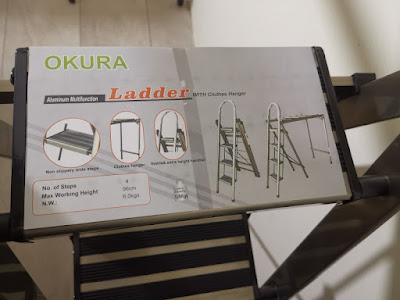
The Okura 2-in-1 foldable aluminium ladder with clothes drying hanger rack would be the solution. It can function as a ladder, and it can also function as a clothes hanger rack, although you can't use both functions at the same time.

My 4-steps Okura ladder costs around RM150, slightly more expensive than ordinary ladder without the clothes hanging rack function. There are taller 5-steps and even 6-steps 2-in-1 ladders available in the market, selling at more expensive price.

This 4-steps ladder is good enough for condominium or apartment with not-too-high ceiling height. Its highest step is 96cm (3.15 feet) from the ground. It has a pretty tall and firm handrail for you to hold on. Being a ladder, its loading capacity is 120kg.

As you can see from the photo below, it is just slightly higher than a washing machine.

I find the length of this 4-step ladder just nice for it to be portable and easy to carry. Its weight is just 6kg, about the weight of a baby below 1 year old.

It can fit in ordinary sedan car, probably not in the boot, but with the car's back seats folded.

It is pretty robust and solid. Its handrail is covered with soft rubber, which is very nice to grasp. When you fold it and lean it against the wall, the soft rubber will not hurt the wall.

However, its rack is not able to hang too many clothes. The 5-steps or 6-steps model will have a longer rack to accommodate more clothes.

A use case for this rack is: to make use of the washing machine and clothes dryer for most of your clothes, while using the rack to dry your delicate hand-washed items, such as underwear.


Tuesday, January 11, 2022

My Nippon II NP2-348T mechanical 24-hour segmented timer electric power switch

If you want a certain electrical appliance to be switched on during certain time period(s) of the day, and be switched off otherwise, this Nippon II NP2-348T mechanical 24-hour segmented timer electric power switch can be very handy to you. It cost only less than RM20.


Some examples of usage including:

  • Switching on your TV and set-top-box during day time, and switch them off at midnight.
  • Switching on a light during night time, and switch it off during day time.
  • Switching on a Wifi AP during day time, and switch it off at midnight.
  • Switching on a power charger for 3 hours, then switch it off.
This mechanical segmented timer switches is designed to work in a "set it and forget it" manner. You just need to set it correctly for one time, and it will continuously switch on/off the electricity supply of its socket according to your setting, on daily basis.


Programming this mechanical timer switch is pretty easy.

Each tappet on its dial represents a 15 minutes time interval. If it is pushed in, there will be electricity supply to its socket during that 15 minutes time interval; otherwise, if it is pulled out, there will be no electricity supply to its socket during that 15 minutes time interval.

There are 96 tappets on the dial. You program the timer switch by pushing in and pulling out the tappets accordingly.

When plugged into the wall socket with power switched on, the dial will rotate like a clock, and the electricity supply to its socket will be turned on/off according to your setting.

To make it works at the right timing, just locate an arrow at its top right corner, then dial its ring so that the arrow is pointing to the current time.

There is a bypass switch at its right hand side. If you switch it to "On", the timer will continuously supply electricity to its power socket, and ignore all the settings programmed with its tappets. This is handy when you want to turn on your electric appliance during the time period which it is programmed to be off.

If you switch the bypass switch to "Timer", then it will work according to your programmed time schedule.

If you want to switch off the electricity supply to your appliance during the time period which it is supposed to be on, you can just turn off the wall socket power supply.

However, turning off the wall socket power supply will also stop the dial from rotating. You will need to adjust the dial position to current time after you turned on the wall socket power supply again.


Monday, December 27, 2021

Rectangular wooden digital LED alarm clock with humidity and temperature display

I have bought this rectangular wooden digital LED alarm clock with humidity and temperature display during the recent 12.12 online sale fiesta, at the price of slightly below RM40.

You can use it as a normal desktop clock (with the alarm function switched off) and also as your bedside alarm clock (with up to 3 different alarm time settings).

It is pretty feature-rich. Other than displaying the time (in either 12-hour or 24-hour format), it also displays the humidity (in RH percentage) and room temperature (in either degree Celsius or Fahrenheit). In DP-1 display mode, it can even show the date of today.

When your air-cond is turned off, and the humidity is above 75%, there is a high possibility that it is going to rain.

In normal days, the humidity level should be between 35%-65%. Higher than that, you should consider using dehumidifier to prevent the growth of mold and pests. Lower than that, you should consider using humidifier instead to safeguard the lifespan of your wooden floorings and furniture.

When your air-cond is turned on, both the humidity and temperature should drop. The room temperature should stay at the level that you set for your air-cond, otherwise you might need to service your air-cond as it no longer able to condition your room temperature according to your setting.

There are 3 power sources for this alarm clock:
  • Internal CR2032 battery, used as emergency power source to memorize your clock settings and to keep the time running when there is no other power sources available.
  • 4x AAA batteries, used as emergency power source for the alarm clock to function as normal, in the event of electricity blackout. Without the USB power source, the AAA batteries will be used up within 24 hours.
  • DC 5V 300mA USB power source, which is the main power source for this alarm clock. Note that the alarm clock only comes with a USB cable, and you need to prepare your own wall charger to supply the DC 5V 300mA power supply to the clock.

There are only 3 buttons at the back of the clock (Set, Up and Down), making it a little bit tricky to set up the clock. Anyhow, it comes with a comprehensive multilingual instruction manual for you to refer to when setting up the clock.

There are 3 brightness levels for its LED display. During 6.00pm to 6.59am, the brightness level will be automatically switched to the lowest. This is a nice feature so that its LED display will not be too bright at night until it might disturb your sleep.

The LED display even has a "power saving" mode that will turn it off after 15 seconds of display. You can either touch the clock with your hand, or make some noise by clapping your hands near the clock, to bring up the display. You can also turn off this "power saving" mode for the LED display to stay on.

This clock has altogether 3 alarms, which you can set up to 3 different time of the day for it to chime. In addition, it also has a setting for the alarm function to only work during weekdays, and it won't wake you up during weekends.

All in all, I find this alarm clock elegant looking, feature rich and practical to use. It is inexpensive too, either for own use or as a presentable gift.


Saturday, December 25, 2021

Gas stove heat diffuser metal plate

 I bought this 28cm heat diffuser aluminium plate for gas stove at the price of RM28.80.


It works by placing it on top of gas burner, so that:

  • To distribute heat from the underneath fire evenly, and avoid scorching. This also keeps the base of your cooking utensil clean and anew.
  • To support cooking utensils with smaller base, so that they can sit stably on top of the burner.
  • There is less mess in the event of soup overflow and spillage, as the plate will hold the spilled liquid, preventing it from dropping into the fire and burner.
This plate has 2 sizes available in the market: 24cm and 28cm. If you are in doubt, get the larger 28cm one. If your gas burner is small, you can get the 24cm one, as it will heat up faster and therefore able to save some cooking gas.

This plate also has several different thickness available in the market: 4mm, 6mm, and some even 8mm.

4mm one is just nice. Thicker plates are more heavy-duty to support heavier weight on top of it without deformation. However, they will need more time to diffuse and heat up, and will use up more cooking gas.


There is a chuck that comes together with the plate, for you to move the plate without worrying about burning your hand when accidentally holding a hot plate.


Sunday, December 19, 2021

Replaced my instant shower heater from Alpha Smart 18EP to Joven SL30iP

Recently, the "Line Fault" indicator of my 6 years old Alpha Smart 18EP instant shower water heater in one of my bathrooms had changed from its usual green light to red light. This is the same shower heater that was repaired in 2017 before.

I have replaced it with a new Joven SL30iP shower heater with DC inverter pump.


I bought the model without rain shower head for a cheaper price at around RM440, and managed to use back the rain shower head of the replaced Alpha Smart 18EP.

I have chosen Joven SL30iP this time, because:

  • It has a very high performance/cost ratio, even higher than Alpha Smart 18EP.
  • While the Alpha Smart 18EP has an AC pump, this Joven SL30iP has a DC inverter pump, which is much silent and saves electricity. More importantly, DC pump is less prone to electric shocks than AC pump.
  • It has a built-in double poles Electronic Earth Leakage Sensor (EELS) with a very good 10mA sensitivity.
  • It supports a lower minimum water pressure at 10kPa / 1.45 psi / 0.1 bar.
  • It supports a lower minimum water flow at 2 litres per minute.
The only thing I don't like about this Joven SL30iP instant shower water heater is that its pump on/off switch, EELS test switch and EELS reset switch are located at its side instead of its front, making it harder to locate the right switch you want to press on.

Note that the water inlet and outlet of this Joven SL30iP are on the opposite side compared with the Alpha Smart 18EP. If you connect its water inlet and/or outlet on the wrong side, the water heater will not operate.

Same with Alpha Smart 18EP, the casing of this Joven SL30iP is IP25 splash proof.

If you are surveying on your new instant shower water heater, perhaps you can consider this one.


Friday, November 19, 2021

My portable ultrasonic turbine mini washer

Other than my CCKO CK9919 stainless steel smart garbage bin, I have also purchased a portable ultrasonic turbine mini washer at the price of slightly above RM40, during the recent 11.11 big sale promotion festival. It is mainly used to wash the mopping cloth of my Roborock S7 robot cleaner.


Inside the packaging box, there are:
  • The round washer unit with 9cm diameter, which can be put inside water.
  • USB cable with a controller unit in the middle. The controller unit cannot be put inside water.
  • USB traveler wall charger, also cannot be put inside water.


Some similar products come with a water bucket. The water bucket can even be foldable to save storage space and to make it easier for carrying along. However, those units with attached water bucket can easily cost double the price than this one.

As you can buy a bucket at the price of a few ringgit only, I think this unit without bucket is good enough, and it has a much better cost-performance ratio.

There are 3 suction cups under the unit. You can stick it at the bottom of a water bucket, or at the inner wall of the water bucket, or inside a basin, or inside any suitable water container.


This mini washer is designed to wash up to 1kg load of clothes, which is more than enough to wash my robot's mopping cloth.


It has 4 modes of operation, controlled by its controller:

  • Mode A: cycles of 2 minutes forward and reverse spinning + 1.5 minutes of ultrasonic cleaning + 5 minutes of bubble cleaning
  • Mode B: forward and reverse spinning
  • Mode C: ultrasonic cleaning
  • Mode D: bubble cleaning
Its forward and reverse spinning action will produce a swirl in the water, to clean up the clothes inside, similar to the way of how ordinary washing machine functions.

When the washing is finished, you can switch off its electricity power at the wall socket to turn it off. Otherwise, it will automatically turn off itself after 30 minutes of operation.

See it in action in the video below:


I find it to be a very good companion for any robot cleaners with mopping function. You can wash several mopping clothes together at one go with it.


Hint: Click on the "Older Posts" link to continue reading, or click here for a listing of all my past 3 months articles.