Showing posts with label programming. Show all posts

Thursday, October 7, 2021

PHP: Exporting data table array to Excel xlsx file with PhpSpreadsheet library

In many occasions when a data table is queried from database and/or displayed on the screen of web application, there is a need to enable the user to download the table, preferably as an MS Excel file.

Traditionally, the method of doing so is to export the table as CSV (comma-separated values) or TSV (tab-separated values) text file, and to use MS Excel to import the CSV or TSV into a worksheet.

There are a lot of shortcomings using this method, including but not limited to:

  • You need to open a new webpage in order to perform the file export, which looks weird to the user experience.
  • The separator character might be different for different users. Some uses comma (","), some uses semicolon (";"), some uses vertical bar pipe ("|"), and so on. Libre Calc in LibreOffice is more flexible in handling the separator character during data import, whereas in MS Excel, if the separator character in the file is not the same with your computer's regional format setting, you will probably get rows of long data in single column.
  • The CSV/TSV is in plain text, and no cell formatting can be made.
  • You need to properly escape and handle the data to be exported, to ensure your data export is successful without error.
  • Numeric fields will most probably be treated as number in the worksheet, although you might want to treat them as text string instead. Common occasions including handling of telephone numbers, batch numbers, serial numbers, etc.
Over the years, there is a trick to export a TSV as XLS (old Excel file format), by putting these 2 lines in the page header:

header("Content-Disposition: attachment; filename=\"$filename\"");
header("Content-Type: application/vnd.ms-excel");

There is a matured sample source code by Chirp Internet (www.chirpinternet.eu) that includes a function to do data cleansing before the export. You can click here to look for the source code of that script.

However, the exported file is actually just a TSV instead of real XLS file. Newer version of MS Excel will actually prompt out warning message when you try to open such exported XLS file.

A much better and proper method is to use the PhpSpreadsheet library to generate the real MS Excel file in xlsx (Microsoft Open XML Spreadsheet) format.

By using this method, you can export the Excel file without the need of opening a new webpage that confuse the user. You can also perform many Excel file manipulation by using the functions, classes and methods provided by the PhpSpreadsheet library.

The PHP codes below are originally posted by billynoah in Stack Overflow forum.

Step 1: Install PhpSpreadsheet library using composer, if you haven't done so.

If you are using Laragon WAMP platform, you can install the library by opening the Terminal window (the 4th button in Laragon control panel) and type the following command:


composer require phpoffice/phpspreadsheet


Step 2: Add these 3 lines at the beginning of your PHP script.

require '/vendor/autoload.php';
use PhpOffice\PhpSpreadsheet\Spreadsheet;
use PhpOffice\PhpSpreadsheet\Writer\Xlsx;

Step 3: Prepare your dataset in an array. Normally, this is queried from SQL database server using SELECT statement. Note that in order to use the writeXLSX function with source codes in Step 4 below, the dataset needs to be stored in an array instead of an object.

Below is a simple example of such codes, utilizing ezSQL library class:

$db = new ezSQL_mysqli(MY_USR, MY_PWD, MY_DB, MY_HOST);
$sql = "SELECT * FROM ".MY_TABLE;
$items =$db->get_results($sql, $output=ARRAY_A);
$keys = array_keys(current($items));

Step 4: Put the following function somewhere in your script.

function writeXLSX($filename, $rows, $keys = [], $formats = []) {
// instantiate the class
$doc = new \PhpOffice\PhpSpreadsheet\Spreadsheet();
$sheet = $doc->getActiveSheet();

// $keys are for the header row.  If they are supplied we start writing at row 2
if ($keys) {
$offset = 2;
} else {
$offset = 1;
}

// write the rows
$i = 0;
foreach($rows as $row) {
$doc->getActiveSheet()->fromArray($row, null, 'A' . ($i++ + $offset));
}

// write the header row from the $keys
if ($keys) {
$doc->setActiveSheetIndex(0);
$doc->getActiveSheet()->fromArray($keys, null, 'A1');
}

// get last row and column for formatting
$last_column = $doc->getActiveSheet()->getHighestColumn();
$last_row = $doc->getActiveSheet()->getHighestRow();

// if $keys, freeze the header row and make it bold
if ($keys) {
$doc->getActiveSheet()->freezePane('A2');
$doc->getActiveSheet()->getStyle('A1:' . $last_column . '1')->getFont()->setBold(true);
}
// format all columns as text
$doc->getActiveSheet()->getStyle('A2:' . $last_column . $last_row)->getNumberFormat()->setFormatCode(\PhpOffice\PhpSpreadsheet\Style\NumberFormat::FORMAT_TEXT);
if ($formats) {
foreach ($formats as $col => $format) {
$doc->getActiveSheet()->getStyle($col . $offset . ':' . $col . $last_row)->getNumberFormat()->setFormatCode($format);
}
}

// enable autofilter
$doc->getActiveSheet()->setAutoFilter($doc->getActiveSheet()->calculateWorksheetDimension());

// autosize all columns to content width
for ($i = 'A'; $i <= $last_column; $i++) {
$doc->getActiveSheet()->getColumnDimension($i)->setAutoSize(TRUE);
}

// write and save the file
$writer = new PhpOffice\PhpSpreadsheet\Writer\Xlsx($doc);
$writer->save($filename);
}

Step 5: Call the writeXLSX function to generate your MS Excel file.

writeXLSX(EXCELFILE, $items, $keys);

That's all about it. Pretty easy and straightforward, isn't it?


Monday, July 12, 2021

MySQL - How to insert record if not exists to avoid data duplication

While coding an application with MySQL as database, you might come into this situation:

You want to insert a new record into a table, if and only if there is no existing record in the table with certain matching fields.

  • The matching field(s) need not has a unique constrain in your table structure design.
  • Your insert statement does not include value definition for the table's autoincremented primary key (the "id"). As usual, you just let the database engine to determine the value of the autoincremented field for you upon successful insert action.
  • You only want to check for duplication in certain field(s). The rest of the fields can be the same or different. Meanings, as long as all those fields you want to check are completely matching, it is considered a duplicated record, regardless the rest of the fields are matching or not.
  • In the event you have found a duplication, you just want to do nothing and skip the insert. This is different from another situation whereby you want to update the existing record with current one.
  • You don't want to mess up with the primary key (the "id") sequence. Meanings, if there is a match, you just abort the insert action without touching the table. The "id" sequence can continue with next insert, without jumping autoincrement number.
and here is an example of the SQL statement, with value fed by PHP variables:

INSERT INTO `payment` (`year`,`month`,`item`,`category`,`type`,`account_no`,`date_due`,`value`,`payment_mode`,`paid_by`,`status`,`owner`,`payer`) SELECT $year,$month,'$item',$category,'$type','$account_no','$date_due',$value,$payment_mode,$payment_option,'$status',$owner,$payer FROM DUAL WHERE NOT EXISTS (SELECT 1 FROM `payment` WHERE `year`=$year AND `month`=$month AND `item`='$item' AND `type`='$type' AND `date_due`='$date_due' LIMIT 1)

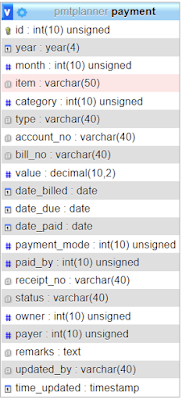
The table structure for payment is as below:


In the example above, you match on fields year, month, item, type and date_due in the table payment. Your insert statement will be executed if the select statement return no result, i.e. there is no matching record(s) fulfilling the search criteria.


Monday, June 29, 2020

Generating PHP codes for mobile-friendly web database applications with AppGini rapid development tool

AppGini by Bigprof Software is a rapid web application development tool for the PHP and MySQL web service stack.

It is very easy to use, and very handy to generate up-and-running mobile-friendly web database applications instantly at one mouse click, without the need of writing any programming code.

With AppGini, it is possible for you to save hundreds of man-hours spent in prototyping, programming, design and testing your web application.


AppGini is a Windows application. As such, it is best suit with Laragon as the WAMP development platform to receive the PHP codes generated by Appgini, so that you can immediately test out the generated web application within the same computer.

If you are using Linux or Mac OS, you can also install AppGini in your computer through PlayOnLinux or PlayOnMac.

Below are 2 of the screens in the generated web application, with sample data, using AppGini's default template. You can modify the looks and feels of the screen by choosing another theme of template and layout options.


The PHP codes generated by AppGini are pretty clean and neat.

In 1 or 2 man-days, by using AppGini, you should be able to produce a fully functional Northwind Orders system with ACL (access control) mechanism from zero. Imagine how many man-days you need to produce the same amount of PHP codes as shown below, by manual coding.


Northwind Orders system is used by Bigprof to demo the work produced by AppGini. You can access to its live demo system here, and can even download its generated source codes here. Beside Northwind, there are more open source web applications generated by AppGini which you can download here.

You don't even need to know about PHP programming in order to create web application using AppGini. Anyhow, you need to have basic knowledge on software development and concept of relational database to master the use of AppGini quickly.

Therefore, I found AppGini an ideal tool for educational purpose to teach and learn about web database CRUD programming concept, and also relational database concept, including the data structure, normalization, joining of tables, keys & constraints, etc.

Of course, AppGini is also ideal for software developer to quickly come out with something, then to further customize on the generated codes. This approach can really save a lot of time and effort.

AppGini is a trialware. You can click here to download AppGini free trial edition, which has no time limit of use, but has limitation on some key functions, including unable to save your AppGini project for future use.

If you like it, you can order its full version at the price of US$79.90 per user. I found that this price is one of the cheapest among its competitor products such as Scriptcase, PHPMaker, CodeCharge Studio, Dadabik, etc.

Thursday, May 30, 2019

How to implement select all function for multiple sets of checkbox items on the same webpage using simple JavaScript

When designing a webpage with list of checkbox items, it is common and useful to implement a Select All/None function so that the user can easily select/unselect all items with a single mouse click.

This can be done with a simple JavaScript function, even without the need of using jQuery.

Now, the challenge is, when you have multiple sets of checkbox items on the same webpage, how to implement a shared JavaScript function to handle the Select All/None action to each set of the items respectively, so that when the user Select All in one of the sets, the other sets will remain unaffected by the action?

Let's say, we have 3 sets of item as below:


You can use separate FORM for each of the sets, and use FORM ID to distinguish each of the FORM. Each FORM will need to handle their own SUBMIT action separately.

If the different sets are within the same FORM and share the same SUBMIT action, you can make use of CLASS name in their CHECKBOX elements to distinguish and separate out the sets.

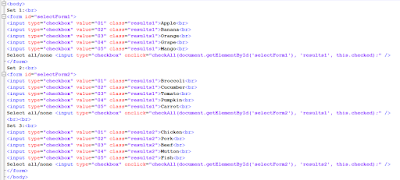
Here is the JavaScript codes to implement the Select All/None function (click the image to enlarge it):


and below is the HTML BODY part of the sample webpage (click the image to enlarge it):


Set 1 is in separate FORM from Set 2 and Set 3 with a different FORM ID. Note that even though Set 1 and Set 2 are both using the same CHECKBOX CLASS name, their checkboxes will can be selected all/none separately.

Set 2 and Set 3 are within the same FORM. We can still separate them by using different CHECKBOX CLASS names.

Our simple checkAll JavaScript function accepts both the FORM ID (as 1st parameter) and CLASS NAME (as 2nd parameter), and making use of its 3rd parameter as toggle. In this way, you can use this checkAll function to handle all the sets on the same webpage.

You can create a HTML file to try it out. Since this is just an ordinary HTML with simple JavaScript, it can run even without any web server. Just create the HTML, and open it with your web browser to test it out.


Friday, May 3, 2019

DSN-less access to Microsoft SQL Server from Raspberry Pi Raspbian Stretch

Accessing Microsoft SQL Server (including SQL Server Express and Azure SQL Database) from Linux isn't that straightforward.

Microsoft does provide free connection library for Linux to access to SQL Server, but the library will not work for Raspbian OS in Raspberry Pi due to conflicting type definition with other essential library in the system.

Below is the easiest way I found out to access SQL Server from Raspberry Pi.

You need to enable and allow TCP/IP access to the SQL Server.

The SQL client to use is FreeTDS through unixODBC.

First of all, make sure the required FreeTDS and unixODBC components are installed in the Raspberry Pi:

sudo apt install freetds-bin freetds-dev tdsodbc unixodbc unixodbc-bin unixodbc-dev

If you are using Python to access the SQL Server, also need to install the following components:

sudo apt install python-pymssql python-pyodbc python-sqlalchemy

If you are using PHP to access the SQL Server, then need to install the following components:

sudo apt install php7.0-odbc

Since we are going to use the DSN-less method to access to the SQL Server, it is not necessary to configure the DSN settings. However, there is still minimal configuration needs to be made.

sudo nano /etc/odbc.ini

[FreeTDS]
Description = SQL Server
Driver = FreeTDS
Trace = No
TDS_Version = 7.0


For the TDS Version, if you are unsure about the version of your SQL Server, then set the TDS Version to 7.0.

You can set the TDS Version according to the following:

  • TDS Ver. 7.0 for SQL Server 7.0
  • TDS Ver. 7.1 for SQL Server 2000
  • TDS Ver. 7.2 for SQL Server 2005
  • TDS Ver. 7.3 for SQL Server 2008
  • TDS Ver. 7.4 for SQL Server 2012, 2014, 2016 or 2017
Lower TDS version has more compatibility but less feature in SQL command and less supported data types.

Another file you need to edit is odbcinst.ini.

sudo nano /etc/odbcinst.ini

[FreeTDS]
Description = FreeTDS unixODBC Driver
Driver = /usr/lib/arm-linux-gnueabihf/odbc/libtdsodbc.so
Setup =  /usr/lib/arm-linux-gnueabihf/odbc/libtdsS.so
fileusage=1
dontdlclose=1
UsageCount=1


Now you should be ready to access to your SQL Server from this Raspberry Pi.

Python test script:

import pyodbc

server = 'your_SQL_Server_IP_address'
database = 'your_database'
user = 'database_user'
password = 'database_user_password'
query = 'SELECT * FROM INFORMATION_SCHEMA.TABLES;'   # your SQL query

conn = pyodbc.connect('DRIVER={FreeTDS};SERVER='+server+';PORT=1433;DATABASE='+database+';UID='+user+';PWD='+password+';')
cursor = conn.cursor()
cursor.execute(query)
for row in cursor.fetchall():
        print row


PHP test script:

$server = 'your_SQL_Server_IP_address';
$database = 'your_database';
$user = 'database_user';
$password = 'database_user_password';
$query = 'SELECT * FROM INFORMATION_SCHEMA.TABLES;';   // your SQL query


if ($db = odbc_connect('DRIVER={FreeTDS};SERVER='.$server.';PORT=1433;DATABASE='.$database.';',$user,$password)) {
        $res = odbc_exec($db, $query);

        while( $row = odbc_fetch_array($res) ) {
                print_r($row);
        }

        odbc_close($db);
}


Monday, April 29, 2019

dnGrep - Free GUI "grep" and "sed" tool for Windows

If you are familiar with UNIX/Linux operating system, you must be using a lot of "grep" command to search for string inside text files, and "sed" command to find and replace string in the text files.

There are identical command in Windows such as "find", "findstr" or even the PowerShell "Select-String", but they are just not as easy to use as "grep" in UNIX/Linux.

There are also GUI tools for Windows which aim to perform the "grep" and "sed" function, majority of the good ones need you to pay for it, except dnGrep which is licensed under GNU GPL v2 and is therefore free for use.


dnGrep is indeed a very powerful find and/or replace tool for Windows. It can not only search for text or keywords inside the target file(s), but also able to perform a text replace action in target text file(s).

Beside normal text files, it is also able to search inside MS Word documents and PDF files. It can also search inside archived file.

You can perform your search by plain text input, or XPath query language, or regular expression (regex), or even phonetic.

You can also specify to search for files in a folder (and sub-folders) within a particular date range in which they are created or last modified.

The search result is displayed with yellow background highlight, together with the line number in the target document. Double click on the search result will open up the target document for further action.

The beauty of its replace function is that, the replace action can be undone.

You can also create "bookmarks" to store frequently used search keywords and conditions.

dnGrep is lightweight, fast in action, powerful and free for use. It is an essential 3-party tool in your Windows computers.

Click here to go to the download page of dnGrep.

Thursday, April 18, 2019

Free database clients able to access multiple DBMS - DBeaver CE & DBSL Database Browser

Nowadays it is not unusual for IT personnel to deal with multiple databases at the same time. There is also a high chance of the need to deal with databases in different database management system (DBMS).

It will be nice to have a universal or multi-platform GUI database client as a single tool for accessing databases in different DBMS. If you are searching for this kind of database tool, and prefer for free solution, I would recommend 2 of them.

DBeaver Community Edition is a more popular one, which can run in Windows, Linux and Mac OS. It is a beast with extensive number of features to view and manage the databases.


The Community Edition supports a vast number of SQL relational databases, while the non-free Enterprise Edition supports additional NoSQL databases including Apache Cassandra, Apache Hive, Hadoop, MongoDB, InfluxDB, Redis, etc.

The Community Edition itself can open and manage most (if not all) of the famous DBMS such as Azure SQL server, IBM DB2, Firebird/Interbase, Informix, Ingres, MySQL/MariaDB, SAP MaxDB, Oracle, PostgreSQL, Microsoft SQL server, SQLite, Sybase, Teradata, etc.

It also supports file-based database like DBF, Microsoft Access, and even CSV file.

With ODBC connection, it supports all databases that is able to be connected via ODBC.


You can open multiple databases and multiple tables at the same time.

It has complete set of table management functions, including import/export and even generating mock data for testing or demo purpose.


If the table relationship is well defined in the database schema, DBeaver can also display the ER-diagram at a mouse click.


DBeaver, even though with the free Community Edition, has everything you need to work with the databases.

But sometimes we just need a simple, lightweight, straightforward, and preferably portable (no installation needed) database tool. Database Browser by DB Software Laboratory will be the one that suit for this purpose. It only run in Windows, either as installed application or as portable application.

Database Browser is very easy to use, and mainly used to view and/or edit the database content. The flow is simple: you select a database, it will list down all the tables. You select a table, it will list out the records in the table.


Database Browser supports famous DBMS such as Oracle, Microsoft SQL server, MySQL/MariaDB, PostgreSQL, Interbase/Firebird, OleDB, SQLite, BDE, MongoDB, etc.

With ODBC connection, it supports all databases that is able to be connected via ODBC.

The list is not as extensive as DBeaver, but is still comparatively more than most other database tool in the market.


It can also show the ER diagram in its SQL Query Builder function. The SQL Query Builder works in a way with GUI interface similar to Microsoft Access.


It supports data import from Excel file, and export to CSV, TAB, Excel, RTF or HTML files.

If you just want to browse or edit the database content, Database Browser will be a handy tool for you.

If you want to deal with views, indexes, stored procedures, sequences, triggers, and even database parameter fine tuning, then you will need DBeaver.

Wednesday, March 27, 2019

EmEditor - lightweight text editor able to open large file and also manipulate CSV

Recently, I was looking for a text editor that is capable to open and edit an SQL dump as large as 2.7 GB, and I only found EmEditor to be the workable one. Most of the well-known text editors for Windows failed to open the file. Several managed to open, but became extremely slow and easy to crash during navigation or editing.

EmEditor by Emurasoft has been around since 1997. Its user interface is still Windows 95 alike, and not that impressive at all. It seems to be powerful, with quite a lot of functions, but looking for the function will probably need some times searching in its menu items. It has most of the basic function of a modern text editor, including syntax highlighting for programming languages and scripts.

Due to its old fashion user interface, you probably won't use EmEditor for normal text editing or program coding. However, EmEditor has 2 unique features that really make a difference from other editors. These 2 superb features are:

  • ability to open and edit large text file, as big as 248 GB or 2.1 billion lines!
  • ability to manipulate CSV file with nice tabulation of the data into columns.
If you need a lightweight editor to open text file with millions of line, you are very likely end up with EmEditor. EmEditor is able to open such large file without consuming much memory or taking up much CPU resources.

Example of those large text files including but not limited to:
  • SQL dump with data
  • Log file
  • Large dataset in CSV or XML
EmEditor is pretty fast in loading the large text file. If the file is really large and over a gigabit, it still needs some times to fully load the file, but not that long.

Sequential moving in between text is seamless and fast, but jumping will take a longer time. Editing character by character is also fast, but text replacement with highlighting and cut will also take a longer time.


EmEditor has function to split a file into multiple smaller files, and also the reverse function to combine several files into one.

This is handy in the situation whereby you need to search for a portion of the large file, and export it out for further manipulation using other tools. Another situation is to split a large chunk of SQL dump into smaller files, so that the SQL server can import by handling smaller files.

EmEditor has powerful CSV manipulation functions similar to spreadsheet such as MS Excel or LibreOffice Calc. Compared with those spreadsheet programs, EmEditor is pretty lightweight and faster to load up.

It can tabulate the CSV data into columns, insert/delete a column, perform sorting, perform filtering, convert the CSV separator, etc.


Because of these 2 unique functions, I find EmEditor a handy tools for IT person, particularly for dealing with large text files involving dataset or log file.

Monday, February 11, 2019

Automate Flow: Let your phone / tablet inform you when its battery is 100% fully charged

This is an example of Automate flow. To learn more about Automate for Android phones, click here.

It is advisable to unplug your phone / tablet from its battery charging source once its battery is 100% fully charged.

Although modern Li-polymer battery has overcharge protection in its circuit and in its charger, overcharge can still happen when the battery is aged (exceeded its warranty period), or you are using 3rd party charger and/or 3rd party charging cable, which might not work well with its overcharge protection mechanism.

Some common symptoms of battery overcharged including overheat and/or battery bulking (permanent damage).

This is a simple Automate flow that lets your phone / tablet speak to you to inform that its battery is 100% fully charged, so that you are alerted and can proceed to unplug it from the charging source.

You can change the speaking voice, its pitch and speed, in your Android text-to-speech setting.


Automate Flow: Auto disable WiFi when you are travelling in a vehicle unless you are connected to a hotspot

This is an example of Automate flow. To learn more about Automate for Android phones, click here.

Normally when we are travelling in a vehicle, we have no WiFi access. Disabling the WiFi function of our Android smartphone and/or tablet will help to conserve some battery usage.

However, there might be situation when our phone/tablet is connected to a mobile WiFi hotspot which is in the vehicle. In this case, we won't want to disable the WiFi function.

Below is the Automate flow that will automatically disable WiFi when you are travelling in a vehicle, unless you are connected to a WiFi hotspot.

Thursday, January 17, 2019

Fixed MySQL Workbench installation problem with missing Visual C++ Redistributable package (2015)

MySQL Workbench is a very useful unified visual tool for database architects, developers, and DBAs working on MySQL and/or MariaDB. It provides data modeling, SQL development, and comprehensive administration tools for server configuration, user administration, backup, etc.

MySQL Workbench Community Edition is free for use, which you can download from MySQL website. It is available for MS Windows, Ubuntu Linux, Red Hat Enterprise Linux, Oracle Linux Fedora and macOS X.

MySQL Workbench is a very good companion to work together with Laragon. In fact, it is among the few (if not the only) free MySQL database administration tools that is able to let user design database with EER diagram and also able to reverse engineer the tables of existing database into EER diagram. This feature is normally available only in the commercial version of other database administration tools.


If you are using Windows 10 and trying to install MySQL Workbench version 8, you might hit with a error during installation saying that Visual C++ Redistributable package (2015) is missing, and you need to install that before you're able to proceed to install MySQL Workbench.

Unfortunately, this problem cannot be simply resolved by installing Microsoft Visual C++ Redistributable package (2015), because the installer program will tell you that it has already been installed.

In fact, this problem is caused by the newer Microsoft Visual C++ Redistributable package (2017) already installed in your Windows system. Its installation might have deleted some registry keys used by the Visual C++ 2015 Redistributable.

The solution is to repair the installed Microsoft Visual C++ 2017 Redistributable (note: not to install or repair the 2015 redistributable, but the 2017 one). It is advisable to repair both the x64 and x86 versions of Microsoft Visual C++ 2017 Redistributable.

To do so, go to Windows System > Control Panel > Uninstall a program and locate for Microsoft Visual C++ 2017 Redistributable (x64). Right click on it and select Change (note: is Change, not Uninstall). Then click the Repair button to start the repair process.


You might be required to reboot your Windows at the end of the process.

When it is done, continue to do the same for Microsoft Visual C++ 2017 Redistributable (x86).


After this, try to install MySQL Workbench again. The installation process should be OK now.

Thursday, January 10, 2019

Laragon the free WAMP platform better than XAMPP, WampServer, etc.

The Windows-Apache-MySQL-PHP or Windows-Apache-MariaDB-PHP (WAMP) is a web application server platform running on Microsoft Windows operating system, derived from the Linux-Apache-MySQL-PHP (LAMP) platform.

In most cases, the LAMP platform is used for production server of web applications, while the WAMP platform is used as local development environment for web application programmers who work on Windows computer. Even so, the WAMP platform can also be used for production server.

XAMPP and WampServer are among the most popular WAMP environment that is free for use. There are many more options available in the market, both free and commercial, including the younger Laragon.

For Apple Mac OS users, there is also a MAMP platform available in both free and commercial Pro option.

I found Laragon to be better than XAMPP and WampServer, because it is very easy to install, very straightforward to use, very flexible to turn features and plugins on/off, very easy to setup new project, and it comes with a unique auto virtual host feature to give each project a nice URL to access from web browser. More importantly, it is lightweight and usually consume less than 4MB RAM when running, the servers are fast to start and be in up-and-running state. Its PHP execution is also pretty fast compared with other WAMP platforms.


The list of services to be started by Laragon can be easily selected in the preference page. You can also modify the default running TCP port at ease.


Laragon WAMP comes pre-installed with Apache, MySQL, Nginx, PHP, Node.js, Redis, Memcached, yarn + ngrok, git, HeidiSQL, Notepad++, etc.


HeidiSQL Portable is its default database tool to access and administer the MySQL. The popular phpMyAdmin can also be automatically downloaded included with a simple mouse click.


Additional services such as MongoDB, PostgreSQL, Python, etc. can be easily installed and added with a single mouse click from the Tools > Quick Add menu.


PHP extensions can be easily switched on/off in the PHP > Extensions menu.


To start new project with popular content management system or PHP framework such as WordPress, Drupal, Laravel, Symfony, etc. is also a breeze. With a single mouse click in the Quick App menu, the framework will be automatically downloaded and installed by Laragon.


Even if you choose to start with blank project, an empty database schema is automatically created for you in MySQL.

Laragon supports multiple versions of Apache, MySQL and/or PHP, which you can select which version to run for your project. Editing their INI configuration file can also be easily done in Laragon.

You can click here to download and install Laragon into your Windows computer.
Tuesday, January 23, 2018

Book: Algorithms Notes for Professionals

An algorithm is a procedure or formula for solving a problem, based on conducting a sequence of specified actions.

Algorithm plays an important role in software engineering. It is one of the major subjects compulsory for students studying computer science, computer engineering or similar IT course in university/college.

Algorithms Notes for Professionals is a freely downloadable PDF e-book compiled from Stack Overflow Documentation, released under Creative Common BY-SA.


Among the algorithms discussed in this e-book are:
  • Graph
  • Graph Traversals
  • Dijkstra’s Algorithm
  • A* Pathfinding
  • Dynamic Programming
  • Kruskal's Algorithm
  • Greedy Algorithms
  • Prim's Algorithm
  • Bellman–Ford Algorithm
  • Line Algorithm
  • Floyd-Warshall Algorithm
  • Catalan Number Algorithm
  • polynomial-time bounded algorithm for Minimum Vertex Cover
  • Multithreaded Algorithms
  • Knuth Morris Pratt (KMP) Algorithm
  • Edit Distance Dynamic Algorithm
  • Online algorithms
  • Big-O Notation
  • Sorting
  • Bubble Sort
  • Merge Sort
  • Insertion Sort
  • Bucket Sort
  • Quicksort
  • Counting Sort
  • Heap Sort
  • Cycle Sort
  • Odd-Even Sort
  • Selection Sort
  • Trees
  • Binary Search Trees
  • Binary Tree traversals
  • Lowest common ancestor of a Binary Tree
  • Searching
  • Substring Search
  • Breadth-First Search
  • Depth First Search
  • Hash Functions
  • Travelling Salesman
  • Knapsack Problem
  • Matrix Exponentiation
  • Equation Solving
  • Longest Common Subsequence
  • Longest Increasing Subsequence
  • Dynamic Time Warping
  • Pascal's Triangle
  • Fast Fourier Transform
  • Algo:- Print a m*n matrix in square wise
  • Check two strings are anagrams
  • Dynamic Programming
It is a very handy reference book for software engineers and computer science students.

Click here to download Algorithms Notes for Professionals for free.

Friday, December 8, 2017

Automate Flow: Auto enable Bluetooth to connect to car hands-free when you are driving, else disable Bluetooth

This is an example of Automate flow. To learn more about Automate for Android phones, click here.

It is always a good idea to disable the Bluetooth function of your Android phone until you want to pair it with another Bluetooth device, such as hands-free system, GPS, audio speaker, input device (keyboard, mouse, gamepad, ...), etc. This will help to conserve some battery usage of your phone.

However, if you are always wearing a Bluetooth smartwatch that paired with your smartphone, you will need to let the Bluetooth function of your phone to always stay on. In that case, this Automate flow might not be so relevant for your need.

Nowadays, driving laws in many places in the world prohibit holding your phone in your hand while driving. If you are caught with that, you could be imposed with penalty and fine. Therefore, you need a hands-free system to answer to phone calls while driving. Many modern cars already have built-in hands-free function in their audio system. Certain automotive GPS device such as Garmin DriveAssist, Garmin DriveSmart, etc. is also able to link with your smartphone through Bluetooth to provide hands-free and some other additional functions.

Well, if you always disable Bluetooth of your Android phone and manually enable it whenever you want to pair it with a Bluetooth device, it would be very tedious if you are a frequent driver. You will need to enable Bluetooth whenever you sit in your vehicle and started its engine, and disable Blueooth whenever you parked your vehicle and stopped its engine, otherwise you will not be able to use the hands-free function. This Automate flow will help you to automatically perform those action.

In addition, normally when we are in a vehicle on the road, there is no WiFi available. This flow will also help you to disable WiFi when it detected you are travelling in a vehicle. You can edit the flow and remove the "Disable WiFi" block in it if your vehicle does provide WiFi connection that you want to use.


The flow begins with a block to stay and wait until it detected your Android phone carried along with you is travelling in a vehicle. This is a very interesting Automate block. Beside "in vehicle", it can also detect whether you or your phone is:
  • On bicycle
  • On foot
  • Running
  • Still
  • Tilting
  • Walking
  • Unknown
It makes use of sensors of your phone to perform the guessing, and report back with a confidence level. The "in vehicle" block setting of the above flow is as below:

The flow will continue its further actions when it is at least 85% sure that you are in a vehicle. The detection interval is set at 2 minutes. If you want the flow to react faster, you can shorten this detection interval, but it might drain more battery at the same time.

Once it detected you are in a vehicle, it will disable WiFi function of your phone (Block 3).

It will then detect whether the battery level of your phone is above 30%. If it is below, whether your phone is plugged to a power source for charging. If both conditions are negative, it will disable Bluetooth and do nothing. I put 30% battery level as this should be sufficient to keep your phone on with Bluetooth paired for quite a long journey. You can adjust this minimum battery level requirement in Block 14 according to your situation. If your driving distance is most of the time pretty short, probably 15% minimum is good enough for you.

If battery level is OK, it will proceed to enable Bluetooth, wait for 10 seconds for your phone to pair with the Bluetooth device in the vehicle (which as a prerequisite, they must be successfully paired before), such as your car audio system hands-free, or your GPS. If the pairing is successful, it will keep the Bluetooth connection until it is disconnected. Disconnection will happen when your car audio system is switched off (when car engine turned off), or when you manually disable your phone Bluetooth function (in case you do not intend to use hands-free during that journey. For example, you are a passenger in your own car which one of your family member is driving for that trip).

It will wait for 3 minutes before going back to detect whether you are in a vehicle again. 3 minutes is a reasonable minimum time interval for you to leave your car and then to drive it again. That will be the estimated time to stop the car engine, pump the petrol, and resume driving. For other occasions, probably the interval is much longer. You can edit Block 13 to change this interval shorter or longer to suit your need too.

In the event Bluetooth pairing failed after the Bluetooth is enabled, you are very likely to be not in your own car, but in another vehicle either as passenger or driver. Since the hands-free function is not available to you in that vehicle, the flow will proceed to disable Bluetooth and wait for a longer 30 minutes (which you can edit Block 20 to change it to be shorter or longer). 30 minutes is an estimation that you will probably won't drive in your own car, since you are travelling in another vehicle at that moment.

In fact, you can remove both Block 13 and Block 20 and immediately go back to activity checking if you want. The 2 delay blocks are merely for the flow to take a break (and save some battery).

Thursday, December 7, 2017

Automate Flow: Auto enable WiFi when you arrive home and disable WiFi when you leave home

This is an example of Automate flow. To learn more about Automate for Android phones, click here.

It is always a good idea to disable the WiFi function of your Android phone until you want to connect to a WiFi network. This will help to conserve battery usage, and also prevent your phone from automatically get connected to certain open WiFi without your aware, which might be used to hack in your phone.

Normally, there are fix places with WiFi that you will definitely want to use, to conserve your mobile Internet data quota usage. Those places include your home and/or your work place.

This Automate flow will help you to automatically disable WiFi function of your phone after your leave your home, and automatically enable it back when you arrive your home. It will even inform you by voice so that you are aware when WiFi is automatically enabled and disabled by this flow.


Enabling WiFi function does not guarantee a successful connection, because sometimes your access point (AP) or wireless router might have problem in establishing the WiFi connection.

Therefore, after enabling WiFi, this flow will wait for 10 seconds, which should be long enough for normal WiFi connection to be established. It will then check if the connection is successful or not.

If the connection is successful, it will log down the name a.k.a. SSID (service set identifier) of the AP or wireless router your phone has connected to.

If the connection is not successful, it provides option for you to remain enable WiFi or to disable it. Regardless of your selection, you will still need to troubleshoot and find out why the WiFi connection cannot be established. It could be caused by your AP or wireless router is switched off, or hang, or WiFi function disabled, or DHCP IP address allocation full, or other possible issue. If your phone has never made a successful connection with the WiFi at the location before, or you have made your phone "forget" about it, the connection will also be not successful as well.

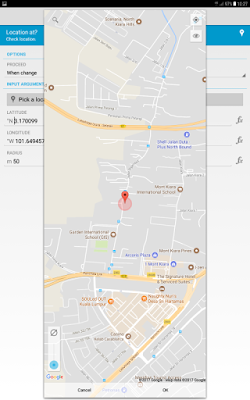
Before you can use this flow, you need to tell it where is your home. This can be done by tapping on Block 12 "When at location". The following screen will come out.

Tap on the "Pick a location on map..." button to bring out Google map. You can then search for your home by either tapping on the "target" icon if you are currently at home, or by tapping on the search (magnifying glass) icon and key in your home address for search, or by manually selecting the location by navigating the map and tap on the targetted place.


When you are done, tap on the OK button below to capture the location's coordinate.

The Radius setting determines the area that you consider your phone is at home. Normally, 50 meter radius as shown above is a good choice. You can set its value larger so that your WiFi is automatically enabled faster when your approaching home, and automatically disabled after you have travelled further away from your home.

You can use this same flow for other places with fixed WiFi, such as your work place. Just go through the same steps able to set the location before running it. You might also want to change the word from "home" to "office" in Blocks 14, 15, 16 and 17 of the flow.

With slight modification, you can even expand this flow to be used for multiple locations.

Wednesday, December 6, 2017

Automate Flow: Always go back to Home screen whenever phone is unlocked at launcher screen

This is an example of Automate flow. To learn more about Automate for Android phones, click here.

This is a very simple Automate flow with only 4 blocks (including the Flow beginning block).

Most if not all Android launchers support multiple screens for you to organize your apps and widgets into different screen as needed. One of the screens is your Home screen, which normally is where you put your mostly accessed apps and widgets.

When you are at the launcher screen without any opened foreground app, you can always go back to the Home screen by pressing your phone's Home soft key or Home button.

If most of the time, when you unlock your phone and start using it, you want to be at the Home screen regardless of which launcher screen you were at when your phone went to sleep and locked itself, this is exactly what this Automate flow will do.


This flow will wait until you unlock the phone, and check if you are at the launcher screen (meaning, no app is opened at the foreground). If yes, it will emulate pressing the Home button so that you will go to the Home screen automatically.

If you were running an app at the foreground (such as Whatsapp, browser, email, Facebook, etc.) when the screen was last locked, the flow will do nothing and you will return to the app screen after unlock.

In order for this flow to work properly, you need to set the correct launcher app of your phone in the "Is foreground app" block, because different Android phone vendor might provide their own launcher app to the phone. In addition, Android system also allows you to install and use 3rd party launcher app such as Nova launcher, Apex launcher, TSF launcher, etc.


You can tap on the "Pick activity..." button as shown above to select the launcher app you use in your phone.

The setting in the above screen is for Samsung TouchWiz launcher. For HTC phones, set the Package to "com.htc.launcher" and leave the Activity Class as empty field.

What if you never set any screen lock to your phone? In that case, you just need to change the "When device unlocked" block to "When screen is on" block.

Monday, December 4, 2017

Automate Flow: Switch your phone between Vibrate and Normal profile with customized mute

This is an example of Automate flow. To learn more about Automate for Android phones, click here.

Your Android phone is likely to have 3 general sound profiles:

  • Normal - ringer (for incoming calls) and notification will play a sound.
  • Vibrate - ringer and notification will mute. The phone will vibrate when there is incoming call.
  • Silent - ringer and notification will mute. There will be no vibration as well.
In fact, your Android phone has the following 6 types of sound, which you can set their volume individually (note: certain phone has paired the ringer and notification sound volume, so that the notification volume will always follow the ringer volume):
  • Ringer - for ringing tone sound
  • Notification - for notification sound
  • Media - for music and sound in apps, including Whatsapp, Facebook, Youtube, etc.
  • Alarm - for alarm sound
  • In-call - for phone conversation
  • System - for shutter sound of camera, screen lock/unlock sound, keyboard sound, etc.
When you switch your phone's sound mode from one to another among Normal, Vibrate and Silent, the volume of these 3 sounds will be changed accordingly: Ringer, Notification and System.

Note that the sound volume of Media, Alarm and In-call remains unchanged. This means when your phone is set to Vibrate or Silent mode, your instant messenger apps will remain unmuted and will still giving out sound, because Media sound remains unchanged.

You might want to also mute the Media sound when you set your phone to Vibrate or Silent mode, and un-mute the Media sound when you set it back to Normal mode.

Of course, there are apps that enable you to set additional customized sound profiles, but I am going to share with you how you can do it yourself by using a simple Automate flow.

The flow below will help you toggle between Vibrate and Normal sound mode. Since the Notification and System sound will follow when the Ringer sound changed, you just need to toggle the Ringer mode.

The beauty of this flow is on its next step. When you toggle the Ringer mode to Vibrate, it will also mute the Music audio. When you toggle it to Normal, it will unmute the Music audio accordingly.

To use this flow, run it once to enter Vibrate mode, and run it again to go back to Normal mode. The flow will display a message about the mode you have changed to, and end.

With this example, I'm sure you can easily modify it to toggle between Silent and Normal mode and save it as another flow.

You can also make it a single flow to toggle among Silent, Vibrate and Normal mode. That will require another block to check "Is ringer mode Vibrate?" when "Is ringer mode Normal?" returned a No. If this returns Yes, you might want to set ringer mode Silent, mute audio Music, and display "Silent mode" in the toast.

Making your Android phone smarter by programming task automation using Automate

Automate is a freemium Android app developed by LlamaLab that enables you to perform task automation in your smartphone.

With it, you can really make your phone much more smarter by running programs constructed using simple flowchart called Flows. All programming in Automate is done graphically by drawing flowcharts (without writing a single line of code) by joining building blocks, whereby each block will perform a single task.

A sample Automate flow looks like this:


Some of the examples that you can program your phone with Automate to do smartly:
  • Every morning when you wake up, greet you with a female voice with weather information and major stock markets closing index point. Pick up your calendar event and read out your appointments in the day.
  • When you are driving your car, auto enable Bluetooth and auto connect your phone to your car's Bluetooth hands-free function, and auto answer any incoming calls. When you leave your car, auto disable Bluetooth and resume manual phone answering.
  • When you are approaching home, auto send a Whatsapp message to your spouse that you are on the way and will arrive soon.
  • When you arrive home, auto turn on WiFi function and connect to your home WiFi. When you leave home, auto turn off the WiFi function to save battery.
  • Whenever you open Spotify app at home, auto enable Bluetooth and connect to your wireless speaker. When you open Spotify at other places, it won't do this and will play the music using your phone's speaker instead.
  • Whenever you enter into your favourite cinema hall, auto mute your phone and set it to vibrate mode. Unmute it when you leave the place.

Automate comes with several hundreds of ready made building blocks. There are basically just 2 types of block:
  • Action block which has a single output (example: Enable WiFi)
  • Decision block which has 2 outputs, 1 for Yes and 1 for No (example: Is WiFi enabled?)
For decision block, you can set the evaluation to be tested immediately (example: Is WiFi enabled?) or wait for the condition to change (example: When WiFi is enabled or disabled).

The ready made building blocks are grouped in the following categories:
  • Apps
  • Battery & Power
  • Camera & Sound
  • Concurrency
  • Content
  • Date & Time
  • File & Storage
  • Flow
  • General
  • Interface
  • Location
  • Messaging
  • Sensor
  • Settings
  • Telephony
Here is an example of available blocks inside one of the categories above (Camera & Sound).


To use Automate, you can either:
  • Just run the sample flows that suit you
  • Create your own flows and run them
  • Download flows shared by other users in the community
  • Download flows from the community, and modify them to suit your need
Automate comes pre-installed with several useful sample flows.


There is also a user community for its users to upload and share their flows with other users. You can upload your flows in the community too.

Community flows are categorized into the following groups:
  • Business
  • Communication
  • Education
  • Entertainment
  • Finance
  • Games
  • Health & Fitness
  • Home
  • Media & Audio
  • News & Magazines
  • Personalization
  • Photography
  • Productivity
  • Security
  • Shopping
  • Social
  • Sports
  • Tools
  • Transportation
  • Travel & Local
  • Tutorials & Examples
  • Weather
Below are some of the top rated community flows available for download:


A running instant in a flow is called a fibre. Each flow when executed will have one or more fibres.

The free version of Automate app is fully functional and ads-free, only with restriction of allowing up to 30 running blocks in all the running fibres. This is sufficient for most simple tasks. If you need to run more complex flows, or need to run a lot of flows concurrently, you can pay a small fee to upgrade to the Pro version.

If you configure Automate to run on system startup, all its running flows will resume from their previous running state even after a restart.

With Automate, you can make a lot of wonders in your phone, without writing a single line of code. All you need is constructing your logics with blocks and charting them into flows.

Saturday, October 7, 2017

Book: Cracking the Coding Interview (6th Edition) by Gayle Laakmann McDowell

Whether you are a fresh graduate or an experienced software developer, if you are thinking about landing your dream job in the software engineering team of one of the world's top IT companies such as Google, Apple, Facebook, Microsoft, Amazon, Palantir, etc., this is the book for you to get well prepared for your job interview.

In fact, this book is suitable for anyone who want to secure a software engineering job in the global IT industry, regardless of level from coder to development team lead to manager to even director or VP.

If you are already working in the industry, the author also alerts you that in the event your company undergoes acquisition or acquihire by those IT big gun companies, eg. the recent case of Google-HTC deal, existing staff of the acquired company (which could be including the CEO himself) are likely required to go through similar interview process, as "they don't want acquisitions to be an easy way into the company" (page 19).


The author, Gayle, is a talented software engineer herself, having working experience at Google, Microsoft and Apple. She had gone through the experiences of being an interviewee as well as interviewer in those companies. Now, she is the founder and CEO of consulting company CareerCup.com.

For computer science graduates, this book will walk through a very quick revision of the important topics you have already learnt and passed in your college, things like the Big "O", data structures (such as hash tables, linked list, stack, queue, tree, graph, etc.), algorithms (such as sorting, searching, bit manipulation, etc.), object-oriented design, system design with scalability, programming logic such as recursion, etc.

If you are not a computer science graduate but have learnt about computer programming and is eager to enter into the software engineering industry, these topics give you some idea of what your computer science graduated counterparts have gone through in their college studies (of course, the whole course covers much more topics than the above list. Those are just some of the fundamentals which they learnt during the first 2 years of their study). You might not be required to know in-depth of such knowledge to secure a software engineering job, such as how to apply them in assembler design, compiler design or operating system memory management design, but it is good for you to know the concept of those knowledge in order to pass the technical interview test. It is out of the scope of this book to teach you such topics. It highlighted them for you to pick up the knowledge from other sources such as computer science textbooks or online courses.

This book contains 189 programming questions and solutions to give you an idea of how you will be tested during your technical interview session. Well, don't be frightened by the questions as they are the level used at Google, Apple, Facebook, Microsoft and those top-notch IT companies who only target to hire highly talented employees. You will probably be tested with less challenging questions, but yet within the domain of similar computer science knowledge. At least, you should be able to write simple function such as listing out the Fibonacci sequence.

Bear in mind that technical knowledge is just a portion of the interviewee assessment. There are other area of evaluation such as soft skills about handling ambiguity, customer focus, communication, passion for technology, teamwork, leadership, etc. before you are offered the job.

Hint: Click on the "Older Posts" link to continue reading, or click here for a listing of all my past 3 months articles.