Showing posts with label IT talks. Show all posts

Saturday, November 7, 2015

Upgraded the firmware of my TP-Link TL-WDR3600 router to version 3.14.3 Build 150605 Rel.53236n with UniFi and Maxis Fiber support

I have just upgraded the firmware of my TP-Link TL-WDR3600 router to the latest version 3.14.3 Build 150605 Rel.53236n with UniFi and Maxis Fiber support from the previous Build 130829.


Noticeable new features in this new version of TP-Link TL-WDR3600 router firmware for UniFi and Maxis Fiber high speed broadband are:

1. Guest Network

This feature has been made available to the universal version of firmware for TL-WDR3600 router for quite a long time ago, but is just newly available for its firmware version with UniFi and Maxis Fiber support.

Now, we can provide guest WiFi Internet access to our visitors with a separated SSID and password, and can determine whether the guest connections can communicate with the other hosts (computers, network printers, etc.) in our LAN or not.

We can also restrict the upload and download bandwidth for guest network with bandwidth control.

In addition, we can define the time period that make available the guest network.

We also have an option to allow the guest network to have access to the shared folder in the USB storage device connected to the router, using a separate login and password, with different storage authority.

2. Application Layer Gateway (ALG) for SIP

This is to allow some multimedia clients to communicate across NAT.

3. IPv6 Support

This feature has been made available to the universal version of firmware for TL-WDR3600 router for quite a long time ago, but is just newly available for its firmware version with UniFi and Maxis Fiber support.

You can click here to learn about how I set up IPv6 in this TL-WDR3600 to work with UniFi Internet.

4. New login mechanism

The login mechanism of this new firmware has changed, and seems to be not backward compatible with the older version. You can no longer login the router with your old credential after the firmware upgrade.


You can click here to download the TL-WDR3600 firmware version 3.14.3 with UniFi and Maxis Fiber support.

To perform the upgrade, unzip the downloaded file to get the wdr3600v1_malaysiaVLAN_en_3_14_3_up_boot(150605).bin file.

Login to the router, and go to System Tools > Firmware Upgrade to perform the upgrade.

Important note:

Your router configurations will be reset to default after the firmware upgrade. Therefore, it is extremely important for you to copy down or screen capture all the existing router configurations before performing the upgrade, and reapply all those configuration to the new firmware after the upgrade.

This includes the login and password to the router will be reset to "admin" user with "admin" password, and its IP address reset to 192.168.0.1.

I have tried doing a configuration backup of the old firmware before the upgrade, and restore the backup to the new firmware. This will not work, because you can't login using your previous login and password, probably due to the change in login mechanism.


Saturday, October 24, 2015

Solved unable to sign in Norton Identity Safe problem

I use Norton Internet Security as the security solution for my home computers, and use the Norton Identity Safe that comes with it to store my web accesses identity information.

Few days ago, when I tried to open my vault in my web browser as usual, I found out that I can't login to Norton Identity Safe.

The symptom is like this:

When I tried to open the vault, I saw this "Get started" pop-up window.


Fine. Click on the "Sign in" button, I was required to provide my email address and password as registered with Symantec to continue.

I keyed in the email address and password, and the window showed it was connecting to the server. The next screen, instead of logged in, it went back to the "Get started" screen again.

I used the same email address and password to login to Norton website, I was able to login without any problem. This means that my email and password combination to login to Norton is correct.


After numerous trial and error, finally I discovered the solution!

Here is the trick: you need to logout from Norton Internet Security before you can successfully login to Norton Identity Safe.

To logout Norton Internet Security, open the application, then click on your email address shown in "Sign in as" corner, and click OK.


After that, go back to the web browser to open the vault.

This time, after entered my email address and password, I finally saw this familiar window:


Key in my vault password, and the vault is opened.

By the way, once successful login to Norton Identity Safe, you will automatically logged in to Norton Internet Security as well, even though you have logout just now.


Friday, September 18, 2015

Buying guide for computer power supply unit (PSU)

Time flies. My Dell Studio XPS 8100 is 5 years old now. It is still working fine, except of some occasional auto restarts during cold boot up.

I decided to replace its stock Chicony CPB09-001A 350 Watt power supply (PSU) as an attempt to fix this auto restart problem. So far, this problem doesn't occur again after I replaced the PSU.

After all, the PSU is a very important component of the computer that converts the AC current from wall socket into DC current of various voltage and distribute them to power up all the electronic parts of the computer. A faulty PSU might fry up the motherboard, introduce bad sectors and/or damage the harddisk, introduce error to memory, burn up the graphics display card, etc.

Not all branded PC can swap in with power supply of other brand, because of proprietary cabling or setting. Luckily, this Dell Studio XPS 8100 uses a standard ATX power supply, and therefore can fit in with another standard ATX power supply, regardless of the brand.

I looked for a low cost but reliable PSU, so that the computer can continue to serve me for another 3 years or so.

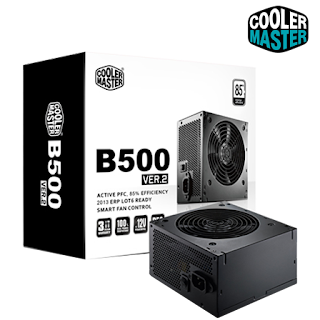
Initially I wanted to buy the Corsair VS450, but there was no stock in the shop I went to. I ended up purchased a Cooler Master B500 ver.2 to replace the stock PSU in my desktop.


I have made some study on how to choose a suitable PSU for my computer before I went to the shop, and would like to share the knowledge here with you.

Choosing Suitable PSU Wattage

The first thing to consider for a PSU is how many Watt of PSU is suitable for the PC. Choosing a lower wattage PSU increases the risk of system to become unstable and louder noise from PSU. Choosing a higher wattage PSU decreases efficiency at lighter loads, and the price is higher too.

You can refer to my article about calculating the recommended power supply wattage for desktop computer. However, this time, I used another website at http://powersupplycalculator.net/ to calculate for the wattage recommendation.

Typically, the CPU and the graphics display card (with GPU on it) are the 2 components in the PC that consume the most power, and high end GPU can consume much more power than the CPU.

For normal PC with normal CPU and one normal graphics display card, a high efficiency power supply of 400-500 watt should be sufficient. You might need more wattage if you have high end GPU, or multiple graphics display cards in the same PC.

PSU Efficiency and Certification

What is the efficiency of power supply? Well, when the PSU converts the AC current to DC current, certain portion of the electric will be lost in the form of heat.

If a power supply is 80% efficient, it can convert 100W of AC current into 80W DC, dissipating the remaining  20W in heat.

Therefore, a high efficiency power supply will waste less electric in the process of converting the AC to DC, produces less heat, and requires less cooling fan speed (and hence runs more silently).

There is a certification body called 80 Plus that will test and confirm if a model of PSU always has an efficiency of at least 80%.

There are several certification grades, from just 80 Plus, to bronze, silver, gold, platinum, and titanium. The higher the grade, the more efficiency is required, and normally the more expensive will be the PSU.


The Cooler Master B500 ver.2 is 80 Plus certified. You can click here for its 80 Plus verification and testing report.

Normally, the PSU has the highest efficiency when it is loaded with around 50% of its capacity. It has lower efficiency at lower load (eg. when the computer is at idle state) or higher load (eg. when all the CPU cores, GPU and memory are at high utilization state).

The 80 Plus test result of Cooler Master B500 ver.2 shows its efficiency rate as below:
  • 20% load - 82.75% efficiency, power factor of 0.97
  • 50% load - 84.55% efficiency, power factor of 0.99
  • 100% load - 81.51% efficiency, power factor of 0.99
You can find the list of all other brands and models of PSU that are 80 Plus certified in their website.

Beside 80 Plus, this Cooler Master B500 ver.2 is also ecoPSU certified. You can click here for its ecoPSU  Level 85 verification and testing report.

The test result with ecoPSU shows even better efficiency than 80 Plus.

Note that both the 80 Plus and ecoPSU also define the minimum power factor requirement in their certification. What is power factor then?

Power Factor Correction

The power factor of an AC electrical power system is defined as the ratio of the real power flowing to the load to the apparent power in the circuit.

In an electric power system, a load with a low power factor draws more current than a load with a high power factor for the same amount of useful power transferred.

The PSU has power factor correction (PFC) circuits to increase its power factor. The PFC circuits type is either passive, active, or dynamic. Low grade PSU uses passive PFC, better one uses active PFC, and dynamic PFC is just too expensive for use in computer PSU.

Therefore, "Active PFC" is probably one of the keyword you search for when considering a PSU. The Cooler Master B500 ver.2 uses active PFC circuits.

The +12v Rail

The Cooler Master B500 ver.2 has a single +12v rail with maximum rating of 38A, 456W. This is the most important rail that supply electric to the high power consumption components of the computer, including the CPU and GPU.


Some PSU has dual or multiple +12v rails to split out the current, especially those PSU with high +12v rail maximum rating of above 40A, so that you can use one rail for CPU, and another for GPU, to balance up the load on the +12v rails.

The Cooler Master B-series of PSU used to have dual +12v rails, but version 2 has switched to single rail design. You can click here to find out the reason why Cooler Master made the change.

Modular vs Non-modular

The Cooler Master B500 ver.2 is non-modular. All its cable rails are attached with the PSU and cannot be detached from its outlet. A PSU with modular cabling system provides a detachable cabling system, offering the ability to remove unused connections, which can reduce clutter and improve air flow in the computer.

Modularity isn't my main concern, as the chassis of Dell Studio XPS 8100 is pretty spacious.

Lifespan and MTBF

The life span of a PSU is usually specified in mean time between failures (MTBF). The Cooler Master B500 ver.2 has an MTBF of 100,000 hours.

This should mean that the PSU has a probability of more than 75% to survive more than 3 years (and therefore has about 25% of chance to fail within 3 years). Also, it has around 25% probability to last as long as 100,000 hours.

Protection Circuits

Modern PSU has protection circuits to prevent the computer components such as the motherboard and harddisk from being fried due to excessive current drawn, or overheat, etc.

These are the keywords you can look for a PSU protection circuits:
  • SCP - short circuit protection
  • OPP - overpower/overload protection
  • OCP - overcurrent protection
  • OTP - overtemperature protection
  • OVP - overvoltage protection
  • UVP - undervoltage protection
The Cooler Master B500 ver.2 has SCP, OPP, OCP, OTP and OVP. Its manufacturer doesn't mention about UVP for it.

Connectors

The Cooler Master B500 ver.2 has the following connectors, which are sufficient for my Dell Studio XPS 8100 PC.


Sunday, August 23, 2015

How to change the default search engine in Microsoft Edge web browser from Bing to Google or others

Microsoft Edge is the web browser that comes together with MS Windows 10, which is made to replace Internet Explorer.

By default, it will use Bing as its search engine to search for the keywords you typed in its search bar. If you want to change the search engine to Google, Yahoo, Baidu or others, follow the steps below.

First, you need to use Microsoft Edge to visit to the webpage of your preferred search engine, eg. http://www.google.com.

Then, go to the Settings panel.


Scroll down to Advanced Settings section, and click on the "View advanced settings" button.


Scroll down to "Search the address bar with", and select "".

You should now be able to see "www.google.com". Select it and click the "Add as default" button.


You can repeat the steps above to add in more search engines to the selection list.


How to mitigate excessive Internet data usage of MS Windows 10

If you have upgraded your Microsoft Windows operating system to the latest Windows 10, and found out that your computer is taking up a lot of your Internet bandwidth and consuming a lot of your data usage, there are 2 settings for you to mitigate this problem.

The first setting is to disable peer-to-peer sharing of Windows Update files and Windows apps that you have downloaded in your computer with other MS Windows 10 computers in the Internet.

Go to Start > Settings > Update & Security.


Then, go to Windows Update and click on "Advanced options".


Inside Advanced Options, click on "Choose how updates are delivered".


In the next screen about Update from more than one place, you can either set the option "when this is turned on, your PC may also send parts of previously downloaded Windows updates and apps to PCs on your local network, or PCs on the Internet, depending on what's selected below.' to OFF, or if you want to share with PCs within your local network but not across the Internet, leave it as ON and select "PCs on my local network".


If you leave the option to be the default "PCs on my local network, and PCs on the Internet", many computers from the Internet will just swarm in and suck off your Internet bandwidth, causing your computer and your Internet link to become slow, and if your Internet line is on quota usage, this will also consume up your data plan within a short period of time.

To further mitigate the Internet data usage, the second setting is to tell Windows that your Internet connection is metered connection. This will prevent background processes and Windows apps use up your Internet link to sync information and provide real time updates to you.

Go to Start > Settings > Network & Internet.

Then click on "Advanced options" under Wi-Fi screen.

Set the Metered Connection to ON.


If you find this information helpful, do not be hesitated to click on the share buttons below to share it with your friends.

Wednesday, August 5, 2015

Solid state drive (SSD) will soon phase out the traditional hard disk drive (HDD)

Flash memory devices that store computer data using NAND memory chips is gradually dominating the data storage medium.

We have just seen how soon the USB thumb drives replaced the optical discs (CDR, DVDR, Blueray, ...) to become the major removable storage medium nowadays. I believe we will soon see the SSD phasing out the traditional HDD to become the major internal storage medium.

In fact, flash memory is already the data storage medium in mobile devices and slim ultrabook computers nowadays.

Traditional HDD stores data in spinning magnetic discs, and the data read/write is performed with a movable r/w head. Since there are moving parts, there will be wear and tear during operations, which limit down its lifespan. Also, it is fragile to drop or even large physical movement during operations, eg. if you shake your laptop with your hands while its HDD is busy operating, you'll probably cause  damage to the HDD, such as introducing some bad sectors.

The traditional HDD also access data much slower than SSD, which is its main disadvantage against SSD. However, HDD is cheaper to produce, and therefore carries a much cheaper price than SSD, and made available at generally higher storage capacity too.

So, the 2 main reasons why SSD hasn't replaced the HDD yet as of today, are:

  • Price
  • Available storage capacity
New NAND memory technology that evolves in 2014 will change the game plan. Now, manufacturers including Samsung, Toshiba, Intel, etc. have already come out with multi-layer 3D NAND memory chips, which stakes the flash memory cells vertically in 32 layers or even 48 layers, to achieve a 256 gigabits multilevel cell (MLC) and 384 gigabits triple-level cell (TLC) die that fit within a standard package.

It is said that this approach can greatly reduce the manufacturing cost, at the same time can make available higher storage capacity to SSD. With reduced price and comparable storage capacity with HDD, there is no more resistant for SSD to replace HDD as the major computer storage medium.

Advantages of SSD over HDD including:
  • Can package in smaller size
  • Less electricity consumption
  • Less heat produced during operation
  • High grade NAND can have a warranty period of 10 years, much longer than HDD
  • Much faster data access speed
  • More robust to drop or movement during operation

The diagram below is a Samsung 850 EVO SSD using the 3D V-NAND technology. You will soon find it inside the next generation of Apple MacBooks within the next couple of months.


Sunday, July 19, 2015

Free TM WiFi access for UniFi users

If you are a UniFi broadband user, and your mobile device is able to detect a WiFi hotspot called "TM WiFi" in a restaurant, shopping center, or any one of the 28,000+ TM WiFi sites in Malaysia, you can connect to it to have free WiFi Internet access, thus saving your valuable mobile data usage quota.

To connect to the Internet with TM WiFi, select "TM WiFi" as your WiFi network provider, then open your mobile web browser and browse to any website.


Your browser homepage will be automatically redirected to a TM WiFi login page that looks like below:


Select "UniFi" as your TM WiFi ID Type. Your login ID is your UniFi login username without the "@unifi" behind. Your password is your UniFi password.

You will be able to access to the Internet with TM WiFi upon successful login.

To find out where you can get the TM WiFi Internet hotspots, go to the webpage below:
https://www.tm.com.my/OnlineHelp/CoverageCheck/Pages/TMWifi.aspx

Monday, July 13, 2015

Upgraded my TM UniFi Internet service from 10Mbps VIP10 to new 30Mbps package

Recently, I received a call from Telekom Malaysia Sales Centre promoting the new 30Mbps UniFi HSBB Internet service to me as an upgrade to my existing 10Mbps UniFi VIP10 package.

Today, I received an email informing that the upgrade has been successfully done.

My previous package: UniFi VIP10 @ RM179 per month +6% GST
My current package: UniFi 30 + HyppTV Aneka Pack @ RM199 per month +6% GST

A test with Ookla Speedtest website shows that my Internet download speed has increased from previous 10Mbps to 30Mbps. However, I also found out that my Internet upload speed has reduced from previous 10Mbps to 5Mbps. I have just contacted TM to clarify on this reduce in upload speed.


If you are also a UniFi subscriber and has received this upgrade offer from TM, here is the information about the RM199 upgrade package that I would like to share with you:
  • 30Mbps Internet speed (but the 5Mbps upload speed yet to receive clarification from TM)
  • Unlimited quota (same as existing UniFi)
  • Free nationwide phone calls to TM numbers (same as existing UniFi. I heard that new subscriber will not get this anymore)
  • Free TM WiFi access at over 28,000 access points (same as existing UniFi)
  • HyppTV Aneka Pack (32 channels)
  • HyppTV Everywhere Plan A to watch HyppTV in 2 devices (PC, Android, or Apple). Need to install the HyppTV Everywhere app. Password will be given by email when service activated.

This upgrade is done seamlessly. It uses back all the hardware devices in existing UniFi package (broadband termination unit, WiFi router, TV set top box, cordless phone), and it is not necessary for any technician to come to your house for the upgrade. All you need to do is to restart the BTU and WiFi router after receiving the email upon successful upgrade to enjoy the new Internet speed.


Sunday, June 28, 2015

Recuva - freeware to recover deleted photo / video / music / document / email from SD card / hard disk / USB thumb drive / iPod

If you want to recover or undelete your deleted or lost files (photo, video, music, document, email, etc.), you can try a Windows freeware called Recuva by Piriform.

Recuva works on any rewriteable storage media you have, including internal and external harddisk, SD card, USB thumb drive, and even iPod. It is possible to recover from damaged or formatted disks too.

Beside that, it is also able to try to recover your deleted emails from MS Outlook, Outlook Express, Windows Live Mail, or Mozilla Thunderbird.

It can even try to recover unsaved MS Word document after a MS Word crash.

Using Recuva is pretty easy and straightforward. You just need to specify the location of your lost file...


... and then the file type...


... then Recuva will start to do the searching.

It will then list out the recoverable files for you to choose and restore them in a new storage location of your choice.

Beside the free Recuva, there are also paid version including Recuva Profession and Recuva Business Edition which include advanced features and professional technical support from Piriform.

Thursday, June 4, 2015

Converting Samsung BD-F5100 Blu-ray & DVD player to become region free (unlocked)

Most genuine DVD and Blu-ray movie discs carry a region code, and the movie can only be played in a Blu-ray and/or DVD player with firmware having the same region code with the disc.

Depends on the manufacturer of the Blu-ray / DVD player, certain players don't implement the region code checking and restriction, and can play the dics from all region. Certain other branded players, particularly Samsung, Sony, etc. impose the region code restriction.

For DVD, the region code is assigned as follow:

  • 0 = Playable in all regions
  • 1 = North America, Hawaii and Bermuda
  • 2 = Middle East, Western Europe, Central Europe, Egypt, French overseas territories, Greenland, Japan, Lesotho, South Africa and Swaziland
  • 3 = Southeast Asia, Hong Kong, Macau, South Korea and Taiwan 
  • 4 = Australia, New Zealand, Central America, the Caribbean, Mexico, Oceania, South America
  • 5 = The rest of Africa, Former Soviet Union, the Indian subcontinent, Mongolia, North Korea
  • 6 = Mainland China
For Blu-ray, the region code is assigned as follow:
  • A = East Asia (except Mainland China and Mongolia), Southeast Asia, North America, South America and their dependencies
  • B = Africa, Southwest Asia, Europe (except Russia and Kazakhstan), Oceania (including Australia and New Zealand) and their dependencies
  • C = Central Asia, East Asia (Mainland China and Mongolia only), South Asia, central Eurasia and their dependencies
The problem with this region code is that, if you are staying in Southeast Asia and want to play a Hollywood DVD movie in genuine discs, the movie might not play due to this region code restriction. This actually encourages people to look for pirated copy or to download the DVD ripped copy from the Internet.

Anyhow, there are methods to hack certain Bly-ray and/or DVD players by hardware chip modification, or just by unlocking the region restriction using the remote control.

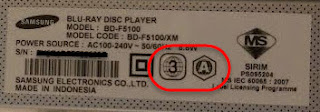
I have a Samsung BD-F5100 Blu-ray & DVD player shipped with the latest firmware version 1019.0. Its region code for DVD and Blu-ray is stated on the label stuck behind the unit.


The steps to unlock this Samsung BD-F5100 Blu-ray & DVD player to make it region free and enabling it to play DVD from all the regions are as below.

Step 1: Take out any disc in the player, and power off the unit.

Step 2: Switch it on. Wait until the Main Menu of the player appears on the TV screen.

Step 3: Press the REPEAT button (the black button under the yellow "C") on its remote control.

Step 4: Use the keypad on remote control to punch in the following 5 digits, depends on the DVD region code stated in the label (the DVD region code in the picture above is "3").

For Region 1: 2 9 3 3 4
For Region 2: 5 7 5 3 8
For Region 3: 5 6 7 3 2
For Region 4: 7 6 8 8 4
For Region 5: 5 3 8 1 4 
For Region 6: 2 4 4 6 2

Step 5: Once you punched in the above 5-digit codes, you will see your current region code shown up on the top left corner in your TV screen. Before this region code disappears, quickly punch in "9" with your remote control.

Step 6: The number on the TV screen will change to "9". Wait for it to disappear.

Step 7: Power off the player.

Your BD-F5100 player should be unlocked to region free by now. Repeat Step 1 to Step 4 above, you will be able to see your region code has changed to "0".

Test it with a DVD disc from different region. The movie should be able to play in your player now.


Thursday, May 7, 2015

Updated my Samsung Galaxy Tab (GT-P1000) to Storm CyanogenMod 11 with Android 4.4.4 (Kitkat) from stock firmware of Android 2.3.3 (Gingerbread)

My first generation 7" Samsung Galaxy Tab (GT-P1000) is aged, but is tough and still functioning well.

Although it only has a single core CPU, 512MB RAM and 16GB internal storage, it is still capable to handle most of the task as an Android tablet, especially with the newer firmware of Android Kitkat and above.

However, its official firmware by Samsung is stuck at the last generation Android version 2.3.3 (Gingerbread), last updated a few years ago.

Luckily, there are supporters and developers who keep working on its latest unofficial firmware. One of them is Storm31 who makes customized version of Cyanogenmod Android OS for this Samsung Galaxy Tab.

With this unofficial firmware using Android Kitkat, the Samsung Galaxy Tab runs even smoother,  more powerful and more feature rich than its latest stock Gingerbread firmware.

I have successfully updated my GT-P1000 from stock Android 2.3.3 to Storm CM11 Android 4.4.4, and I'll share with you how to do it.

First of all, backup all the data in your tab that you want to save to your PC or to its external SD card. Warning: this upgrade will wipe out everything and no user data will left behind in the tab. You better save all the data you want to save now.

Then, remove the external SD card from the tab. If you keep the SD card in the tab, the data in it might be wiped out too.

Download the following files:

GB-Stock-Safe-v5.zip contains the latest official stock firmware for GT-P1000. You'll need this in case you bricked your tab along the upgrading process. This will restore your tab back to its original state with stock firmware of Android 2.3.3 (but without any user data).

Inside it you'll also find Samsung USB driver for Windows which you need to connect your computer to your tab in order to perform the upgrade. If you have already installed the Samsung USB driver in your computer before, then you don't need to install it again.

Inside it you can also find Odin 1.7, the firmware flashing tool to flash the firmware file(s) from your computer to your tab using the USB cable.

Samsung_GT-P1000_CyanogenMod_install_all_in_one.zip contains the ClockworkMod (CwM) Recovery, the CM 9.1 firmware, and a later version of Odin 1.85.

Note that you cannot upgrade your firmware from stock Android 2.3.3 directly to CM 11. You need to replace the stock firmware with CM 9.1 first, then update it to CM 10.2, then only to the latest CM 11 or upcoming CM 12.

You need to replace the stock Recovery in the tab's ROM with ClockworkMod Recovery in order to flash the CM firmware from the SD card (either internal or external) into the tab.

cm-10.2-20131104-UNOFFICIAL-p1.zip is the firmware flash file of CM 10.2.

cm-11-20150428-UNOFFICIAL-p1.zip is the firmware flash file of CM 11. If there is a newer version than this, you can use the newer version instead of this one.

CyanogenMod Android does not come with Google Play Store and Google Play Service, that's why you need pa-gapps-modular-pico-4.4.4-20150308-signed.zip to flash the Google Play Store and Google Play Service into your tab. Once you have the Google Play Store (previously known as Market) in your tab, you can use it to install more Google apps and Android apps into it.

After you have done backup of all the data you want to save from the tab to your PC, removed the SD card from the tab, charged the tab to at least 90% battery level, and installed the Samsung USB driver, you are ready to start this upgrade process.

Step 1: Unzip GB-Stock-Safe-v5.zip in your PC.

Step 2: Power off your tab. Then hold down its Volumn Down button, at the same time, long press the Power button. Your tab will go into Download mode with screen looks like below:


Step 3: Execute Odin3 v1.7.exe inside the Odin3_v1.7 folder.

Step 4: Connect your tab to your computer using its USB cable. You should see the first box in Odin's ID:COM section turns yellow.

Step 5: Click the PIT button and select the file gt-p1000_mr.pit.

Step 6: Click the PDA button and select the file GB_Stock_Safe_v5.tar.

Step 7: Click the PHONE button. If your tab is GSM-based (Asia/Europe/Middle East/Oceania/Africa/Rest of the world...), select modem.bin inside the folder JPZ Modem. If you are an American T-Mobile user, select modem.bin inside the folder T-Mobile Modem. If you are AT&T (USA), TelCel (Mexico) or Telstra (Australia) user, select modem.bin inside JK3 Modem instead.

Step 8: Click the Start button. The flashing process will begin. Let it run until you see a green PASS! box. Do not power off your PC or your tab, or disconnect the USB cable before you see the green PASS!.

In any event you bricked your tab, you can come here and perform Step 2 to Step 8 above to bring your tab to live again.

Step 9: Your tab should reboot. If not, reboot it. The Android initial setup screen will appear, don't bother to fill in any information, just tap on Next or Skip until you reach the home screen.

Step 10: Turn off your tab. Disconnect its USB cable from PC, and put it into Download mode again (Volumn Down + Power).

Step 11: Unzip Samsung_GT-P1000_CyanogenMod_install_all_in_one.zip in your PC.

Step 12: Now you can execute the newer Odin3 v1.85.exe inside the Samsung Odin3 v1.85 folder.

Step 13: Connect your tab to your computer using its USB cable.

Step 14: Click the PDA button and select the file CF-Root-TAB7_XX_OXA_JQ1-v3.3-CWM3RFS.tar inside ClockworkMod Recovery folder.

Step 15: Click the Start button to flash ClockworkMod Recovery into your tab.

Step 16: Power off your tab. Now you can plug back the external SD card to the tab if you want.

Step 17: Reboot your tab until you get back the Android home screen.

Step 18: Set your tab USB connection to Mass Storage Mode.

Step 19: Transfer the file cm-9.1.0-p1.zip inside CyanogenMod v9.1 for Galaxy Tab GT-P1000 folder to the tab's SD card (internal/external).

Step 20: Turn off your tab. Go into Recovery mode by holding Volumn Up button and at the same time long press the Power button.

Step 21: From the Recovery menu, select Install ZIP then Choose ZIP from SD Card. Locate and select the cm-9.1.0-p1.zip file, then confirm the selection. CM 9.1 will be flashed into your tab and replace the stock firmware. Wait for the process to finish. If there is any error, repeat this step again to reflash CM 9.1.

Step 22: Reboot your tab. The Android initial setup screen will appear, don't bother to fill in any information, just tap on Next or Skip until you reach the home screen.

Step 23: Repeat Step 18 until Step 21 for CM 10.2. The file to flash this round is cm-10.2-20131104-UNOFFICIAL-p1.zip. Note that updating from CM 9.1 to CM 10.2 might not be so smooth and might need to repeat Step 21 a few times before a final success.

Step 24: Reboot your tab. The Android initial setup screen will appear. This time, you can fill in your information, and connect to your local WiFi, until you reach the home screen.

Step 25: Repeat Step 18 until Step 21 again for CM 11. The file to flash this round is cm-11-20150428-UNOFFICIAL-p1.zip.

Step 26: Finally, flash the minimal Google apps. Repeat Step 18 until Step 21 again. The file to flash this round is pa-gapps-modular-pico-4.4.4-20150308-signed.zip.

Step 27: Reboot your tab. You will find the Google Play Store appears in your home screen.

Step 28: The keyboard that comes with CyanogenMod might be too basic and primitive. I replaced it with iFlytek Voice Input for Pad which you can install from Google Play Store.

Now, you can enjoy your GT-P1000 tab with new generation of Android and the CyanogenMod experience.


Saturday, May 2, 2015

Updated the BIOS of my Lenovo Yoga 2 Pro to Version 76CN43WW

It was just shortly about a month Lenovo last released the BIOS security update Version 76CN42WW for the Yoga 2 Pro ultrabook laptop, now there is another new BIOS update Version 76CN43WW.

Lenovo informed that this BIOS for Yoga 2 Pro Version 76CN43WW release on 29 April 2015 will increase the stability of DRAM.

You can click here to go to the download page of the latest BIOS update utility for Lenovo Yoga 2 Pro.

The BIOS update is pretty straightforward. Make sure that the battery level of the laptop is at least 80%, and it is plugged on to the AC power supply. Then, run the downloaded BIOS Update Utility.

The new BIOS will be flashed with the InsydeFlash utility from Windows 8.1. After that, the system will reboot itself, and the BIOS update will be performed.
After the BIOS update completed, the laptop will reboot itself again and back to the Windows login screen.

There is no data lost for this BIOS update. Even the BIOS settings and passwords remain after the update.

Monday, April 27, 2015

Change Google Now cards temperature display from Fahrenheit to Celsius

If you have an Android smartphone with Google Now, and you would like to change the temperature display in your Google Now cards showing weather information of your favourite place from Fahrenheit to Celsius, or vice versa, I'll show you how I did it in my HTC One M8 running on Android Lollipop version 5.0.1.


Firstly, locate the 3 little dots on the top right corner of the weather card. Tap on it.

You will be asked 3 questions. The first question is whether you are interested in weather updates for the location, answer Yes, then swipe left to answer the second question.

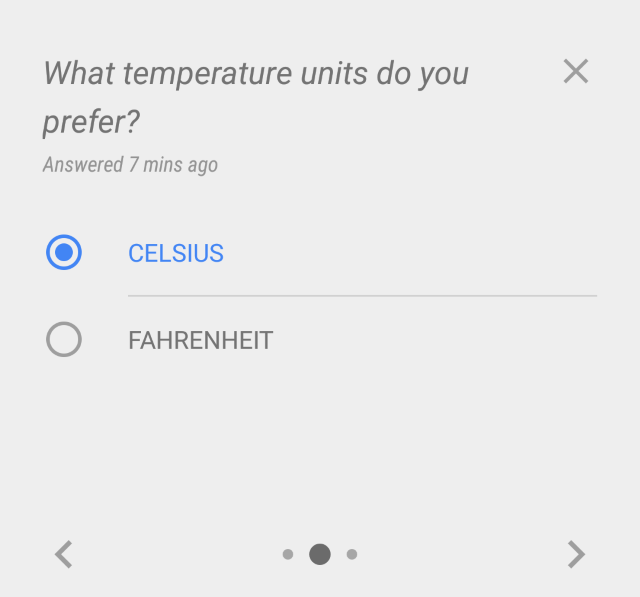
The second question "what temperature units do you prefer?" is exactly the place for you to tell Google Now to display the temperature in Celsius or Fahrenheit.


Make your choice and then swipe left again for the third question.

Answer Yes to "continue to get weather updates". Then tap on the "X" on the right hand side of the question to return to Google Now cards screen.

Once you have answered these questions, you can find them in Google Now customize setting. To locate it, tap on the three bars on the left of Google to open the Google Now menu.


Then, tap on Customize.
Lastly, tap on "Everything Else".


You will be able to change your preference on temperature units here too.

Saturday, March 28, 2015

BIOS security update for Lenovo Yoga 2 Pro and Yoga 3 Pro laptops

On 27 March 2015, Lenovo has released the latest BIOS update (version 76CN42WW) for Lenovo Yoga 2 Pro ultrabook laptop.

On the same day, Lenovo has also released the latest BIOS update (version A6CN49WW) for Lenovo Yoga 3 Pro ultrabook laptop.

This latest version BIOS for Yoga 2 Pro and Yoga 3 Pro respectively fixed all merged issues from previous, and also fixed the security issues in the Intel UEFI (Unified Extensible Firmware Interface) module.

You can click here to go to the download page of the latest BIOS update utility for Lenovo Yoga 2 Pro, and click here to go to the download page of the latest BIOS update utility for Lenovo Yoga 3 Pro.

The BIOS update is pretty straightforward. Make sure that the battery level of the laptop is at least 80%, and it is plugged on to the AC power supply. Then, run the downloaded BIOS Update Utility.


The new BIOS will be flashed with the InsydeFlash utility from Windows 8.1. After that, the system will reboot itself, and the BIOS update will be performed.
After the BIOS update completed, the laptop will reboot itself again and back to the Windows login screen.

There is no data lost for this BIOS update. Even the BIOS settings and passwords remain after the update.

Thursday, March 26, 2015

Using SQLite Expert to develop and administer SQLite3 databases

SQLite is today's de facto database for mobile development, particularly as the local database used in Android and iOS apps. It is also widely used to handle data storage in embedded system.

In fact, SQLite is also a good choice for lightweight database to handle data storage and query for Windows / Linux / Mac applications. It is released in the public domain and free for use (compared with other non-free alternative such as MS Access database). It is serverless and doesn't need installation nor configuration of database system (compared with alternative such as MySQL, PostgreSQL, etc.)

Now come to the big question: how to create, develop and maintain the SQLite databases?

There are quite a number of tools available, some are free and some are non-free. I have chosen SQLite Expert for use in Windows development environment.

SQLite Expert comes in 2 editions: the free Personal Edition (free for both personal and commercial use), and the non-free Professional Edition with additional features. You can click here to find out the feature differences between the 2 SQLite Expert editions. The Personal Edition should be good enough for most SQLite application developers.

SQLite Expert is able to handle Unicode data, Views and Virtual Tables.

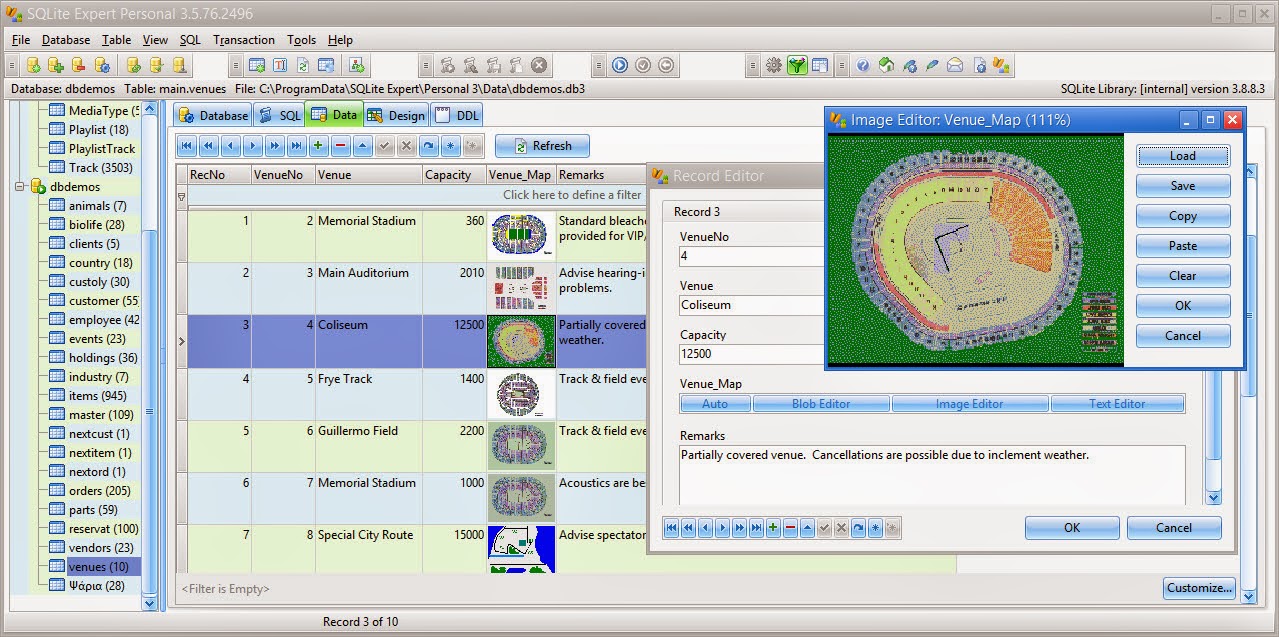
SQLite Expert has a nice and easy to use GUI. It even comes with Hex Editor (to edit fields with binary data) and Image Editor (to edit fields with image data).


It has a powerful visual editor for database table creation, restructuring and maintenance, which able to handle columns, indexes, foreign keys, triggers, unique and check constraints.


It also has a handy Data Definition Language (DDL) viewer to show the DDL of tables.


For the Professional Edition, you will also get a Visual SQL Query Builder, able to import and export data, Lua / Pascal scripting support, etc.

If you are in search for a good database tool for SQLite3, I strongly recommend this one to you.

Friday, March 6, 2015

Boost WiFi coverage with TP-Link TL-WA860RE 300Mbps WiFi range extender with AC passthrough

My TP-Link TL-WDR3600 N600 wireless dual band gigabit router is located upstairs near the center of the house, and my HiMedia Q5II Android 3D smart TV + media player box is located downstairs.

There is no problem for the HiMedia Q5II box to connect wirelessly to the TP-Link wireless router, until one day, when I streamed a 1080P full HD movie stored in my Transcend StoreJet 25A3 USB 3.0 1TB external harddisk which connected to the TP-Link wireless router with USB cable, over the air through WiFi to my HiMedia Q5II box which connected to my TV with HDMI cable. The movie didn't play smoothly on the TV.

As a result, I decided to boost my home WiFi coverage with a TP-Link TL-WA860RE 300Mbps WiFi range extender. The price of this WiFi range extender is just slightly below RM100.


I place this TP-Link TL-WA860RE downstairs near the center of the house, so that it can connect wirelessly with the TL-WDR3600 upstairs, and act as WiFi repeater to boost up the WiFi signal downstairs.


Now my HiMedia Q5II TV box is able to play 1080P full HD movie streamed from my Transcend external harddisk without problem.

Beside able to act as WiFi repeater to expand the WiFi coverage and boost up the WiFi signal, this TP-Link TL-WA860RE has one 10/100Mbps Ethernet LAN Port at its bottom, enabling it to become a WiFi bridge to wiredly connect to its network client using a LAN cable.

It also comes with an AC power passthrough socket in front, so that the power socket it plugged into is not wasted, and can still connect to electrical device up to 13 Amperes.

This TP-Link TL-WA860RE WiFi range extender is able to connect with the WiFi AP/router in either Universal or WDS mode.

The Universal mode can work with almost any kind of WiFi AP/router running at 2.4GHz frequency range. However, it might not be compatible with certain applications running in the WiFi clients.

The WDS mode is compatible with same TP-Link brand of wireless AP/router that also support WDS. It does not work with WiFi AP/router that doesn't support WDS, and it might not work well with other brand of WiFi AP/router even WDS is supported. It will not have applications compatibility issue with the WiFi clients.

Theoretically, passing of network packets in the range extender is more efficient with the WDS mode.

In order to enable WDS mode of connection, wee need to enable WDS bridging in the host AP/router and inform it about the range extender's SSID, MAC address and encryption method.


You can access to the web-based admin page of the TP-Link TL-WA860RE WiFi range extender by pointing your web browser's URL to http://tplinkrepeater.net/ or http://192.168.0.254 .

You must also provide the SSID and MAC address of the host AP/router information to the range extender.


When the SSID of the range extender is set to be the same with the WiFi AP/router, your mobile devices will automatically switch over to the WiFi provider with the stronger signal at its location. However, you might face problem of the mobile device keeps on connecting and disconnecting, switching from one WiFi provider to another, at the area where their signal are about equal strength.

You can also set the SSID of the range extender to be different from the WiFi AP/router. This will give you easier control over your mobile device to manually decide which WiFi provider it should connect to. Your mobile device is still able to automatically switch over to SSID with stronger signal when its WiFi connection with current connected provider is too weak to maintain the link and transmit data.

The wireless security setting must pair with the same setting in the host AP/router.


The TP-Link TL-WA860RE WiFi range extender also has a WPS button to pair with the host WiFi AP/router easily. However, this will connect it to its upstream AP/router using the universal mode instead of WDS mode.

One drawback of using WiFi range extender is that, its wireless connection is designed to work in half-duplex mode. This mean it cannot "talk" with the host AP/router and the wireless client at the same time. To relay the data over the air, it first talk with the transmitting wireless device, and then talk with the target device to pass the data on. Therefore, although the TP-Link TL-WA860RE supports wireless throughput of up to 300Mbps, when working in wireless repeater mode, the bandwidth is shared between the data sending and target devices, so each of them will get a throughput of around 150Mbps only.

On the other hand, when the TL-WA860RE is working in wireless bridge mode whereby one of the device is connected wirelessly and another device is connected through LAN port, the device connected wirelessly will get the maximum throughput of 300Mbps, while the one connected with LAN cable will get a maximum throughput of 100Mbps. The effective maximum connection bandwidth will be limited to 100Mbps, which is the highest at its Ethernet LAN port.

Bear in mind that the actual connection speed depends on the lowest supported connection speed of the 2 connected devices. Over the air, the wireless connection speed is further reduced over distance, physical blockage and signal interference with other wireless devices (such as neighbours' WiFi, cordless phone, Bluetooth devices, etc.) around the area.

Friday, February 27, 2015

Make your Windows PC into WiFi hotspot with open source Virtual Router

Have you been to a place (such as hotel room, meeting room, training room, etc.) where no WiFi service is available, and instead LAN connection is available for Internet access, and you need to connect a number of your gadgets (such as handphone, tablet, etc.) to the Internet?

With the Virtual WiFi and Wireless Hosted Network features introduced in MS Windows 7 (also available in its successor Windows 8 as well), you are able to make your laptop or PC with wireless network card into a WiFi hotspot to share its Internet access with other WiFi connected devices (computer, handphone, tablet, printer, camera, etc.)

Virtual Router by Chris Pietschmann is a small Windows application that make use of this Virtual WiFi and Wireless Hosted Network features in Windows 7 and above, to provide a very simple and fool proof way for you to make your laptop (or PC with wireless network card) to be the WiFi hotspot. It is open source and free for download and use under Microsoft Public License (Ms-PL).

With Virtual Router, you can wirelessly share any Internet connection (WiFi, LAN, Cable Modem, Dial-up, Cellular, etc.) of your computer with any WiFi device (Laptop, Smart Phone, iPod Touch, iPhone, Android Phone, Zune, Netbook, wireless printer, etc.) These devices connect to Virtual Router just like any other WiFi access point, and the connection is secured using WPA2 encryption.

This small application is so easy to use that, you just need to define your desired SSID and password, and select the network interface to share the Internet access, then click the Start Virtual Router button.


Connected devices will be shown in the Peers Connected panel.

The device will be connected with WPA2 data encryption, and get a DHCP assigned IP address.


Click here to go to the download webpage of Virtual Router.

Monday, January 26, 2015

Updated the BIOS of my Lenovo Yoga 2 Pro laptop to Version 41

Lenovo has just released a new BIOS update for Lenovo Yoga 2 Pro laptop (version 76CN41WW) on 20 January 2015.

I have just updated the BIOS of my Lenovo Yoga 2 Pro laptop from Version 38 to this latest Version 41.

You can download the latest BIOS update utility of Lenovo Yoga 2 Pro from their support website here.

The Lenovo BIOS Update Utility requires the laptop to be plugged on to the AC power supply before it proceed with the BIOS updating action.

The new BIOS will be flashed with the InsydeFlash utility from Windows 8.1. After that, the system will reboot itself, and the BIOS update will be performed.

After the BIOS update completed, the laptop will reboot itself again and back to the Windows login screen. This is much better than the previous Version 38 update which ended in a blank screen with keyboard backlit on.

There is no data lost for this BIOS update. Even the BIOS settings and passwords remain after the update.

Friday, January 16, 2015

Fixed Samsung Galaxy Note 8 battery fast draining problem

My Samsung Galaxy Note 8 is using Digi data plan to access the Internet.

Since last week, its battery was draining very fast. Battery Monitor Widget Pro showed that even when it is idle and not in use, it lost battery charge at the rate of around 3.5% per hour. Within half a day, 50% of its battery drained off from fully charged, even when not in use!


The Statistics screen in Battery Monitor Widget Pro told me that it was the Android System that drained a lot of battery, but I need more detail to nail down the root cause.

I finally found the culprit with Better Battery Stats. In its Kernel Wakelock screen, I discovered the ril-fd wakelock was keeping my tablet awake most of the time, and it hardly gone into Deep Sleep mode.

A search in the Internet told me this ril-fd wakelock is related to a feature called Fast Dormancy, and it seems that some sort of flaw in Digi base station network has caused this Fast Dormancy feature to drain off battery in my tablet.

Finally, I managed to turn Fast Dormancy off by using FastDormancy Toggle for i9300. Yes, my Samsung Galaxy Note 8 is N5100, but this app seems to work well with other Samsung mobile devices running on Android 4.x as well.

In order to use FastDormancy Toggle for i9300, your Samsung mobile device need to be rooted. After toggling the Fast Dormancy on/off, you need to restart the device and charge the battery up to 100%.

Now, My Samsung Galaxy Note 8 is back to normal, draining battery at the rate of around 0.27% per hour when not in use.


I am running on stock ROM with build number KOT49H.N5100XXDNJ2 (Android version 4.4.2). It is rooted, as I need to gain back full access to its SD card. Now, the root access also enables me to toggle the Fast Dormancy feature to get rid of battery draining problem.

Friday, December 19, 2014

My Belkin B2E027 4-port 2.4A full rate USB power charger

With more and more mobile devices and gadgets at home, which commonly use Type A USB for battery recharging, I've bought a Belkin B2E027 4-port USB power charger to charge up to 4 devices at the same time.


This Belkin USB power charger doesn't come cheap, but it is not as expensive as it listed price which you can notice in the photo above. I bought it for RM88.

So, what's the different of this 4-port USB charger from other cheaper alternatives, other than the Belkin brand which is a symbol of reliability?

Firstly, all the 4 USB charging ports support fast charging up to 2.4 Amperes each at full rate. Therefore, all of them are equally capable to charge tablets, iPad, and other devices that need 2 Amperes charging which won't charge on the normal 1 Ampere USB charging port.

Secondly, it comes with a $2500 Connected Equipment Warranty from Belkin.

Thirdly, it is attached with a 6 feet long power cable. The advantage is, it can be place at a nice location some distance away from the wall socket. The disadvantage is, you might find the cable too long to keep, especially when you are on the way bringing it with you from one place to another.

However, its size of about 5x4 square inches is quite big and takes up some space on the table.

See it in action below, when one of the ports is in used...


Hint: Click on the "Older Posts" link to continue reading, or click here for a listing of all my past 3 months articles.