Sunday, June 14, 2015

How many hours to wait before power on a refrigerator after moving it

If you bought a new refrigerator which will be delivered from the shop/warehouse, travelling on a lorry/van to your house, unloaded and placed at your desired location, you will most likely be advised to only turn it on after a couple of hours.

The timeframe of such advice can vary from 30 minutes to as long as 24 hours.

This waiting period also applies when you move your fridge from one location to another, be it within your house, or from your house to another house.

I have done quite an extensive Internet searching regarding this power on waiting period for refrigerator after moving, and believe that the following information is pretty reliable.

The waiting period is for the oil that lubricates the cylinders in the compressor of the refrigerator to settle down to where it should reside, with the help of the gravity.

You will need a shorter period (as short as 5 minutes) of waiting time if the refrigerator is always in upright position when being moved.

If you tilted the refrigerator for less than 30 degree, there will be chances for the oil to spill over into the tubes behind the refrigerator. This kind of tilting is common when it is loaded and unloaded from a lorry/van. It is better for you to wait for 1 hour to let the oil in the tube to gradually move back to where it supposes to be.

If the tilting is more than 30 degree, or the refrigerator has been laid down horizontally, it is better for you to wait for 4 hours or more.

If the refrigerator has been put in upside down position (which shouldn't be in common sense), then you will need to wait for 24 hours or more.

If you are unsure, just wait for at least 4 hours before power it on after it has settled down in its new place.

What are the dangers of turning on the refrigerator immediately or with too short waiting period?

  • The motor might subject to damage due to lack of lubrication.
  • The oil might clog in the tube, causing malfunction to the refrigerator.

Thursday, June 4, 2015

Converting Samsung BD-F5100 Blu-ray & DVD player to become region free (unlocked)

Most genuine DVD and Blu-ray movie discs carry a region code, and the movie can only be played in a Blu-ray and/or DVD player with firmware having the same region code with the disc.

Depends on the manufacturer of the Blu-ray / DVD player, certain players don't implement the region code checking and restriction, and can play the dics from all region. Certain other branded players, particularly Samsung, Sony, etc. impose the region code restriction.

For DVD, the region code is assigned as follow:

  • 0 = Playable in all regions
  • 1 = North America, Hawaii and Bermuda
  • 2 = Middle East, Western Europe, Central Europe, Egypt, French overseas territories, Greenland, Japan, Lesotho, South Africa and Swaziland
  • 3 = Southeast Asia, Hong Kong, Macau, South Korea and Taiwan 
  • 4 = Australia, New Zealand, Central America, the Caribbean, Mexico, Oceania, South America
  • 5 = The rest of Africa, Former Soviet Union, the Indian subcontinent, Mongolia, North Korea
  • 6 = Mainland China
For Blu-ray, the region code is assigned as follow:
  • A = East Asia (except Mainland China and Mongolia), Southeast Asia, North America, South America and their dependencies
  • B = Africa, Southwest Asia, Europe (except Russia and Kazakhstan), Oceania (including Australia and New Zealand) and their dependencies
  • C = Central Asia, East Asia (Mainland China and Mongolia only), South Asia, central Eurasia and their dependencies
The problem with this region code is that, if you are staying in Southeast Asia and want to play a Hollywood DVD movie in genuine discs, the movie might not play due to this region code restriction. This actually encourages people to look for pirated copy or to download the DVD ripped copy from the Internet.

Anyhow, there are methods to hack certain Bly-ray and/or DVD players by hardware chip modification, or just by unlocking the region restriction using the remote control.

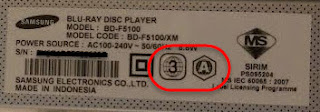
I have a Samsung BD-F5100 Blu-ray & DVD player shipped with the latest firmware version 1019.0. Its region code for DVD and Blu-ray is stated on the label stuck behind the unit.


The steps to unlock this Samsung BD-F5100 Blu-ray & DVD player to make it region free and enabling it to play DVD from all the regions are as below.

Step 1: Take out any disc in the player, and power off the unit.

Step 2: Switch it on. Wait until the Main Menu of the player appears on the TV screen.

Step 3: Press the REPEAT button (the black button under the yellow "C") on its remote control.

Step 4: Use the keypad on remote control to punch in the following 5 digits, depends on the DVD region code stated in the label (the DVD region code in the picture above is "3").

For Region 1: 2 9 3 3 4
For Region 2: 5 7 5 3 8
For Region 3: 5 6 7 3 2
For Region 4: 7 6 8 8 4
For Region 5: 5 3 8 1 4 
For Region 6: 2 4 4 6 2

Step 5: Once you punched in the above 5-digit codes, you will see your current region code shown up on the top left corner in your TV screen. Before this region code disappears, quickly punch in "9" with your remote control.

Step 6: The number on the TV screen will change to "9". Wait for it to disappear.

Step 7: Power off the player.

Your BD-F5100 player should be unlocked to region free by now. Repeat Step 1 to Step 4 above, you will be able to see your region code has changed to "0".

Test it with a DVD disc from different region. The movie should be able to play in your player now.


Sunday, May 24, 2015

Eco Breeze EB-2228 ceiling mount air circulator with LED lights and ionizer

I have recently installed an Eco Breeze EB-2228 ceiling mount air circulator with LED lights and ionizer.


It is basically a small fan with energy saving motor (claimed to be able to save up to 30% electricity) function to improve air circulation and regulate the room temperature, best working together with a nearby air-cond. It will boost the cooling effectiveness and efficiency of the air-cond, and claimed to be able to save up to 20% electricity consumption cost of air-cond too.

Under the fan is a 360 degree air jet rotation grill, which can let us manually direct the air blowing direction by stopping the grill rotation at a fixed position, or to let the air circulate 360 degree by keeping the jet rotating.

Surrounding the grill are several blue and white colour LED lights (the black dots in the photo above. They are off when the photo was taken), which will produce a soft, dim, aesthetic lighting.

There is a built in ionizer, which can be manually turned on or off.

At the outer part are 4 E27 lamp bulb base, which can put in LED bulbs. The light bulbs do not come together with the air circulator package, and need to purchase separately. In the photo above, I use the 5 watts warm white (yellowish) LED bulbs, which are pretty bright when all 4 of them are turned on.

This Eco Breeze air circulator comes with an all-in-one remote control, which can control separately for:
  • Fan on/off
  • Fan speed (slow, medium, high)
  • Louver vent oscillation on/off
  • Ionizer on/off
  • On/off timer (2, 4, 6 hours)
  • Light on/off
  • Circulation among 5 lighting modes
The 5 lighting modes are:
  • Single LED blue light
  • 4 LED white light
  • Air circulator internal blue light
  • 2 diagonal light bulbs
  • 4 light bulbs
After installation, this Eco Breeze EB-2228 air circulator is flat with the ceiling. It needs a 6 inches space above the ceiling to fit in completely.

The fan blades is pretty short though. Therefore, do not expect the wind produced will be as powerful as normal ceiling fan or wall fan, which has longer blades than this air circulator. After all, it is meant to circulate the air and best working together with nearby air-cond or ceiling fan, rather than blowing air like normal fan by itself.


Thursday, May 21, 2015

Yale YKB/200/CB2 20 hooks security key cabinet box with combination lock

I have just purchased a Yale YKB/200/CB2 20 hooks security key cabinet box with combination lock to secure and organize my apartment keys.


This key box with powder coated black surface can be wall mounted. It can be secured with its 3-dial resettable combination lock. This keyless access design is the main attraction for me to buy it, as most other similar products are using normal key lock, causing the user to still need to carry the key to unlock the box.

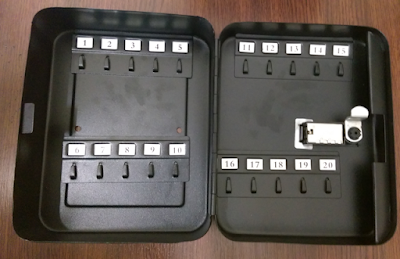
This key box is pretty small. Its dimension is 20cm x 16cm x 8cm. It contains 20 key hooks inside, able to store many keys. You can lock your car's remote control and apartment door/lift access RFID cards in it too.

Saturday, May 16, 2015

JetBox air-cond cleaning service by Dustbox Solutions

Dustbox Solutions has just performed an impressive cleaning service for the 4 units of air conditioners at my home today.

Engaging a good air-cond cleaning service provider is not easy. The price to clean one unit of split wall-mounted air-cond (for both indoor and outdoor unit) in Klang Valley can range from around RM75 to around RM200.

The price tag might or might not be related to the following factors:

  • Type of cleaning (e.g. chemical clean, water clean, ...)
  • Type of air-cond (e.g. inverter type normally cost more, higher HP normally cost more, ...)
  • Technology use
  • Comprehensiveness of the scope of service
  • Workmanship
  • After service warranty period
The Jetbox air-cond cleaning service by Dustbox Solutions cost me RM120 per unit, regardless of the HP of the air-cond, which I find is value for money. All my air-conds are normal type (not inverter type), and the one with the highest power is 2 HP.

The payment can be made using credit card on their website while booking for their service online. There will be surcharge if you opt to pay by cash when the actual service commenced on site.

The company sent 2 workers to my house, and they used about 45 minutes to clean one unit of air-cond with their JetBox power cleaning technology. They carry a blue JetBox with them to perform the cleaning, which I was told the machine is R&D from their own company.

They have even put up the video below in YouTube to explain about the JetBox indoor unit service.


The scope of service covers:
  • Outdoor unit checking for compressor fan, running capacitor, refrigerant gas pressure, and copper pipe liquid.
  • Indoor unit checking for swinging flap function, water leaking observation, visual check, air temperature check, and air flow check.
  • Refill of R22a gas.
  • Outdoor unit cleaning with chemical, rinse the condenser coil and compressor cover, check fan bearing and lubricate.
  • Indoor unit cleaning with chemical covering coil unit, barrel fan, covers, filters, louver & drain pan, treat condensate drain with anti-algae, disinfect and wipe cover.
I was given a detail service report for each unit of the air-conds (the scope of service listed above is copied from the checklist in the report), and 3 months of workmanship warranty.

If there is any faulty in terminal wire, supply wire, relay/fan capacitor, compressor, motor, gas leakage, run capacitor, etc., their worker can perform a repair for you with additional repair charges.

I am satisfied with their service and will engage them again for air-cond cleaning service in the future.

Monday, May 11, 2015

Investment opportunity in TravelCenters of America (NYSE:TA)

Some background information provided by the company to its investors:

TravelCenters of America (NYSE:TA) is the largest publicly-traded operator/franchisor of full-service highway Refuel-Replenish-Refresh (RRR) travel centers in the United States.

As of 31 March 2015, the Company's business included 251 travel centers, 175 of which were operated under the "TA" brand name and 76 of which were operated under the "Petro Stopping Centers" brand name located in 43 states.

TA and Petro Stopping Centers have the largest sites on average, with full-service offerings that include diesel and gasoline fuel, truck maintenance and repair, full-service and fast food restaurants, large convenience stores, car and truck parking and other services dedicated to serving professional truck drivers and highway motorists.

As of 31 March 2015, TravelCenters of America also operated 60 convenience stores with retail gasoline stations, primarily under the "Minit Mart" brand name.

When the US market opened on Thursay 7 May 2015, TA share price hit a 52-weeks record high of US$18.10 right after it announced its first quarter result. Surprisingly, right after the stock price hit this 52-weeks high, it slumped down all the way to close at US$14.98 on Friday 8 May 2015, wiping out more than one month previous price gain since its rally from March 2015 onwards.

Graph snapshotted from Google Finance

What's going on? I think The Specialist has written a nice article to explain about the situation in Seeking Alpha website titled "Oops, TravelCenters Of America Did It Again - Buy Time?" and I am pretty agreeable with his view. I'm not going to repeat the content in his article here, you can click the link and read his report if you are interested.

The diagrams about TA below are taken from NASDAQ Stock Market website.


The chart above shows that TA's revenue (US$1.407 billion) dropped a lot in first quarter of fiscal year 2015, compared with previous years in 2014 and 2013.

However, its EPS (US$0.41) recorded in the quarter increased a lot compared with previous years in 2014 and 2013. This means its profit margin actually jacked up a lot, which is the key argument point of The Specialist in his article.

When we look further to more older data...


we'll find out that TA actually used to make lost in first quarter almost every year, and its earning has a cyclical pattern which is normally weak during the 4th and 1st quarter, and will turn strong during the 2nd and 3rd quarter.

From here, we observed that:
  • TA's result in Q1-2015 is actually very impressive. It is a hefty 40 fold from previous year, not to mention traditionally it is "suppose" to make lost during this quarter.
  • Barring unforeseen circumstances, we expect TA's result in Q2 and Q3 will be better than Q1, as that is its cyclical trend for years.
In fact, we can see the institutional investors have more buying than selling of TA during this price drop after it hit 52-weeks high.


One month ago, Zacks Equity Research has written a report explaining the 3 Reasons Value Stock Investors Will Love TA, and I believe the points are still intact as of today.

So, is this really a great investment opportunity given by its price drop? You can continue to find out more facts and figures about it.


Disclaimer: This article is intended for sharing of point of view only. It is not an advice or recommendation to buy or sell any of the mentioned stock counters. You should do your own homework before trading in the stock market.

Sunday, May 10, 2015

Disabling customized ringtone in Whatsapp message notification

Recently, whenever a person in my Android phone's contact who I have set a customized ringtone sends a Whatsapp text message to me, my phone will play the ringtone as if the person is voice calling me.

This is very annoying and not a Whatsapp "feature" I want. Firstly, it really confused me as I always tought the person is calling me instead of sending Whatsapp message to me. Secondly, the ringtone MP3 is quite long to play. Imagine how frustrating to wait for it to stop everytime it plays just because a new Whatsapp message is received.

Luckily, I found the place to disable this annoyance.

To disable it in Whatsapp, go to Settings > Notifications and untick the checkbox of Contact Ringtone under Message Notifications.


This is another Contact Ringtone for Whatsapp calls which you can see when you scroll down the above screen, and I am OK with that.

If Whatsapp really want to put a feature for customized message tone, they should make use of the SMS tone instead of the call ringtone. I consider this as an annoying bug, and ought to be fixed in their next version release.

Thursday, May 7, 2015

Updated my Samsung Galaxy Tab (GT-P1000) to Storm CyanogenMod 11 with Android 4.4.4 (Kitkat) from stock firmware of Android 2.3.3 (Gingerbread)

My first generation 7" Samsung Galaxy Tab (GT-P1000) is aged, but is tough and still functioning well.

Although it only has a single core CPU, 512MB RAM and 16GB internal storage, it is still capable to handle most of the task as an Android tablet, especially with the newer firmware of Android Kitkat and above.

However, its official firmware by Samsung is stuck at the last generation Android version 2.3.3 (Gingerbread), last updated a few years ago.

Luckily, there are supporters and developers who keep working on its latest unofficial firmware. One of them is Storm31 who makes customized version of Cyanogenmod Android OS for this Samsung Galaxy Tab.

With this unofficial firmware using Android Kitkat, the Samsung Galaxy Tab runs even smoother,  more powerful and more feature rich than its latest stock Gingerbread firmware.

I have successfully updated my GT-P1000 from stock Android 2.3.3 to Storm CM11 Android 4.4.4, and I'll share with you how to do it.

First of all, backup all the data in your tab that you want to save to your PC or to its external SD card. Warning: this upgrade will wipe out everything and no user data will left behind in the tab. You better save all the data you want to save now.

Then, remove the external SD card from the tab. If you keep the SD card in the tab, the data in it might be wiped out too.

Download the following files:

GB-Stock-Safe-v5.zip contains the latest official stock firmware for GT-P1000. You'll need this in case you bricked your tab along the upgrading process. This will restore your tab back to its original state with stock firmware of Android 2.3.3 (but without any user data).

Inside it you'll also find Samsung USB driver for Windows which you need to connect your computer to your tab in order to perform the upgrade. If you have already installed the Samsung USB driver in your computer before, then you don't need to install it again.

Inside it you can also find Odin 1.7, the firmware flashing tool to flash the firmware file(s) from your computer to your tab using the USB cable.

Samsung_GT-P1000_CyanogenMod_install_all_in_one.zip contains the ClockworkMod (CwM) Recovery, the CM 9.1 firmware, and a later version of Odin 1.85.

Note that you cannot upgrade your firmware from stock Android 2.3.3 directly to CM 11. You need to replace the stock firmware with CM 9.1 first, then update it to CM 10.2, then only to the latest CM 11 or upcoming CM 12.

You need to replace the stock Recovery in the tab's ROM with ClockworkMod Recovery in order to flash the CM firmware from the SD card (either internal or external) into the tab.

cm-10.2-20131104-UNOFFICIAL-p1.zip is the firmware flash file of CM 10.2.

cm-11-20150428-UNOFFICIAL-p1.zip is the firmware flash file of CM 11. If there is a newer version than this, you can use the newer version instead of this one.

CyanogenMod Android does not come with Google Play Store and Google Play Service, that's why you need pa-gapps-modular-pico-4.4.4-20150308-signed.zip to flash the Google Play Store and Google Play Service into your tab. Once you have the Google Play Store (previously known as Market) in your tab, you can use it to install more Google apps and Android apps into it.

After you have done backup of all the data you want to save from the tab to your PC, removed the SD card from the tab, charged the tab to at least 90% battery level, and installed the Samsung USB driver, you are ready to start this upgrade process.

Step 1: Unzip GB-Stock-Safe-v5.zip in your PC.

Step 2: Power off your tab. Then hold down its Volumn Down button, at the same time, long press the Power button. Your tab will go into Download mode with screen looks like below:


Step 3: Execute Odin3 v1.7.exe inside the Odin3_v1.7 folder.

Step 4: Connect your tab to your computer using its USB cable. You should see the first box in Odin's ID:COM section turns yellow.

Step 5: Click the PIT button and select the file gt-p1000_mr.pit.

Step 6: Click the PDA button and select the file GB_Stock_Safe_v5.tar.

Step 7: Click the PHONE button. If your tab is GSM-based (Asia/Europe/Middle East/Oceania/Africa/Rest of the world...), select modem.bin inside the folder JPZ Modem. If you are an American T-Mobile user, select modem.bin inside the folder T-Mobile Modem. If you are AT&T (USA), TelCel (Mexico) or Telstra (Australia) user, select modem.bin inside JK3 Modem instead.

Step 8: Click the Start button. The flashing process will begin. Let it run until you see a green PASS! box. Do not power off your PC or your tab, or disconnect the USB cable before you see the green PASS!.

In any event you bricked your tab, you can come here and perform Step 2 to Step 8 above to bring your tab to live again.

Step 9: Your tab should reboot. If not, reboot it. The Android initial setup screen will appear, don't bother to fill in any information, just tap on Next or Skip until you reach the home screen.

Step 10: Turn off your tab. Disconnect its USB cable from PC, and put it into Download mode again (Volumn Down + Power).

Step 11: Unzip Samsung_GT-P1000_CyanogenMod_install_all_in_one.zip in your PC.

Step 12: Now you can execute the newer Odin3 v1.85.exe inside the Samsung Odin3 v1.85 folder.

Step 13: Connect your tab to your computer using its USB cable.

Step 14: Click the PDA button and select the file CF-Root-TAB7_XX_OXA_JQ1-v3.3-CWM3RFS.tar inside ClockworkMod Recovery folder.

Step 15: Click the Start button to flash ClockworkMod Recovery into your tab.

Step 16: Power off your tab. Now you can plug back the external SD card to the tab if you want.

Step 17: Reboot your tab until you get back the Android home screen.

Step 18: Set your tab USB connection to Mass Storage Mode.

Step 19: Transfer the file cm-9.1.0-p1.zip inside CyanogenMod v9.1 for Galaxy Tab GT-P1000 folder to the tab's SD card (internal/external).

Step 20: Turn off your tab. Go into Recovery mode by holding Volumn Up button and at the same time long press the Power button.

Step 21: From the Recovery menu, select Install ZIP then Choose ZIP from SD Card. Locate and select the cm-9.1.0-p1.zip file, then confirm the selection. CM 9.1 will be flashed into your tab and replace the stock firmware. Wait for the process to finish. If there is any error, repeat this step again to reflash CM 9.1.

Step 22: Reboot your tab. The Android initial setup screen will appear, don't bother to fill in any information, just tap on Next or Skip until you reach the home screen.

Step 23: Repeat Step 18 until Step 21 for CM 10.2. The file to flash this round is cm-10.2-20131104-UNOFFICIAL-p1.zip. Note that updating from CM 9.1 to CM 10.2 might not be so smooth and might need to repeat Step 21 a few times before a final success.

Step 24: Reboot your tab. The Android initial setup screen will appear. This time, you can fill in your information, and connect to your local WiFi, until you reach the home screen.

Step 25: Repeat Step 18 until Step 21 again for CM 11. The file to flash this round is cm-11-20150428-UNOFFICIAL-p1.zip.

Step 26: Finally, flash the minimal Google apps. Repeat Step 18 until Step 21 again. The file to flash this round is pa-gapps-modular-pico-4.4.4-20150308-signed.zip.

Step 27: Reboot your tab. You will find the Google Play Store appears in your home screen.

Step 28: The keyboard that comes with CyanogenMod might be too basic and primitive. I replaced it with iFlytek Voice Input for Pad which you can install from Google Play Store.

Now, you can enjoy your GT-P1000 tab with new generation of Android and the CyanogenMod experience.


Saturday, May 2, 2015

Updated the BIOS of my Lenovo Yoga 2 Pro to Version 76CN43WW

It was just shortly about a month Lenovo last released the BIOS security update Version 76CN42WW for the Yoga 2 Pro ultrabook laptop, now there is another new BIOS update Version 76CN43WW.

Lenovo informed that this BIOS for Yoga 2 Pro Version 76CN43WW release on 29 April 2015 will increase the stability of DRAM.

You can click here to go to the download page of the latest BIOS update utility for Lenovo Yoga 2 Pro.

The BIOS update is pretty straightforward. Make sure that the battery level of the laptop is at least 80%, and it is plugged on to the AC power supply. Then, run the downloaded BIOS Update Utility.

The new BIOS will be flashed with the InsydeFlash utility from Windows 8.1. After that, the system will reboot itself, and the BIOS update will be performed.
After the BIOS update completed, the laptop will reboot itself again and back to the Windows login screen.

There is no data lost for this BIOS update. Even the BIOS settings and passwords remain after the update.

Monday, April 27, 2015

Change Google Now cards temperature display from Fahrenheit to Celsius

If you have an Android smartphone with Google Now, and you would like to change the temperature display in your Google Now cards showing weather information of your favourite place from Fahrenheit to Celsius, or vice versa, I'll show you how I did it in my HTC One M8 running on Android Lollipop version 5.0.1.


Firstly, locate the 3 little dots on the top right corner of the weather card. Tap on it.

You will be asked 3 questions. The first question is whether you are interested in weather updates for the location, answer Yes, then swipe left to answer the second question.

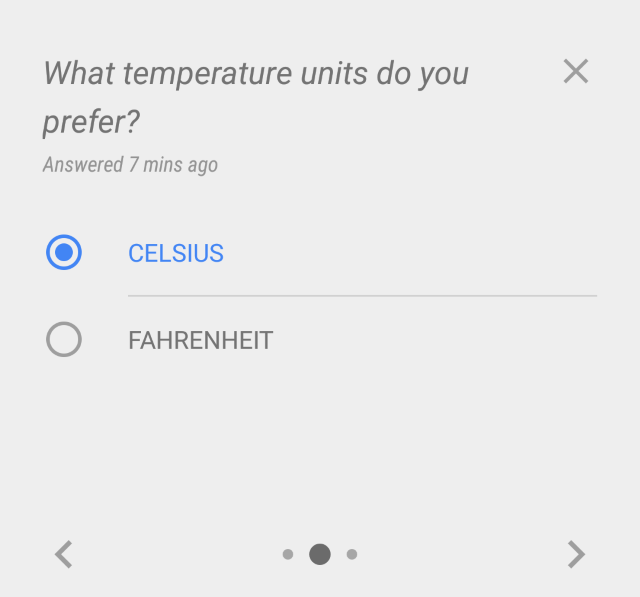
The second question "what temperature units do you prefer?" is exactly the place for you to tell Google Now to display the temperature in Celsius or Fahrenheit.


Make your choice and then swipe left again for the third question.

Answer Yes to "continue to get weather updates". Then tap on the "X" on the right hand side of the question to return to Google Now cards screen.

Once you have answered these questions, you can find them in Google Now customize setting. To locate it, tap on the three bars on the left of Google to open the Google Now menu.


Then, tap on Customize.
Lastly, tap on "Everything Else".


You will be able to change your preference on temperature units here too.

Tuesday, April 21, 2015

Vote your survey choice for the 4 EPF proposals

The Employees Provident Fund (EPF, a.k.a. Kumpulan Wang Simpanan Pekerja, KWSP) has put up an online survey in their website at http://www.kwsp.gov.my for its members to vote for their preference to the 4 proposals they've put up.

The online survey starts from 21 April 2015 until 5 May 2015. You need to login to their i-Akaun system in order to participate in this important survey.

The 4 EPF proposals are as follow:

Proposal 1:  To raise the age for full withdrawal from current 55 to 60.

  • Option 1: To increase the minimum age for full withdrawal gradually from 55 to 60 in stages, over a 15-year period starting 2016 until 2031. The minimum age for full withdrawal to increase by 1 for every 3 years.
  • Option 2: To continue to allow for full withdrawal at the age of 55, but if you are still working and still contributing to EPF after 55, all subsequent contributions are locked in the fund until the age of retirement of 60.
What is the impact?

For option 1, your EPF money will be locked down and cannot be fully withdrawn for a longer period of time. If EPF performs badly and pays lousy dividend, you have no choice but to just accept it. Currently, you are able to make a full withdrawal of EPF at the age of 55, and you have your own choice to get a better fund manager to manage your fund, or to self manage your fund with your own investment.

For option 2, your EPF money can be set free at 55, and then zerorized and reaccumulates from 55 to 60.

Proposal 2: To collect EPF contributions from both employee and employer at the minimum amount based on the declared minimum wage. The minimum wage is currently RM900 for Peninsular Malaysia and RM800 for East Malaysia.

What is the impact?

If you are having a basic salary below the minimum wage, but total monthly income above the minimum wage after commission, your monthly EPF contributions will increase.

This means your monthly disposable income will decrease, but your total actual income will increase as your boss need to contribute more into your EPF account.

This proposal will not affect you if your basic salary is already above the level of minimum wage.

Proposal 3: To continue to pay dividend to your EPF account until the age of 100, if you don't make a full withdrawal after your age of retirement.

What is the impact?

Currently, EPF will continue to pay dividend to your EPF account until the age of 75 if your account is still active after the age of retirement.

This will be good for you if you trust EPF with your retirement fund until you die.

This will be bad for all other EPF members, as your dividend will be diluted by old folks with active EPF account.

Proposal 4: To introduce option for fully Syariah-compliant fund in addition to the existing EPF retirement scheme.

What is the impact?

The performance of the existing scheme and the new Syariah-compliant scheme might not be the same, and the effort of EPF fund managers on the 2 schemes might not be equal.

Are the members allowed to switch from one scheme to another from time to time?

If you are an EPF member, it is important to vote for your choice in this online survey, as the final decision made and enforced will have long term impact on you, your family, your children, and all subsequent generations.


Monday, April 6, 2015

Comparison table for Samsung UHD, Smart, LED and Plasma TVs

Samsung produces quite a lot of flat panel TV models, which can be categorized as the 4000, 5000, 6000, 7000, 8000, and 9000 series.

Normally, the higher the number, the more features, the better in visual and audio quality, and the higher in price too.

It is still quite difficult to compare among them, without putting them together in a same table for side-by-side comparison.

Well, I found the table below (click it to enlarge) in a booklet published by Samsung called 2014 TV Collection. Perhaps the 2015 edition will be available later in the year.


This table does not provide the full set of feature comparison, but better than none.

For normal consumer, we would probably look into whether the TV model has the following or not:
  • 3D movie support
  • Resolution (HD = 1280x720, full HD 1080p = 1920x1080, 4k UHD = 3840x2160)
  • Screen panel (normal or Ultra Clear)
  • Number of built-in HDMI ports
  • Number of USB ports
  • Built-in wireless LAN support
  • Multi-link screen (screen can split into 2: one side is the TV, another side is web browsing or app. Some models can split into 4.)
  • Sound output (standard = 2x10W, enhanced = 2x10W + woofer)
  • Dynamic dimming technology
  • Flat panel or curved panel
  • Instant on (need very short time to turn on)
  • Soccer mode
  • Voice control
  • Built-in camera and motion control
  • Smart Evolution / future ready (can be upgraded by attaching an Evolution Kit)
I think the 7000 series is a good balance between features and price.

Saturday, April 4, 2015

How to check if a merchant in Malaysia is eligible to collect GST from you

A merchant in Malaysia can only collect the goods and services tax (GST) from its customers after it has registered with the Royal Malaysian Customs Department as GST taxpayer and obtained a unique GST ID.

The merchant need to print out its company name, company full address, and GST ID on its tax invoice with serial number to its customers. The tax invoice could be a full tax invoice with customer's name and address, or a simplified tax invoice without the customer's name and address (i.e. cash sales).

If the merchant did not registered with the Royal Malaysian Customs Department as GST taxpayer, or does not issue tax invoice (either full or simplified) in valid format to its customers, it is not eligible to collect GST from the customers.

We can check for the registration detail of a GST ID in the website https://gst.customs.gov.my/TAP/_/ to ensure that the GST ID is valid and the registered merchant name belongs to the right supplier which we purchased the goods/services from.

You need to click on the "Lookup GST Status" link after you reached the screen as below:


Beside checking using GST ID, we can also check for the GST registration detail by using the merchant's business registration number or company name.

You need to click on one of the 3 radio buttons to select checking by which criteria.

Then, key in the search item and hit Enter. The result will be shown below.

I found that there are a lot of rooms of improvement for this online GST registration checking system, including:
  • This website is not mobile friendly. It lacks a mobile user interface when accessed by handphone or tablet.
  • We cannot access to the lookup screen directly, and must go through the main page and click the "Lookup GST Status" link. The system should have a direct link to reduce one step of using it.
  • Suggest to have a mobile app beside this website. The mobile app should have OCR function for us to scan for the GST ID / company name / company registration number from the tax invoice using the phone's camera, so that we don't need to manually key-in the information to perform the search.

Tuesday, March 31, 2015

Check for Malaysia goods/services price reasonability with MyKira GST app

Just before Malaysia implement Goods and Services Tax (GST) on 1 April 2015, the Ministry of Domestic Trade, Co-Operatives and Consumerism Malaysia (a.k.a. Kementerian Perdagangan Dalam Negeri, Koperasi Dan Kepenggunaan, KPDNKK) has released an Android app called MyKira GST which enable us to check for the price reasonability of over 10,000 products and services in Malaysia.

The price is checked from the online database of KPDNKK and based on the location (parliament area) of selling.

To do the checking, you need to provide the name of the product/service, which has autocomplete search while key-in.


Then, specify the weight/size/packaging information, which is also having autocomplete search during key-in.


After that, key-in the price you see, and optionally its price before GST (old price) if you remember.

Then provide the information of the shop (premise) and area (parliament). There is a map showing your current location, which can help you in identifying the area you are in.

After that, tap on the submit button to do the checking. It will show you whether the price is within reasonable range, or too expensive (out of range) accordingly.


If the price is found to be out of range, you can tap on the e-Aduan button and immediately file a complaint to KPDNKK.


You can click here to download and install the MyKira GST app from Google Play Store to your Android phone or tablet.

Monday, March 30, 2015

DIY write your own will in Malaysia for free with template download

Have you written your will? If not, are you deterred by the charges of will writing and maintenance services?

Well, the good news is, under the Malaysian Wills Act 1959, you are empowered to write your own will which is recognised as legal document, even without the need of a lawyer or professional will service provider.

So, if you believe that your will is quite unlikely to be challenged, and is very simple and straightforward, you can try DIY your own will. Otherwise, you should think about getting the professional to help you in will writing to avoid any unexpected trouble after you die.

Why you should write a will, be it DIY or drafted by professional will writer? With a valid will, when you pass away someday, you are said to die testate and your will and testament will be executed accordingly. You will be able to inform about:

  • Who should execute your will? (the executor)
  • Who shall inherit your wealth (a.k.a. estate) and what portion they will get? (the beneficiaries)
  • Who you entrust to distribute your asset? (the trustee) Before the actual distribution to beneficiaries, your asset might need to temporary parked under this name to facilitate the distribution process.
  • If both your spouse and yourself die together, who will take care of your minor children? (the guardian)
  • Do you want to donate certain portion to charity, NGO, etc.? (the special bequests)
  • How you want your funeral to be? (burial, cremation, ...) Done under ceremony of what religion? (the additional request)
  • Any last words you want to speak to your family members?
After you die testate, your executor will need to perform the following duties:
  • Locate your Will
  • Make funeral arrangement
  • Apply for a Grant of Probate (GP)
  • Call in assets
  • Pay remaining debts
  • Prepare Statement of Accounts
  • Distribute assets according to your Will
  • Carry out your wishes mentioned in your Will
 
If you die intestate without a valid will, your family members will need to:
The possible problems due to die intestate could be (and not limited to):
  • Taking longer time to process.
  • The LA is generally more expensive than the GP.
  • Might need legal services, accountants, tax consultants and other professionals arises, which could end up more costly.
  • One asset being distributed out to too many beneficiaries, which might cause problem for them to sell the asset later, as all signatures are needed when disposing the asset.
  • The guardian of your minor children is not appointed when they become orphan.
  • Your funeral might not be carried out in your preferred manner.
What do you need to write a will?
  • Yourself as the testator, who is above 18 years old, be of sound minded. If your will is written when you are sick, you might want to get your doctor to sign and certify that you are of sound minded the moment when you write your will.
  • At least 2 witnesses, who are above 18 years old. The witnesses cannot be any one from your beneficiaries.
  • Have your will hand-written or computer printed on paper, and the testator and all witnesses to sign on it.
When you die, all your loans and debts need to be settled first, before the remaining to be distributed to your beneficiaries.

If your loans and debts are unable to be settled by your assets, then your estate is insolvent, and there is nothing left to distribute to your beneficiaries. Your beneficiaries will get nothing from you, but they also need not taking care of your remaining debt.

If you are able to clear off all your financial obligations and have a solvent estate, then your beneficiaries will inherit your estate accordingly.

Now you are pretty clear about the requirement and knowledge of writing your own will. You can download this template courtesy of Struan Inc. Sdn Bhd, fill in the necessary, and get it fully signed by all of your witnesses and yourself.

Note that under the Malaysian Inheritance (Family Provision) Act 1971, your surviving spouse and/or children might be able to challenge your will if they are not agreeable with it, regardless they are stated as beneficiaries or not. If you wish to make your will unchallengeable, you should better engage the service of professional will writer to assist in your will writing.

Note: The above only applies to non-Muslim in Malaysia. There are separate laws and treatment for Muslim will writing.

Saturday, March 28, 2015

BIOS security update for Lenovo Yoga 2 Pro and Yoga 3 Pro laptops

On 27 March 2015, Lenovo has released the latest BIOS update (version 76CN42WW) for Lenovo Yoga 2 Pro ultrabook laptop.

On the same day, Lenovo has also released the latest BIOS update (version A6CN49WW) for Lenovo Yoga 3 Pro ultrabook laptop.

This latest version BIOS for Yoga 2 Pro and Yoga 3 Pro respectively fixed all merged issues from previous, and also fixed the security issues in the Intel UEFI (Unified Extensible Firmware Interface) module.

You can click here to go to the download page of the latest BIOS update utility for Lenovo Yoga 2 Pro, and click here to go to the download page of the latest BIOS update utility for Lenovo Yoga 3 Pro.

The BIOS update is pretty straightforward. Make sure that the battery level of the laptop is at least 80%, and it is plugged on to the AC power supply. Then, run the downloaded BIOS Update Utility.


The new BIOS will be flashed with the InsydeFlash utility from Windows 8.1. After that, the system will reboot itself, and the BIOS update will be performed.
After the BIOS update completed, the laptop will reboot itself again and back to the Windows login screen.

There is no data lost for this BIOS update. Even the BIOS settings and passwords remain after the update.

Thursday, March 26, 2015

Using SQLite Expert to develop and administer SQLite3 databases

SQLite is today's de facto database for mobile development, particularly as the local database used in Android and iOS apps. It is also widely used to handle data storage in embedded system.

In fact, SQLite is also a good choice for lightweight database to handle data storage and query for Windows / Linux / Mac applications. It is released in the public domain and free for use (compared with other non-free alternative such as MS Access database). It is serverless and doesn't need installation nor configuration of database system (compared with alternative such as MySQL, PostgreSQL, etc.)

Now come to the big question: how to create, develop and maintain the SQLite databases?

There are quite a number of tools available, some are free and some are non-free. I have chosen SQLite Expert for use in Windows development environment.

SQLite Expert comes in 2 editions: the free Personal Edition (free for both personal and commercial use), and the non-free Professional Edition with additional features. You can click here to find out the feature differences between the 2 SQLite Expert editions. The Personal Edition should be good enough for most SQLite application developers.

SQLite Expert is able to handle Unicode data, Views and Virtual Tables.

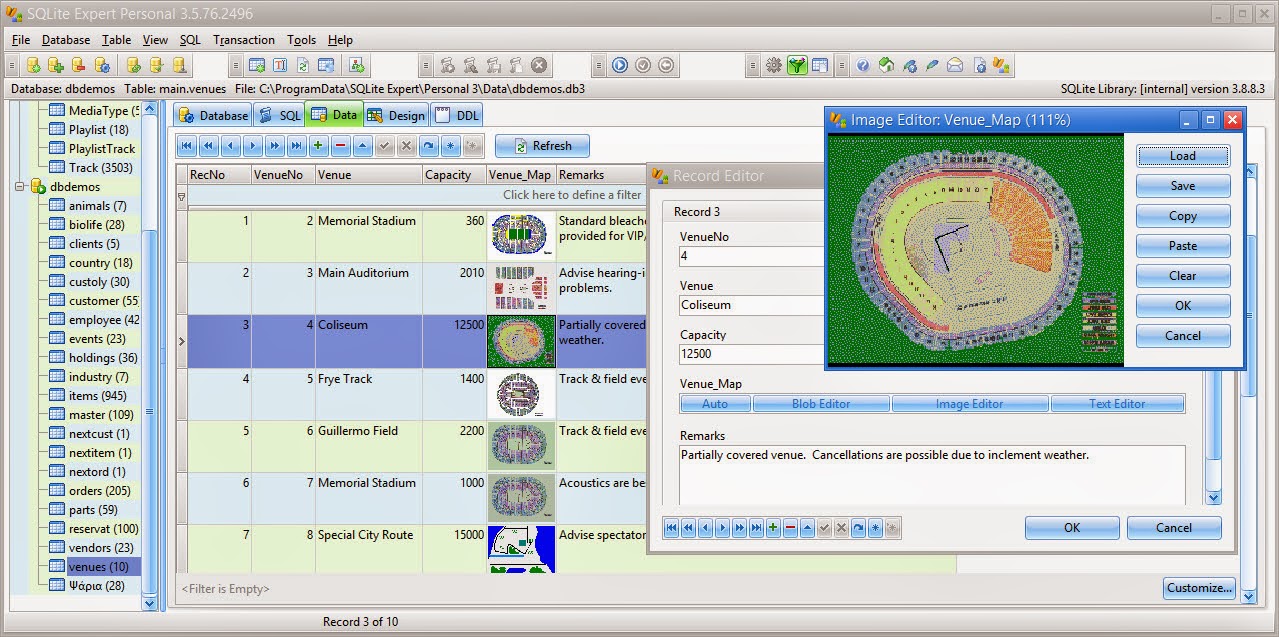
SQLite Expert has a nice and easy to use GUI. It even comes with Hex Editor (to edit fields with binary data) and Image Editor (to edit fields with image data).


It has a powerful visual editor for database table creation, restructuring and maintenance, which able to handle columns, indexes, foreign keys, triggers, unique and check constraints.


It also has a handy Data Definition Language (DDL) viewer to show the DDL of tables.


For the Professional Edition, you will also get a Visual SQL Query Builder, able to import and export data, Lua / Pascal scripting support, etc.

If you are in search for a good database tool for SQLite3, I strongly recommend this one to you.

Monday, March 9, 2015

Opened a CIMB AirAsia Savers Account

I am switching over my traditional CIMB savings account to a new CIMB AirAsia Savers Account for better interest rate and additional benefits that come with this online savings account.

CIMB AirAsia Savers Account is an online savings account in partnership with AirAsia. It is paperless, and you won't get any passbook nor paper monthly statement. Transaction details and online statements are available in the CIMB Clicks website.

 So, what's the big deal about this CIMB AirAsia Savers Account?

  • It offers an interest rate from 0.15% up to 1.00%. No big deal as some other banks are giving higher rate than this, but this rate is also higher than the traditional CIMB savings account or CIMB basic savings account.
  • If you maintain an average monthly balance of above RM5,000, and there is no over-the-counter transaction in that month, you will get a monthly RM5 cash rebate. Consider you are keeping RM5,000 in the account, that will translate into 5/5000 x 12 = 1.2% additional interest rate.
  • If you maintain an average quarterly balance of above RM3,000, you will get automatic entries into a Quarterly Contest to win holiday packages, complimentary flights, E-Gift Vouchers and other prizes. Every average quarterly balance of RM3,000 entitles you to one automatic entry.
  • If you maintain an average quarterly balance of above RM1,500, you will earn 250 AirAsia BIG Points quarterly. In my experience, the AirAsia BIG Points are very difficult to collect through buying air tickets from AirAsia, this seems to be a faster way to collect more points easily.
  • If you maintain an average monthly balance of above RM3,000, you will get E-Gift Voucher on your birthday month.
  • You will have priority booking benefit to grab the best deals during AirAsia sales one day before the general public.
If you already have a CIMB savings or current account, and you already have access to CIMB Clicks online banking facility, you don't even need to visit to CIMB branch in order to open a new CIMB AirAsia Savers Account, as you can do it inside CIMB Clicks. That's how I did it, and my new CIMB AirAsia Savers Account was opened instantly after I clicked the Confirm button.

To open a new CIMB AirAsia Savers Account from CIMB Clicks, just drop down the Apply For menu and select Savings Account. Then, select "CIMB Bank AirAsia Savers Account" under Product Type.


To link your CIMB AirAsia Savers Account with your AirAsia BIG Shot ID, click here.


If you need to lookup your AirAsia BIG Shot ID number, you can click here.


Click here to get more detail about CIMB AirAsia Savers Account from CIMB website.

Friday, March 6, 2015

Boost WiFi coverage with TP-Link TL-WA860RE 300Mbps WiFi range extender with AC passthrough

My TP-Link TL-WDR3600 N600 wireless dual band gigabit router is located upstairs near the center of the house, and my HiMedia Q5II Android 3D smart TV + media player box is located downstairs.

There is no problem for the HiMedia Q5II box to connect wirelessly to the TP-Link wireless router, until one day, when I streamed a 1080P full HD movie stored in my Transcend StoreJet 25A3 USB 3.0 1TB external harddisk which connected to the TP-Link wireless router with USB cable, over the air through WiFi to my HiMedia Q5II box which connected to my TV with HDMI cable. The movie didn't play smoothly on the TV.

As a result, I decided to boost my home WiFi coverage with a TP-Link TL-WA860RE 300Mbps WiFi range extender. The price of this WiFi range extender is just slightly below RM100.


I place this TP-Link TL-WA860RE downstairs near the center of the house, so that it can connect wirelessly with the TL-WDR3600 upstairs, and act as WiFi repeater to boost up the WiFi signal downstairs.


Now my HiMedia Q5II TV box is able to play 1080P full HD movie streamed from my Transcend external harddisk without problem.

Beside able to act as WiFi repeater to expand the WiFi coverage and boost up the WiFi signal, this TP-Link TL-WA860RE has one 10/100Mbps Ethernet LAN Port at its bottom, enabling it to become a WiFi bridge to wiredly connect to its network client using a LAN cable.

It also comes with an AC power passthrough socket in front, so that the power socket it plugged into is not wasted, and can still connect to electrical device up to 13 Amperes.

This TP-Link TL-WA860RE WiFi range extender is able to connect with the WiFi AP/router in either Universal or WDS mode.

The Universal mode can work with almost any kind of WiFi AP/router running at 2.4GHz frequency range. However, it might not be compatible with certain applications running in the WiFi clients.

The WDS mode is compatible with same TP-Link brand of wireless AP/router that also support WDS. It does not work with WiFi AP/router that doesn't support WDS, and it might not work well with other brand of WiFi AP/router even WDS is supported. It will not have applications compatibility issue with the WiFi clients.

Theoretically, passing of network packets in the range extender is more efficient with the WDS mode.

In order to enable WDS mode of connection, wee need to enable WDS bridging in the host AP/router and inform it about the range extender's SSID, MAC address and encryption method.


You can access to the web-based admin page of the TP-Link TL-WA860RE WiFi range extender by pointing your web browser's URL to http://tplinkrepeater.net/ or http://192.168.0.254 .

You must also provide the SSID and MAC address of the host AP/router information to the range extender.


When the SSID of the range extender is set to be the same with the WiFi AP/router, your mobile devices will automatically switch over to the WiFi provider with the stronger signal at its location. However, you might face problem of the mobile device keeps on connecting and disconnecting, switching from one WiFi provider to another, at the area where their signal are about equal strength.

You can also set the SSID of the range extender to be different from the WiFi AP/router. This will give you easier control over your mobile device to manually decide which WiFi provider it should connect to. Your mobile device is still able to automatically switch over to SSID with stronger signal when its WiFi connection with current connected provider is too weak to maintain the link and transmit data.

The wireless security setting must pair with the same setting in the host AP/router.


The TP-Link TL-WA860RE WiFi range extender also has a WPS button to pair with the host WiFi AP/router easily. However, this will connect it to its upstream AP/router using the universal mode instead of WDS mode.

One drawback of using WiFi range extender is that, its wireless connection is designed to work in half-duplex mode. This mean it cannot "talk" with the host AP/router and the wireless client at the same time. To relay the data over the air, it first talk with the transmitting wireless device, and then talk with the target device to pass the data on. Therefore, although the TP-Link TL-WA860RE supports wireless throughput of up to 300Mbps, when working in wireless repeater mode, the bandwidth is shared between the data sending and target devices, so each of them will get a throughput of around 150Mbps only.

On the other hand, when the TL-WA860RE is working in wireless bridge mode whereby one of the device is connected wirelessly and another device is connected through LAN port, the device connected wirelessly will get the maximum throughput of 300Mbps, while the one connected with LAN cable will get a maximum throughput of 100Mbps. The effective maximum connection bandwidth will be limited to 100Mbps, which is the highest at its Ethernet LAN port.

Bear in mind that the actual connection speed depends on the lowest supported connection speed of the 2 connected devices. Over the air, the wireless connection speed is further reduced over distance, physical blockage and signal interference with other wireless devices (such as neighbours' WiFi, cordless phone, Bluetooth devices, etc.) around the area.

Hint: Click on the "Older Posts" link to continue reading, or click here for a listing of all my past 3 months articles.