Showing posts with label IT talks. Show all posts

Monday, July 4, 2016

Understanding Wireless-AC bandwidth you can get from 802.11ac WiFi routers

Wireless-AC (IEEE 802.11ac), a.k.a. Very High Throughput (VHT) is the successor of the Wireless-N WiFi technology, and is the mainstream technology supported by today's WiFi routers and wireless networked devices including smartphones, tablets, laptops, PC wireless cards, smart TVs, smart CCTVs, etc.


As a layman, we always see the wireless-AC device rated with AC followed by a number, such as AC2600. What does that number tell us about the supported bandwidth of the device? Well, the number is actually a close figure to the total bandwidth of all its wireless bands added up together.

Bandwidth is the maximum available network connection speed of two connected devices. The actual connection speed (i.e. throughput) between the two connected devices is equal or lower than the supported bandwidth of the connection. The throughput is usually lower than the bandwidth due to shared connections, distance, surrounding interference, obstacle in-between, etc.

The wireless-AC network can operate in both the "traditional" 2.4GHz frequency band as well as the 5GHz frequency band. The 2.4GHz band is usually congested with the older wireless-b/g/n networks using the same band for wireless data transmission.

Wireless-AC routers or access points are dual band WiFi devices, supporting wireless connections with both the 2.4GHz and 5GHz frequency bands.

The newer AC3200 and AC5300 routers support two 5GHz bands instead of one, making them a triple band WiFi devices.

The table below shows the bandwidth of each of the bands for the common wireless-AC types.


Let's say your smartphone is connected to an AC600 router (the 1st one in above list) using the 2.4GHz band, the maximum connection speed the phone can obtain is 150Mbps. If it is connected to the same router using the 5GHz band, the maximum connection speed is 433Mbps.

If you are buying an AC2600 router (last 4th in above list), you can expect your wireless-AC supported devices connected with it using 2.4GHz band to have WiFi speed of up to 800Mbps, and if connected using 5GHz band, can reach a maximum speed to 1733Mbps, which is even much faster than the Cat-6 cable wired gigabit network (1000Mbps) connected to its gigabit network port.

Note that the maximum bandwidth in each of the bands in the table above is a combination of bandwidth delivered by one or multiple channels running in Channel Width of 20Mhz, 40Mhz, 80Mhz or 160Mhz. Connection of two linked WiFi devices must be established using the same channel number.

In wireless-AC network, each channel in 2.4GHz band supports a bandwidth of 150Mbps or 200Mbps; and each channel in 5GHz band supports a bandwidth of 433Mbps.

An AC2600 router such as the TP-Link Archer C2600 could support 4 channels in 2.4GHz band (4 x 200Mbps = 800Mbps) and 4 channels in 5GHz band (4 x 433Mbps = 1732Mbps). If your smartphone only support 2 channels in 5GHz band, then the maximum connection speed with the AC2600 router is only 2 x 433Mbps = 866Mbps instead of the full channel 1733Mbps. If your smartphone also support 4 channels in 5GHz band, then it is possible for you to achieve 1733Mbps connection speed.

Note that WiFi is a kind of local area network (LAN). The internet access speed you can get from the router is still restricted to the bandwidth you subscribed with your ISP, which is normally lower. Anyhow, a fast wireless-AC connection enables network data transfer between devices within the local network to be speedy. This will enable smooth ultra-high definition video streaming to your 4K smart TV from another device.

Monday, June 20, 2016

Updated the firmware of my Samsung Xpress M2885FW printer to version 3.00.01.13

I have just updated the firmware of my Samsung Xpress M2885FW printer to version 3.00.01.13.

You can download the latest firmware from Samsung support webpage of this MFP here.

Firmware update can be done via the Samsung SyncThru Web Service, by accessing the printer's IP address using your web browser.

Note that you need to login as administrator user in order to perform the firmware update.

Here are the steps to perform the update:

  • Download the latest firmware, and unzip the file.
  • Locate the firmware file with extension .HD, such as M2885_V3.00.01.13.hd.
  • Open your web browser and access to the printer's SyncThru Web Service.
  • Login as administrator.
  • Go to Maintenance > Firmware Upgrade.
  • Click the Upgrade Wizard button.
  • Select the firmware file, e.g. M2885_V3.00.01.13.hd.
  • The file will be uploaded, and the firmware update process will begin.
  • The printer will restart, followed by the firmware reflash procedure.
  • Upon successful update, you can check the firmware information in Maintenance > Firmware Version screen.

And here is the changelog of the firmware for this printer for your reference.


Upgraded my home MFP to Samsung Xpress SL-M2885FW/XSS mono multifunction laser-class LED printer from Dell 1355cn colour multifunction LED printer

My Dell 1355cn colour multifunction laser-class LED printer has served me for more than 4 years before I hit with a paper jam problem that I'm unable to resolve by myself (probably due to faulty in either its sensor or paper feed roller alignment).

Considering its high toner price and I found difficulty to get a printer repair shop who are willing to repair this Dell printer, I decided to replace it with a new Samsung Xpress SL-M2885FW/XSS mono multifunction (print/scan/copy/fax) laser-class LED printer.


I have chosen a mono laser printer this time rather than a colour laser printer, as I found out that I seldom need to do colour printing. This BLI award-winning mono laser MFP which cost me RM698 (inclusive 6% GST) is much cheaper than the colour laser MFP available in the market. In addition, it only has black toner to replace instead of 4 toners which cost a lot when replaced at the same time.

One of the beauty of this Samsung M2885FW printer is that its imaging unit is separated from the toner, which helps to bring down the cost of the toner. The imaging drum unit MLT-R116 has a page yield of up to 9,000 pages and cost around RM175 for replacement, while its high-yield toner MLT-D116L  with page yield of up to 3,000 pages cost about the same price with the imaging unit. There is an alternative standard-yield toner MLT-D116S with page yield of up to 1,200 pages cost around RM100 only.

The easiest way to setup this Samsung M2885FW printer is to first connect it to the computer using USB cable, configure its TCP/IP settings so that it is accessible with network cable or WiFi LAN. The printer also supports WiFi setup using WPS method.

There are 2 ways to obtain and install its required drivers and software applications. One way is to install from its installation CD, another way is to install the Samsung Printer Software Installer and Samsung Printer Diagnostics which you can download from Samsung support website for SL-M2885FW/XSS.


You can make use of the Samsung Printer Diagnostics software to install and update the drivers and related applications to the latest version.


Other ways to setup the printer's TCP/IP network settings including using its control panel with 2-line LED display, which might not be convenient, and to connect to the printer using WiFi Direct, then continue with the configuration, which might need some technical know-how before the attempt succeed.

There are 2 important software that you need to install namely Samsung Easy Printer Manager and Samsung Easy Document Creator.

The Samsung Easy Printer Manager has 2 modes. The Basic Mode (or I call it end-user mode) is a clean and straightforward screen that tells you the printer's status, and provides quick button access to its scanner functions (which handled by the Samsung Easy Document Creator application), fax functions, user's guide (which is a comprehensive user manual) and some other basic functions.


The Advanced Mode (or I call it administrator mode) provides more detailed information about the printer, including its serial number. It also allows you to perform some settings configuration here.


There is a reason I said setting up TCP/IP for the printer is important. Apart from making the printer accessible via the network once the TCP/IP setting is done, it also enables you to have access to its powerful Samsung SyncThru Web Service which you access by connecting to port 80 of the printer's IP address using your web browser.


The number of information you can get in SyncThru Web Service is even more than Samsung Easy Printer Manager Advanced Mode. It also provides you much more control to the settings of the printer.

You can gain even more access by login as administrator in SyncThru Web Service. The default username is admin and its default password is sec00000. Once logged in, you can replace this username and password with your own.

You can also perform print, scan or fax function from your mobile device through the Android app called Samsung Mobile Print. If you are using iPhone or iPad, there is Samsung Mobile Print for iOS too.


What I like about this printer?
  • It prints and/or copies really fast, at speed of up to 28ppm. Much faster than the Dell 1355cn.
  • Its print output is of high quality. Resolution can be as high as 4800x600 dpi.
  • Its scanner support high resolution of up to 1200x1200 dpi optical, and 4800x4800 dpi maximum.
  • It has built-in support for automated double-sided printing, which is a feature normally available in printers of higher range.
  • It has built-in support for ID copy to easily copy double-sided cards (e.g. IC, driving license, business card, ...) onto the same page of A4 paper.
  • It has built-in support for Google Cloud Print, Samsung Cloud Print, and Apple AirPrint.
  • It is small in size, even slightly smaller than the Dell 1355cn.
  • It has low power consumption of 1.6W during power save mode, 2.4Wwhen sleeping with WiFi direct on, 50W during standby, and 400W when printing.
  • Its paper tray is of drawer type, not exposing the papers in front of the printer. The tray has input capacity of up to 250 sheets of papers.
  • It has easy to use Eco Mode which helps to save toner and/or paper usage.

What I dislike about this printer?
  • Its 2-line LCD display panel has limited display area. It is not practical to perform setting directly using its control panel.
  • When putting in A4 paper in its paper tray, there is still slight exposure of the paper at the back of the printer.
  • It supports NFC, which needs to function together with WiFi Direct. However, my phone's NFC contact with the printer most of the time not successful to bring up the Samsung Mobile Print app. It is not easy to make use of this function.
  • The Samsung Printer Installer unable to detect and download the latest firmware for the printer, and the Scanner Driver is always in "update needed" state even if the latest version already installed successfully.


Thursday, May 26, 2016

My Avantree CGTR-520-W desktop power station with 5 USB charging ports and 2 AC outlets

You've probably read about my Belkin B2E027 4-port 2.4A full rate USB power charger before. It is still working fine and I am still using it.

Recently, I discovered something even better, which is the Avantree CGTR-520-W desktop power station. It comes with 5 smart USB ports, which each single port able to charge up to 2.4A and the total combined charging capacity is 8A.

It also comes with 2 AC sockets (maximum 10A loading) with surge protector of 1,700 Joule and power rating of 1,250W (for 125Vac) or 2,250W (for 225Vac).


You've probably seen it in action when I talked about my KCX-017 USB current and voltage tester in my previous post.

This power station is handy when you have limited wall sockets, as it won't occupy your wall socket and at the same time it extends another socket for your use. You can use its sockets to charge your laptop and other bigger devices that need to be charged with electrical socket instead of USB.

Saturday, May 21, 2016

My SanDisk Ultra Dual USB Drive 3.0

The price of USB flash drive has eventually gone cheap. Nowadays, you can get a genuine 16GB SanDisk Ultra dual USB drive 3.0 with plug-and-play support to OTG-enabled Android devices at the price of less than RM20.


This SanDisk Ultra dual USB drive 3.0 has 2 connectors. At one end is a USB 3.0 connector that is able to transfer file to computer at a speed of up to 130 MBps (or about 1 Gbps).

Note that there is another product called "SanDisk Ultra dual USB drive" without the "3.0" behind, selling at slightly cheaper price, which the USB connector is a USB 2.0 connector and the data transfer speed is much lower than the 3.0 version.


At the other end is a micro-USB connector that can work on the fly with OTG-enabled Android devices.


Similar with the warranty period of most SanDisk Ultra range of products, this SanDisk Ultra dual USB drive 3.0 comes with a 5 years warranty.

Once plugged into the micro-USB port of the Android device, this USB flash drive is auto-detected by Android as one of the external storages and is immediately accessible by File Manager of Android system.

SanDisk also provides a free mobile app called SanDisk Memory Zone for user to access the USB flash drive and to transfer file between it and the device's internal storage or flash memory card installed in the device.

However, I found the function of this SanDisk Memory Zone app is very limited. It doesn't work with the folders in the USB flash drive so you can only copy file to its root directory, and the copying process is pretty slow.

The only Android app I found that can work with it without hassle is ES File Explorer Pro (or its free version ES File Explorer).

ES File Explorer Pro is able to detect and use this OTG drive upon plugged in, and all file operations of copying, moving, renaming, deleting, creating, opening with associated app, etc. can work well without problem.


ES File Explorer Pro works equally well to access my SanDisk Ultra Dual USB Drive 3.0 with my HTC One M8 smartphone running on Android 6.0 and my Samsung Galaxy Note 5.0 tablet running on Android 4.4.2.

Wednesday, May 18, 2016

OCBC Bank launched open API for developers to integrate apps with their open data

In line with Singapore Government's Smart Nation Initiative and the Monetary Authority of Singapore's vision to create a Smart Financial Centre and move toward an open API architecture, OCBC Bank has on 17 May 2016 launched their open Application Programming Interface (API) platform, namely CONNECT2OCBC,  that allows software developers to integrate their apps or websites with OCBC's open data related to their products and services.


OCBC claims to be the first in Southeast Asia to introduce such open API service, playing a bigger role in growing the FinTech ecosystem.

For a start, 4 APIs are made available:
  • Branch Locator provides a list of OCBC Bank branches with their respective location details and operating hours.
  • Credit Card Advisor provides credit card suggestions based on user's lifestyle.
  • ATM Locator provides a list of OCBC Bank ATMs with their location details to facilitate users in finding them.
  • Forex provides a list of updated currency exchange rates by OCBC, allowing the integrated apps to perform calculations across currencies.
Although these 4 APIs looks limited, it is deemed as a good start. Hopefully more APIs will be made available for broader and deeper usage in the near future.

Click here for more information about the CONNECT2OCBC APIs.

Besides, OCBC has also established a new business unit called The Open Vault @ OCBC, which is a FinTech innovation center aimed to incubate FinTech startups, helping them make products and services that the bank can add to its digital banking arsenal or bring to the market.

The 5 areas of interest of Open Vault @ OCBC are:
  • Wealth management
  • Credit and financing
  • Insurance
  • Cyber security
  • Artificial intelligence
The center has partnered with Hong Kong venture capital firm Nest to run the OCBC FinTech Accelerator incubation program to provide selected start-ups with business and technical expertise mentorship.

Thursday, May 5, 2016

Today is World Password Day

Today is the  first Thursday of May, the World Password Day! It is observed to create awareness of the need for good password security practice.

Nowadays, password is used everywhere,  being a commonly used security mechanism for:

  • identity verification
  • authentication of access control
  • encryption/decryption key to protect our private information

Here are the 4 steps action to secure your online experience, recommended by organizers of World Password Day:


Why the first Thursday of May? Perhaps this day itself is an interesting day, being observed in:
  • 5 May 2016
  • 4 May 2017
  • 3 May 2018
  • 2 May 2019
  • 1 May 2020

For more information, visit to : https://passwordday.org/


Friday, April 29, 2016

U Mobile attacked competitors again with free video streaming on top of existing data quota

If you have a smartphone or tablet attached with U Mobile postpaid and prepaid service, and you have been using it to watch online videos, here is a good news to you.

U Mobile has just launched their Video-Onz service, providing free additional quota on top of existing data plan for you to watch videos using the apps from the following 12 providers:

  • YouTube
  • YouTube Gaming
  • Youku Tudou
  • iflix
  • Astro on the Go
  • HyppTV Everywhere
  • Viu
  • Eros Now
  • tonton
  • Herotalkies
  • ONFM
  • Pocketimes

This mean that when you are watching videos with these apps, you are given additional quota on top of your existing Internet data quota for the video streaming, for free by U Mobile under the Video-Onz service.

The monthly allocation of the free Video-Onz video streaming quota on top of the existing Internet data quota of various U Mobile postpaid and prepaid plans is as below:


There is no Video-Onz quota imposed for P70, i90 and i130 postpaid plans, meanings you can watch videos or movies with the above 12 video streaming apps as much as you wish, as there is unlimited Video-Onz data for these plans. 

Nowadays U Mobile marketing is really aggressive in capturing the market share by providing competitive package that really can shake and disrupt its competitors, which is a good news for all mobile consumers in Malaysia.

Let's see what will Celcom and Digi offer to counter attack this. Maxis? Maybe their customers need to cry and scream and swear for another time again for them to finally react.

Meanwhile, the P1 (now known as Webe) under TM has been making a lot of hoo-haa recently, but until today the general public is still unclear about what they are going to offer to join this intensified competition.


Thursday, March 24, 2016

WiFi technology - from Beamforming to MU-MIMO

Modern WiFi routers come with new selling features such as Beamforming and even MU-MIMO. What are these new features about? Will your home and/or office WiFi network be benefited with these new features? I also have the same questions, and here is the answer from my research.

Beamforming Technology

Beamforming is a kind of wireless transmission method introduced to reduce interference and improve the reliability of WiFi signal. It is adapted in the 5th generation WiFi standard 802.11ac.

Beamforming is based on Digital Signal Processing (DSP) logic and Multiple Input Multiple Output (MIMO) technology. Using a procedure called channel calibration or channel sounding, it changes the phase and relative amplitude of the signal, creating a constructive interference and destructive interference to make the signal in preferred direction stronger and others weaker.

In this way, the WiFi router can focus the signal towards the direction of your WiFi devices connected to it, making the wireless connection stronger, more stable, and further reaching. As effective WLAN bandwidth degrades with weaker signal and longer distance, beamforming can help to reduce this degrading effect, therefore making the network faster.

However, bear in mind that your WLAN network is still limited by the maximum supported bandwidth of the WiFi router and the WiFi client, and your Internet bandwidth is still limited by the maximum bandwidth of your subscription package. Your network still won't be faster than these limitation.

Certain 802.11n routers and devices also support beamforming, but unlike 802.11ac, there is no common standard with beamforming in wireless-N.

In order to benefit from the beamforming technology, both your wireless router and wireless device (computer, tablet, handphone, smart TV, etc.) must support this technology. If they are of wireless-N device, then the beamforming of the wireless client must compatible with the wireless router as well, preferably from the same brand or manufacturer.

Beamforming is standardized in wireless-AC, but that does not mean that all wireless-AC has this feature. You have to ensure your wireless-AC device comes with beamforming technology to get its benefit.

MU-MIMO

Traditional wireless router or access point, even with MIMO technology, can only serve one wireless client at one time. If it is connected to multiple WiFi devices, each of the devices take turn to be served. The more wireless devices you connect to the WiFi router, the less bandwidth is available for each one of them.
Multiuser MIMO (MU-MIMO) is introduced in the 5th generation WiFi standard 802.11ac. In a wireless system that uses MU-MIMO, the router can direct separate streams of bandwidth to up to 4 different devices simultaneously, as long as the devices are also able to use MU-MIMO technology.

For a MU-MIMO router with 4 antennas, each antenna can serve an individual MU-MIMO supported wireless device. Each of these devices can utilize the full WLAN bandwidth supported by the router.

If there are more devices, then the 5th onwards still need to share antenna with other device.

So, one MU-MIMO router is equivalent to 4 virtual MIMO routers, in the condition that the wireless clients connected to it also support MU-MIMO technology.

What if your wireless device is not supporting MU-MIMO? The router is backward compatible to act as single-user MIMO (SU-MIMO) router just like the older MIMO, and you won't enjoy the benefit of MU-MIMO in this case.


Saturday, March 19, 2016

Ambidio - new audio technology that enables normal speaker to play super immersive surround sound that beats high-end 7.2 speakers

Ambidio is a new start-up in Los-Angeles founded by 29 years old Taiwanese girl Iris Wu and her friends, specialized in revolutionary sound technology. The company is backed by multiple-times Grammy award-winning artist will.i.am, and private investment arm of Hong Kong tycoon Li Ka-Shing - Horizons Ventures.

So, what's so special about this Ambidio technology? Well, it brings a high quality, immersive sound experience by just using computer software technology, which can instantly enable normal low-end speaker (preferably stereo) to play sound with effect of the standard as produced by expensive high-end surround sound systems.

Ambidio offers a new way for people to experience sound. It has a range that is at least 3 times wider than conventional methods that simulates three dimensional sound, using traditional speakers and headphones, allowing for a fully immersive experience.

Don't believe me? You can try yourself with this demo video provided by Ambidio, using your low-end speaker, and tell me what you think after listening to this 1 minute demonstration.


Ambidio has enlisted Lucasfilm’s Skywalker Sound, which has been redefining immersive sound for nearly 4 decades for film, TV and videogames, as a strategic advisor to assist with Ambidio's technology and creative development.

“Technology is transforming the way we experience music and, as an artist and producer, I’m always looking to what’s next – where the innovation is. Ambidio brings music to life through immersive sound, giving people a chance to experience music in a whole new way,” says will.i.am of his involvement.

The idea came about while music lover Iris Wu was attending graduate school at New York University, and was trying to create a quality listening experience but was dissatisfied with the results due to living in a small New York City apartment. She began experimenting with sound engineering through code rather than hardware and Ambidio’s technology began to take shape.

“The brain is a powerful mechanism that can interpret the directional origin of different sounds in everyday life,” says Iris, “however, when consuming content on a device, such as a laptop, sound consistently comes from a fixed point – the front.”

Ambidio made it by treating our brain as a decoder and creates a continuous sound field with a sense of depth and dimension. It creates an immersive sound experience using only stereo speakers by inserting common cues into audio files that the brain then uses to identify and perceive where different sounds within the audio stream would have come from. Essentially, our brains process the sound the way it does in everyday life.

We look forward for Ambidio to disrupt the entire audio industry.

Friday, March 11, 2016

The ultimate comparison of TP-Link Archer C7 vs C8 vs C9 wireless routers

TP-Link has been well-known for wireless routers with performance comparable or even better than Asus, Linksys, Netgear, etc. with a much cheaper price. More importantly, most of its routers support UniFi and MaxisNet fibre broadband, including the IP phone and IPTV functions.

Let's compare 3 of the TP-Link Archer series of wireless-AC routers at the price range between RM400-RM600: the C7, C8 and C9. Below is the comparison table (click image to enlarge):


The Archer C7 is the oldest among them, with old housing and old web user interface. However, it seems to outperform its successors C8 and C9 in terms of network throughput and maximum simultaneous connections supported, with the help of its 6 antennas (3 internal and 3 external). It has the lowest price too.

The Archer C8 is a new design with new housing and newer, more user friendly web user interface. It also has a dual core CPU. Its USB performance is better than the C7. However, its 3 dual band antennas are shorter, and seems to perform weaker than the C7, despite it comes with Beamforming technology.

The Archer C9 has the same design with C8. It comes with a faster dual core CPU, newer Broadcom chipset, and even better USB performance than C8. However, its network throughput is a bit disappointing in the comparison.

If you are familiar with TP-Link old user interface, here is how its new user interface looks like:


TP-Link is phasing out C8 to replace it with C9, so the availability of C8 in the market is very rare now. However, the C7 is still widely available in the market.

So, there are both pros and cons among them in terms of user interface, specification, performance and price. If you were to choose one of them for your home Internet, which one will you buy?

References:

Sunday, January 17, 2016

Installed YouTube for Android TV 1.3.8 in Huawei EC6108V8 STB of UniFi HyppTV

The Huawei EC6108V8 set top box (STB) of TM UniFi HyppTV comes pre-installed with YouTube app that is not functioning, even though you've successfully make use of WiFi to connect the STB to the Internet.

Anyhow, I've installed YouTube for Android TV version 1.3.8 that can functioning well in the Huawei EC6108V8 STB.

You probably can't find this app in the pre-installed Google Play Store running in the Huawei EC6108V8 STB of UniFi HyppTV. You need to make use of the pre-installed web browser in the STB and visit to the URL below to download and install the YouTube for Android TV app:

Note that the pre-installed YouTube is a system app and you can't easily uninstall it. After installing YouTube for Android TV version 1.3.8, you will have 2 different YouTube app in the My Applications screen of the STB. Luckily they have different icon, so you can easily differentiate between them.


You might probably also be interested to read about:

Monday, January 11, 2016

Upgraded my UniFi HyppTV set top box (STB) from Huawei EC2108E to Huawei EC6108V8

If you are new home subscriber to TM UniFi with HyppTV package, you will probably get the new Huawei EC6108V8 set top box (STB) as your IPTV service decoder.


If you are existing TM UniFi VIP package user, your HyppTV STB might be of the old Huawei EC6106V5 model...

or even the older Huawei EC2108E...


The Huawei EC2108E STB can only run the HyppTV app, and provides the least control to user.

The Huawei EC6106V5 STB comes with higher hardware specs as well as later version of Android, and is possible to install with other Android apps with some hacking.

The Huawei EC6108V8 is much smaller in size, has even better hardware specs, running on Android 4.4.2, and comes with Google Play Store which makes installation of Android apps even easier.


If you are using the older HyppTV STB and have recently upgraded your UniFi to the 30Mbps or 50Mbps package, you can request to replace your old STB with the latest model for free. As a result, I've upgraded my Huawei EC2108E STB to EC6108V8.


Note that the LAN port of your STB is connected to the LAN port of your router with VLAN 600, which is dedicated for IPTV service. So you can't use it to access to the Internet.

In order for your STB to access to Internet and download apps from Google Play Store, you need to enable WLAN under Settings > Wireless and Network > Enable WLAN.


With this, you can connect the STB to your home WiFi network provided by your router, and use it to connect to the Internet.


Saturday, December 5, 2015

Updated the firmware of my Transcend DrivePro 220 car video recorder from v1.0.7 to v1.0.8

I have successfully updated the firmware of my Transcend DrivePro 220 car video recorder from version 1.0.7 to the latest version 1.0.8.

The new firmware of Transcend DrivePro 220 can be downloaded from this webpage:
http://www.transcend-info.com/Support/No-692

Look for the Driver/Firmware section under the Support & Download screen, the click on the file download icon to download the firmware update package.


Here are the steps to perform the firmware update to the Transcend DrivePro 220:

Step 1: Remove the microSD card from the car video recorder and put it in a USB card reader.

Step 2: Plug in the USB card reader to your computer to access to the storage content of the microSD card.

Step 3: Backup all the videos and pictures in the microSD card to your computer.

Step 4: You will see a folder called System in the microSD card. Go into that folder. It is OK if you find the folder is empty.

Step 5: Unzip the firmware update package you just downloaded from Transcend's support website, you will find a file called DP220.bin. Copy this file into the System folder of the microSD card.

Step 6: Safely remove the USB card reader from your computer, and put back the microSD card into the Transcend DrivePro 220.

Step 7: Ensure your Transcend DrivePro 220 is fully charged.

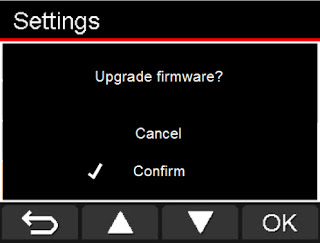
Step 8: Turn on the Transcend DrivePro 220, and open the Settings menu.

Step 9: Go to the "Firmware Upgrade" option, and press the OK button.


Step 10: Confirm the firmware update, and press OK to proceed.


The firmware update will now begin. It will take several minutes, and your Transcend DrivePro 220 will reboot itself after the update.


After reboot, it should be running on the new version of firmware. You can check the firmware version inside the Settings > Information screen.


Wednesday, December 2, 2015

U Mobile awarded as Malaysia 2015 Fastest Mobile Network by Ookla and give 1GB additional free quota in December 2015 to all subscribers

Which mobile network provides the fastest 4G LTE Internet bandwidth in 2015?

According to the Ookla Speedtest results, the winner is... U Mobile, and the second place is... Celcom. The Maxis who made a lot of noise recently ends up at the third place, and the forth is Digi.


Right after winning this award, U Mobile has announced that all their postpaid and prepaid subscribers will get 1GB extra quota to their data plan for free in the month of December 2015.

I have received this SMS from U Mobile too!


Seems like I have made a right choice in switching my tablet network provider from Digi to U Mobile recently.

Meanwhile, there is news that P1 who invested heavily in the wrong technology (WiMAX instead of LTE) will make a strike back to the market under the umbrella of TM. This means that TM who all the while in the fixed line market, will soon enter into the competition world in the mobile market, after they bought P1 mobile business quite some times ago.

Things are getting interesting, especially if you still remember P1's advertisement about "potong", ended up they need the rescue from TM.

Anyhow, it is a good news for consumers to see more competition in the market. We look forward for more quality service and more "potong" in pricing among them.

Saturday, November 21, 2015

Register free Comexe Dynamic DNS domain name and use it in TP-Link router

Dynamic Domain Name System (DDNS) is a way for you to access to your home network from the Internet even if your ISP is assigning dynamic (non-fixed) IP address to you.

With DDNS configured in your router, you can access your home network using a domain name, regardless of what the IP address of your router has changed to.

TP-Link router provides 3 options of DDNS to setup with, namely:

  • Comexe
  • DyDNS
  • No-IP
Among the three of them, Comexe provides free DDNS service, and doesn't need periodical account confirmation.

In order to use Comexe DDNS service, you need to register an account in their website:
http://www.comexe.net/member/reg_login.php


There are 5 fields for you to fill in:
  • The 1st field "用户名" is your preferred account name, comprises of 3 to 16 characters. For free Comexe DDNS service, your free dynamic domain name is fixed to be your_account_name.kmdns.net. So, set your account name carefully.
  • The 2nd field "登录密码" is your preferred password comprises 6 to 16 characters.
  • The 3rd field "确认密码" is to reconfirm your preferred password.
  • The 4th field "电子邮箱" is your email address, which will be used to reset your password in case you forget it in the future.
  • The 5th field "验证码" is a captcha verification. Just key in the characters you see in the image.
When you are done, click on the left button "注册" below to register your account. The right button "取消" is a cancel button.

The registration might take some time. Do not refresh your browser while it is still running. You need to be a little bit patient.

If your account is successfully registered, you will reach the screen that looks like below.


Now, go to this URL directly: http://www.comexe.net/member/domain_free.php


You should be able to see your free DDNS domain name is ready for activation. You need to click on the "立即开通" button to activate it before it can be used.

Upon successful activation, you will see the message similar to this:


Next, login to your TP-Link router, and go to Dynamic DNS configuration section.

Select Comexe (www.comexe.cn) as your Service Provider, then enter your DDNS domain name and provide your account name (user name) and password in Comexe.

Make sure you ticked the "Enable DDNS" option, can click the Login button.

If you see the word "Succeeded!" in the Connection Status, then your dynamic domain name is up and running now. You can then proceed to click the Save button to save the DDNS configuration in the router.

In future, if you want to disable the DDNS service, just untick the "Enable DDNS" option and click the Logout button.

You can go to System Tools > Diagnostic section of your TP-Link router to ping your dynamic domain name. You should be able to see that your dynamic domain name is now bound to the current IP address of your router's WAN interface.


Monday, November 9, 2015

Switched telco plan of my tablet from Digi Tablet 1GB plan to U Mobile U28 3GB plan

About 2 months ago, Digi started to offer a new RM25 SmartPlan with 1GB monthly Internet data quota.

I contacted Digi to find a way to switch over my Digi Tablet 1GB plan (RM29/month) to this RM25 SmartPlan. Disappointedly, Digi told me there is no way to switch over, unless I terminate the existing Tablet 1GB subscription, and reapply for a new RM25 SmartPlan subscription.

Since there is no flexibility to switch over to the new plan, I wondered if there is any other better postpaid plan from Celcom, Maxis or U Mobile for my tablet, and I found U Mobile U28.


The monthly subscription of this U Mobile U28 is about the same as the Digi Tablet 1GB plan, and is in fact RM1 cheaper.

However, it provides 3GB monthly Internet data quota, which is triple of what the old Digi Tablet 1GB or the new Digi RM25 SmartPlan is offering.

On top of that, there are free voice call minutes and free SMS every month, which is not available in the Digi counterpart plan. Anyhow, it is very rare for me to use the tablet to make phone call or send out SMS, although I do use it to receive SMS.

Similar to Digi SmartPlan, I can listen to KKBox music with U Mobile all day long without using up my Internet quota, with their free music streaming service.


U Mobile also provides free YouTube and Tonton video streaming, but only within the very odd time period from 2am to 10am everyday.

As a result, after terminated my Digi Tablet 1GB plan, I switched over to U Mobile U28 plan to have a try.

Now, after about 2 months of usage, I decided to stay with U Mobile.

I found that in many places in urban area, the Internet speed of U Mobile is about the same with Digi. I some places, it is even better than Digi. In certain rural areas where U Mobile only able to provide EDGE or GPRS data speed, I still have my Celcom First Plan in my smartphone as backup Internet. After all, Celcom is still having the best rural coverage among the telcos now.


Sunday, November 8, 2015

Upgraded the firmware of my TP-Link TL-WA860RE 300Mbps WiFi range extender to Version 3.15.8 Build 150820 Rel.40814n

I have just upgraded the firmware of my TP-Link TL-WA860RE 300Mbps WiFi range extender to Version 3.15.8 Build 150820 Rel.40814n.


The most visible enhancement to this new firmware is the addition of Proxy Mode on top of the existing Universal Mode and WDS Mode of operation.


The Proxy Mode is said to have the best compatibility with routers and access points of all brands. If your range extender has problem working in Universal Mode and WDS Mode, you can try using this Proxy Mode. However, it may decrease the overall performance.

Note that you might lost all your existing settings in the TL-WA860RE after the firmware upgrade. Anyhow, there are not much settings for the device, so you can redo all the settings without taking up much of your time and effort.

You can click here to download the firmware for TP-Link TL-WA860RE version 3.15.8.

To perform the upgrade, unzip the downloaded file to get the wa860rev1_en_3_15_8_up_boot(150820).bin file.

Login to the WiFi range extender, and go to System Tools > Firmware Upgrade to perform the upgrade.

I strongly recommend you to connect to the device using a LAN cable instead of connecting through WiFi to perform the firmware upgrade.


Saturday, November 7, 2015

Setting up IPv6 in TP-Link TL-WDR3600 router for TM UniFi Internet

IPv6 is finally supported in the latest Malaysian firmware version 3.14.3 Build 150605 Rel.53236n for TP-Link TL-WDR3600 router.

The available IPv6 Internet connection types are:

  • DHCPv6
  • Static IPv6
  • PPPoEv6
  • Tunnel 6to4
So far, I only able to make the Tunnel 6to4 work in my router. I am not able to obtain IPv6 address with the other 3 connection types.

Here is the way to setup the TP-Link TL-WDR3600 router to support IPv6 network with TM UniFi, using Tunnel 6to4 method.

Go to IPv6 Support > IPv6 Setup, and enable the IPv6, choose "Tunnel 6to4" as the WAN connection type.

Set the MTU Size to be 1472, which is 20 bytes less than the MTU Size of 1492 set for the IPv4 in PPPoE Advanced Settings page.

To make use of Google DNS servers, set your primary and secondary IPv6 DNS servers to be
2001:4860:4860::8888 and 2001:4860:4860::8844 respectively.

Leave the LAN IPv6 Address Assign Type as SLAAC.
 

Click the Save button and you are done. You should be able to see your IPv6 address and settings in the IPv6 Status page now.

You can test your IPv6 connectivity with this website: http://test-ipv6.com/


Note that you won't be able to get a 10/10 score with Tunnel 6to4 connection. The website will just give you a 7/10. This is absolutely fine, as long as you don't get MTU related error which is the common headache in IPv6 setting.

Next, you can compare your Internet access speed to Japan when using IPv4 and IPv6. Both connection speeds are, in fact, surprisingly very different.

URL to test IPv4 connection speed from your location to the Japan server: http://www.speedtest6.com/


URL to test IPv6 connection speed from your location to the same Japan server: http://ipv6.speedtest6.com/


Below is the ping result from my computer to www.google.com using IPv4 and IPv6:

Hint: Click on the "Older Posts" link to continue reading, or click here for a listing of all my past 3 months articles.