Monday, December 27, 2021

Rectangular wooden digital LED alarm clock with humidity and temperature display

I have bought this rectangular wooden digital LED alarm clock with humidity and temperature display during the recent 12.12 online sale fiesta, at the price of slightly below RM40.

You can use it as a normal desktop clock (with the alarm function switched off) and also as your bedside alarm clock (with up to 3 different alarm time settings).

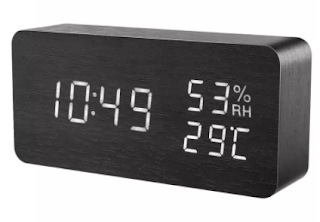
It is pretty feature-rich. Other than displaying the time (in either 12-hour or 24-hour format), it also displays the humidity (in RH percentage) and room temperature (in either degree Celsius or Fahrenheit). In DP-1 display mode, it can even show the date of today.

When your air-cond is turned off, and the humidity is above 75%, there is a high possibility that it is going to rain.

In normal days, the humidity level should be between 35%-65%. Higher than that, you should consider using dehumidifier to prevent the growth of mold and pests. Lower than that, you should consider using humidifier instead to safeguard the lifespan of your wooden floorings and furniture.

When your air-cond is turned on, both the humidity and temperature should drop. The room temperature should stay at the level that you set for your air-cond, otherwise you might need to service your air-cond as it no longer able to condition your room temperature according to your setting.

There are 3 power sources for this alarm clock:
  • Internal CR2032 battery, used as emergency power source to memorize your clock settings and to keep the time running when there is no other power sources available.
  • 4x AAA batteries, used as emergency power source for the alarm clock to function as normal, in the event of electricity blackout. Without the USB power source, the AAA batteries will be used up within 24 hours.
  • DC 5V 300mA USB power source, which is the main power source for this alarm clock. Note that the alarm clock only comes with a USB cable, and you need to prepare your own wall charger to supply the DC 5V 300mA power supply to the clock.

There are only 3 buttons at the back of the clock (Set, Up and Down), making it a little bit tricky to set up the clock. Anyhow, it comes with a comprehensive multilingual instruction manual for you to refer to when setting up the clock.

There are 3 brightness levels for its LED display. During 6.00pm to 6.59am, the brightness level will be automatically switched to the lowest. This is a nice feature so that its LED display will not be too bright at night until it might disturb your sleep.

The LED display even has a "power saving" mode that will turn it off after 15 seconds of display. You can either touch the clock with your hand, or make some noise by clapping your hands near the clock, to bring up the display. You can also turn off this "power saving" mode for the LED display to stay on.

This clock has altogether 3 alarms, which you can set up to 3 different time of the day for it to chime. In addition, it also has a setting for the alarm function to only work during weekdays, and it won't wake you up during weekends.

All in all, I find this alarm clock elegant looking, feature rich and practical to use. It is inexpensive too, either for own use or as a presentable gift.


Saturday, December 25, 2021

Gas stove heat diffuser metal plate

 I bought this 28cm heat diffuser aluminium plate for gas stove at the price of RM28.80.


It works by placing it on top of gas burner, so that:

  • To distribute heat from the underneath fire evenly, and avoid scorching. This also keeps the base of your cooking utensil clean and anew.
  • To support cooking utensils with smaller base, so that they can sit stably on top of the burner.
  • There is less mess in the event of soup overflow and spillage, as the plate will hold the spilled liquid, preventing it from dropping into the fire and burner.
This plate has 2 sizes available in the market: 24cm and 28cm. If you are in doubt, get the larger 28cm one. If your gas burner is small, you can get the 24cm one, as it will heat up faster and therefore able to save some cooking gas.

This plate also has several different thickness available in the market: 4mm, 6mm, and some even 8mm.

4mm one is just nice. Thicker plates are more heavy-duty to support heavier weight on top of it without deformation. However, they will need more time to diffuse and heat up, and will use up more cooking gas.


There is a chuck that comes together with the plate, for you to move the plate without worrying about burning your hand when accidentally holding a hot plate.


Sunday, December 19, 2021

Replaced my instant shower heater from Alpha Smart 18EP to Joven SL30iP

Recently, the "Line Fault" indicator of my 6 years old Alpha Smart 18EP instant shower water heater in one of my bathrooms had changed from its usual green light to red light. This is the same shower heater that was repaired in 2017 before.

I have replaced it with a new Joven SL30iP shower heater with DC inverter pump.


I bought the model without rain shower head for a cheaper price at around RM440, and managed to use back the rain shower head of the replaced Alpha Smart 18EP.

I have chosen Joven SL30iP this time, because:

  • It has a very high performance/cost ratio, even higher than Alpha Smart 18EP.
  • While the Alpha Smart 18EP has an AC pump, this Joven SL30iP has a DC inverter pump, which is much silent and saves electricity. More importantly, DC pump is less prone to electric shocks than AC pump.
  • It has a built-in double poles Electronic Earth Leakage Sensor (EELS) with a very good 10mA sensitivity.
  • It supports a lower minimum water pressure at 10kPa / 1.45 psi / 0.1 bar.
  • It supports a lower minimum water flow at 2 litres per minute.
The only thing I don't like about this Joven SL30iP instant shower water heater is that its pump on/off switch, EELS test switch and EELS reset switch are located at its side instead of its front, making it harder to locate the right switch you want to press on.

Note that the water inlet and outlet of this Joven SL30iP are on the opposite side compared with the Alpha Smart 18EP. If you connect its water inlet and/or outlet on the wrong side, the water heater will not operate.

Same with Alpha Smart 18EP, the casing of this Joven SL30iP is IP25 splash proof.

If you are surveying on your new instant shower water heater, perhaps you can consider this one.


Tuesday, December 14, 2021

How to keep MS Outlook meeting invitations inside Inbox after responding to them?

This is a frequently asked question (FAQ) that many people using Microsoft Outlook as their email client found their meeting invitations automatically deleted and moved from Inbox to Deleted Items folder once they've clicked on the button to accept or decline the meeting invitation.

The accepted meetings will appear inside your Calendar.

I believe many people prefer to keep the original meeting invitation emails inside their Inbox instead of deleting them, because the invitation email might contain important information about the meeting, such as the meeting agenda, attached documents, etc.

In fact, deleting responded meeting invitations from Inbox is not a bug, but rather a strange default behaviour of MS Outlook.

To change that default setting to retain your meeting invitation emails inside Inbox, go to File > Options, the Outlook Options dialog box as below will popup.


Select Mail on the left menu, scroll down to the Send messages section, and uncheck the option of "Delete meeting requests and notifications from Inbox after responding".

Click the OK button and you are done.


Friday, December 10, 2021

K8 body temperature infra-red thermometer powered by USB

Nowadays, infra-red thermometers are widely used in a lot of places to capture our body temperature, especially for COVID-19 preventive measure at the entrance of most commercial premises.

Infra-red thermometer has the following advantages:

  • Non-contact way of measuring body temperature
  • Fast measurement time of around 1 second
  • Pretty accurate if there is no other infra-red source around that might interfere with its signal receiver
  • Affordable price
For home and personal use, if we want to buy an infra-red thermometer, we might want to look for the following features:
  • Small and lightweight, easy to carry along, and save storage space
  • Accurate reading
  • Non-battery powered, since we are not going to use it frequently
  • Cheap price
I found the K8 body temperature infra-red thermometer that operates with DC 5V and powered by USB, cost slightly above RM10, is an ideal one to be used.


This small little device actually has 3 variants of power source connector: USB-C, micro-USB and lightning connector. If you want a future proof one, choose the one with USB-C connector.

It can be powered by the USB port of handphone...


or powered by the USB port of other devices, such as a laptop.


There is a button at its back to switch its reading between Celsius and Fahrenheit.

It will beep when it captured a new temperature reading in the rage between 32 °C to 42 °C. You will most probably get the same temperature when placing your forehead or palm in front of it.


Friday, December 3, 2021

Self COVID-19 testing by saliva with Sejoy SARS-CoV-2 antigen rapid test kit

There will be occasions that you need to do a COVID-19 self-test, to ensure that you are free from COVID-19 infection, before you attend certain events or enter into certain premises.

There are generally 4 types of COVID-19 self-testing kit available in the market now:

  • Nasal swab specimen test
  • Mouth swab specimen test
  • Nasal + mouth swab specimens test
  • Saliva specimen test
Among them, I find the saliva specimen test type is the easiest to use, cheapest to buy, and does not cause any discomfort during specimen collection.

You can get the Sejoy SARS-CoV-2 antigen rapid test kit at a price of slightly below RM5 per box (for single test) in Mr. DIY, 99 Speedmart, pharmacies, online e-commerce stores, and some other places.


A brief instruction on how to use it is printed at the back of its packaging box.


There is also detailed instruction printed on a large piece of paper inside the box.

Here are the steps to use it:
  • Do not eat or smoke or drink anything other than plain water at least 30 minutes before the test.
  • Wash your mouth with plain water.
  • Use a knife or scissor to unseal the box by breaking its "QC Passed" sealing sticker.
  • Take out its content.
  • Assemble the saliva collection funnel kit on top of the extraction tube.
  • Collect your saliva into the extraction tube until the saliva is slightly on top of the level mark you can see near the bottom of the extraction tube.
  • Remove the saliva collection funnel kit and put it inside the biohazard waste bag.
  • Put the extraction tube into the hole at the back of the packaging box, so that it won't fall down.
  • Unseal the extraction reagent bag.
  • Drop all the extraction reagent liquid into the extraction tube by squeezing on its bag.
  • Cover up the extraction tube with its attached stopper.
  • Mix your saliva with the extraction reagent by shaking the extraction tube for about 1 minute.
  • Take out the test cassette from its aluminum foil pouch.
  • Drop 2 drops of the mixture in the extraction tube by squeezing the tube on top of the "S" area on the test cassette.
  • You will see the liquid slowly moving from one end of the test paper to the other end. The paper will become purple in colour during the movement, and will change back to white after the movement.
  • The test result should be ready in 15-20 minutes.

  • The control line at "C" position should appear, otherwise the test is not successful, and you will need to redo the test again with a new test kit.
  • If you see another line at "T" position, your test result is COVID-19 positive. If there is no line at "T" position, congratulations, your test result is COVID-19 negative.
  • After the test, insert everything (except the large instruction paper) into the biohazrd waste bag, seal it before disposal.

After using the COVID-19 self-testing kit, you are required to report the test result in MySejahtera app regardless your test result is positive or negative.
  • Open up MySejahtera app in your mobile device.
  • Tap on the "Close" button to close the front page.
  • Tap on the "COVID-19 Self Test" icon.
  • Select "Update Self-Test Result".
  • Continue to follow the on-screen instructions to complete your reporting.

The COVID-19 self-testing kit is labelled with manufacturing lot number, year and month of manufacture, and also the year and month of expiry. At first I thought I'd need to key-in these information in the report, but it ends up I just need to report on whether my test result is positive or negative.

If you are tested COVID-19 positive, then you should reconfirm by taking another test with a new test kit.

If both the tests are showing COVID-19 positive, please isolate yourself immediately, and contact MOH immediately. You can click here to get the MOH COVID-19 hotline contacts.


Hint: Click on the "Older Posts" link to continue reading, or click here for a listing of all my past 3 months articles.