Showing posts with label gadget. Show all posts

Monday, July 24, 2023

My CyberPower CL1000EVR Automatic Voltage Regulator (AVR)

A few months back, when I upgraded my CyberPower UT800EG UPS with APC BV1000I-MSX 1kVA/600W Easy UPS for power protection to my desktop PC and network equipment, I've relocated the old CyberPower UT800EG UPS to my living room to provide power protection for my TV, IPTV box and cordless phone.

Later, I decided to retire the old UPS and to protect my TV, IPTV box and cordless phone with a more proper Automatic Voltage Regulator (AVR).

Advantages of replacing the old CyberPower UT800EG UPS with a CyberPower CL1000EVR AVR:

  • At the cost of below RM100, the CyberPower CL1000EVR AVR is cheaper than the UPS.
  • Generally, AVR has a very long lifespan of easily more than 10 years, while UPS has a much shorter lifespan.
  • The battery in the UPS can only last around 2 years. After that, it would need to be replaced for the UPS to continue function as designed. Faulty battery could also be a potential cause of fire hazard.


As printed on its packaging box, this CyberPower CL1000EVR AVR is able to perform:
  • Output voltage regulation with surge protection and AVR function (prevent overvoltage as well as undervoltage)
  • Overload protection with circuit breaker


It is pretty small in size, about the same as a household UPS. This is how it looks like:


At its back, it has a power switch and 4 universal power outlet sockets.


The seller has attached a flyer of CyberPower range of products in UPS, AVR and surge protector, which I find is pretty useful in providing comparison information among them.


Surge protector power extension could be an even cheaper option, but bear in mind that:

  • Surge protector can only protect overvoltage spikes but not undervoltage.
  • Surge protector cannot regulate the voltage waves.
  • Surge protector normally makes use of varistor to capture the spikes. The varistor itself has a limited lifespan, and it sacrifices itself to capture the spikes. For each spike it captures, its lifespan will reduce tremendously.
If you want to have the maximum power protection for your expensive electrical equipment, you can make use of a combination of surge protector, AVR and UPS by connecting the AVR to surge protector, and connecting UPS to AVR, then connecting your devices to the UPS.


Sunday, March 19, 2023

Upgraded my CyberPower UT800EG UPS with APC BV1000I-MSX 1kVA/600W Easy UPS

My CyberPower UT800EG 800VA/400W UPS has been serving me well for more than 3 years, and it is still functioning well.

It has never failed to protect my Dell XPS 8930 desktop, my Asus RT-AX86U router and Unifi BTU from sudden blackouts and also voltage spikes during thunderstorms.

Anyhow, I anticipate its internal battery, which is not user serviceable, has already reached more than half its lifespan.

Not to take the risk, I decided to get a new UPS, and I found this APC BV1000I-MSX 1000VA/600W Easy UPS as its upgrade.


This APC BV1000I-MSX Easy UPS has 4 universal power outlets (the CyberPower UT800EG only has 3), and it has a larger capacity of 1000VA/600W which is able to provide longer battery runtime. It also has a higher surge suppression rating of 156 Joules (compared with CyberPower UT800EG's 125 Joules).


While transporting, its battery stays disconnected. Before use, we need to connect its battery by using its yellow coloured battery connector at its back. Detailed instruction is available in its user manual.

Same with CyberPower, this APC UPS also comes with 2 years warranty, which registration can be made online.

I have reallocated my CyberPower UT800EG UPS to my living room to provide power protection for my TV, IPTV box and cordless phone.

Even though its battery might run flat in the next 2-3 years time, I think it can still serve as a good AVR to protect those appliances in my living room.


Thursday, August 25, 2022

My UGREEN CD226 GaN 100W 4-ports USB fast charger

If you want to have a common charger for multiple devices that charge using USB cable, and better still, to be able to charge multiple devices at the same time, then you can look for a multiport charger such as this UGREEN CD226.


The UGREEN CD226 is a 4-ports charger that supports fast charging (or quick charging / super charging) of various protocols including PD3.0, PD2.0, PPS, QC4+, QC3.0, QC2.0, FCP, SCP, AFC, etc.

You can feel that this Gallium Nitride (GaN) charger is quite big (compared with those single port charger) and quite heavy. Holding it is like holding a tennis ball.

Anyhow, if it is not using the modern Gallium Nitride (GaN) technology, it might have been even much more larger in size. 

It has 3 USB-C charging ports and 1 USB-A charging port. Its maximum charging power is 100W. You can use one or more ports at the same time to charge your device(s) simultaneously.

It is compatible with many devices (handphone, smart watch, tablet, game station, ear phone, and even laptop).

If you connect your device to the right charging port, it supports the fastest charging speed compatible with your device's USB port. However, if you connect your device to a non-compatible fast charging port, it can still charge up your device without problem, but with a slower charging speed.

Port C1 and C2 have the same specs that support a maximum charging power of 100W. You should try charging your device with either one of these 2 ports first. If you are unable to get fast charging, then try port C3, followed by port A.

It supports products of multiple brands, including but not limited to iPhone, iPad, MacBook, Dell XPS, Asus, Lenovo, HP, Surface, Huawei, Honor, Samsung, Xiaomi, Vivo, Nintendo Switch, etc.

Apple product users might like it very much, because its charging speed is much more faster than Apple's original charger.

However, it does not support the latest 100W super charge protocol of my Honor Magic 4 Pro handphone. I can still use it to charge the Honor Magic 4 Pro, but the charging speed is much slower, compared with charging using the handphone's original supercharge charger.

Same with most other modern chargers, the UGREEN CD226 has protection mechanisms to prevent overheat, overvoltage, overcharge, etc.


Sunday, May 29, 2022

The 3 generations of timer switch plug used in my household

Timer switch plug is a kind of gadget that can easily convert a normal wall socket into programmable timer socket. 

I have been using it for quite a long time, from one generation to another.

Some scenarios of using timer switch plug include:

  • To supply electric power to TV and audio-visual devices in the morning, so that they are well standby to be turned on instantly, and to cut off the power at mid-night.
  • To switch off the air purifier when you go to work, and to switch it on when you back home.
  • To turn on the light at night, and turn off in the morning.
  • To turn off the wall charger power 2 hours after charging.
  • etc.
Here are some photos of the 3 generations of them (front view, side view and back view):


Surprisingly, all the 3 generations are selling at almost the same price in the market now.

The 1st generation only support programmable timing interval of 15 seconds time period, and you can decide during that particular 15 seconds it should be turned on or turned off by toggling its key position to be up or down.

It will rotate and repeat its setting every 24 hours. It has no clock to keep track on the actual time. In the event there is a power blackout, it will stop rotating, and therefore after the power resume, its setting will be offset and you might need to readjust its setting.

The 2nd generation, a digital one, is more advanced. It has an internal clock, powered by an internal rechargeable battery, and its programmable period is up to a week.

With this capability, and its programmable timing interval of 1 second, it is possible for you to set it to turn on and turn off at different timing for each day in the week.

The 3rd generation, a smart plug which I am using now, is even more advanced. You need a mobile app (either Smart Life or Tuya Smart) to control it.

The smart plug connects with the corresponding mobile app via 2.4GHz WiFi network that is connected to the Internet. There is a gateway server in the cloud that link it to your mobile app.

One mobile app can be used to control multiple smart plugs.


Scheduling the time for it to be switched on and switched off is a basic function, available in the app.

On top of that, the smart plug also has the capability to monitor and record down the electric power consumption of the devices attached to it.


Together with the sensors in your handphone accessible by the mobile app, it is possible to program for scenario-based automation, such as:
  • Turn off when you are away (your handphone detected location is leaving the smart plug)
  • Turn on when you are back (your handphone detected location is near to the smart plug)
  • Turn on/off at sunrise/sunset, which will be on different timing during different season
  • Turn on/off when it rains (it can get the weather information from your phone)
  • etc.


It even can integrate with some voice control assistants, including Alexa, Google Assistant, SmartThings, IFTTT, etc. so you can actually speak to your voice assistant and ask it to be turned on/off with your voice command.


Monday, March 14, 2022

My Youpin Suanglng JC-B18 2.5 litres mini washing machine

Do you remember my portable ultrasonic turbine mini washer that I bought at the price of slightly above RM40 that I used it to wash the mopping cloth of my Roborock S7 robot cleaner?

Unfortunately, I have to tell you that it cannot last long, and started to malfunction after about 3 months of daily usage. Maybe its motor is too weak to handle daily usage, and now it could hardly spin.

It is still a very good mini washer, probably for occasional use, such as when you're travelling.

Anyhow, I have found a more robust replacement for it, which is my Youpin Suanglng JC-B18 2.5 litres mini washing machine, which cost me around RM150.

This mini washing machine has a higher power motor than my previous mini washer, operating at 12V 10W.

It has its own bucket with touch power button. Other than the washing function similar to my previous mini washer, it also has voilet ray and ozone bubbles to sanitize virus and bacteria.

See it in action below:


Note that its bucket is pretty small, at the size of 165mm x 165mm x 187mm only.

Other than mopping cloth, it is also suitable to wash handkerchief, socks, underwear, baby clothes, saliva napkin, and other small items.

Hopefully this Youpin Suanglng JC-B18 mini washing machine can last for 2 years or more.


My Hericaine Twister R-6053 rechargeable portable dry and wet vacuum cleaner

It seems that vacuum cleaners nowadays have become more and more portable, light-weight, and more importantly affordable.

My Hericaine Twister R-6053 rechargeable portable dry and wet vacuum cleaner just cost me slightly above RM50 only, with full set of necessary components, and even with a 30cm x 30cm microfibre mopping cloth as free gift (not in the photo).


I like its carrying bag, which can store all of its components, making it very easy to store and to carry along. Everything in the photo above just has a total weight of less than 1kg.

I use this to vacuum my car, as well as tabletops, cupboards, cabinets, keyboards, desktop rig (outside and inside), printer, screens, corners, air-cond outlets, etc.

It is pretty small in size, and it operates with its own rechargeable battery without any power cord, making it easy to reach out to any place and any corner that you want to vacuum.

Upon full charge, it can operate up to 30 minutes. Its recharging time is quite long though, taking about 3 hours for a full recharge.

It has a pretty decent suction power of 3200kpa, able to suck in items such as paper clips and even small coins without much problem.

I like its wet vacuuming capability, enabling you to suck away spilled water on cushion, for example.

Its HEPA filter is washable and reusable. This HEPA filter is also sold as replacement item at the cost of around RM13.


Friday, March 4, 2022

My Okura 2-in-1 foldable aluminium ladder with clothes drying hanger rack

I believe every household needs a ladder for the purpose of ceiling fan cleaning, replacing faulty light bulbs, air-cond filter cleaning, reaching up to things at higher place, etc.

Your ladder would probably sit in your storeroom most of the time, until the moment you need to use it.

What if you have a ladder that has additional function to use it more often, such as being a clothes drying hanger rack?

The Okura 2-in-1 foldable aluminium ladder with clothes drying hanger rack would be the solution. It can function as a ladder, and it can also function as a clothes hanger rack, although you can't use both functions at the same time.

My 4-steps Okura ladder costs around RM150, slightly more expensive than ordinary ladder without the clothes hanging rack function. There are taller 5-steps and even 6-steps 2-in-1 ladders available in the market, selling at more expensive price.

This 4-steps ladder is good enough for condominium or apartment with not-too-high ceiling height. Its highest step is 96cm (3.15 feet) from the ground. It has a pretty tall and firm handrail for you to hold on. Being a ladder, its loading capacity is 120kg.

As you can see from the photo below, it is just slightly higher than a washing machine.

I find the length of this 4-step ladder just nice for it to be portable and easy to carry. Its weight is just 6kg, about the weight of a baby below 1 year old.

It can fit in ordinary sedan car, probably not in the boot, but with the car's back seats folded.

It is pretty robust and solid. Its handrail is covered with soft rubber, which is very nice to grasp. When you fold it and lean it against the wall, the soft rubber will not hurt the wall.

However, its rack is not able to hang too many clothes. The 5-steps or 6-steps model will have a longer rack to accommodate more clothes.

A use case for this rack is: to make use of the washing machine and clothes dryer for most of your clothes, while using the rack to dry your delicate hand-washed items, such as underwear.


Thursday, March 3, 2022

My Geekria 170cm stereo audio cable with noise-cancelling boom mic for my Sony WH-1000XM4 headset

The Sony WH-1000XM4 headset can operate in Bluetooth wireless mode as well as in 3.5mm audio cable wired mode.

The audio cable that comes together with this headset only support audio in but not audio out. As such, I believe the 3.5mm AUX port on the Sony WH-1000XM4 headset also does not have audio out function to transmit your voice collected from its microphone to the connected device when it is operating in wired mode.

The built-in noise-cancelling microphone of the Sony WH-1000XM4 headset actually functioning pretty well. However, just like all other wireless headset without an attached boom mic, the location of its microphones is some distance away from your mouth. Your voice will sound a little bit "backwards" and much softer, compared to the situation of using a headset with a good boom mic. If the voice captured is too soft, it might become unclear to your listening party over the other end of a phone call or conference call.

To solve this issue, you will need another microphone, not belong to the headset, to take care of your audio out (which becomes the audio in of the receiving device, such as your computer or mobile device).

If the operating system allows separate handling of audio in device and audio out device, then you can make use of your headset to receive its audio out, while using a separate microphone to capture its audio in. Microsoft Windows can handle this kind of situation pretty well.

I believe all laptops nowadays come with built-in microphone, so you can make use of that for your audio in. For PC without built-in microphone, you can get a 3rd party microphone for its audio in.

There also exists another kind of solution, which is using an audio cable with a boom mic that can work independently on its own. This kind of solution is easier and more convenient to use, as you don't need to mess around too much with the audio settings of your computer's operating system and/or conferencing software. With this solution, you can turn your headset into a gaming or call-centre headset that can capture your voice loud and clear.

There are several brands available in the market, including V-Moda, Headset Buddy, Audio-Technica, Geekria, etc. I have chosen Geekria mainly because of its price of around RM35 only, and it works well like those more expensive counterparties.


My Geekria stereo audio cable is 1.7 meter long, which is a perfect length that is long enough for your convenience to use, yet not too long for easy storage.

Inside its packaging contains:

  • Reusable storage bag
  • The 1.7 meter audio cable with attached boom mic
  • Y adapter cord (to separate audio in and audio out, when needed)
  • Leather wire organizer strap
  • 2x microphone cap


Its boom mic is attached with an adjustable cord.

If your computer's 3.5mm audio port supports both audio in and audio out, you don't need to use the Y adapter cord, and can just plug it in as shown in the photo below.


If your computer has separate 3.5mm ports for audio in and audio out, you can plug it in by using the Y adapter cord, as shown in the photo below.

This Geekria stereo audio cable with noise-cancelling boom mic is fully compatible with the Sony WH-1000XM4 headset, as well as the earlier versions of WH-1000XM3, WH-1000XM2, and most other models of Sony headset.

With this, your voice will be recorded loud and clear, with unnecessary ambience noise filtered out properly, and with any echoing problem.

Try it out, and you will be able to notice the tremendous difference of using it than using the wireless microphone in the headset.


Tuesday, March 1, 2022

Sony WH-1000XM4 on-ear wireless headset good for music listening, video watching, phone call handling, online conferencing and gaming

I believe there is no doubt about Sony WH-1000XM4 being the best consumer-grade foldable, stereo on-ear wireless headset with built-in internal echo-cancelling microphones nowadays (during 2021-2022) for music listening with superb active noise-cancelling (ANC) features.

Well, the following criteria are rules of thumb in determining a good wireless headphone/headset:

  • High fidelity of music playback
  • Relatively large driver unit (>=40mm)
  • Wide frequency range at both low end (<=20Hz) and high end (>=20,000Hz)
  • Good noise-cancelling function
  • Long battery life per charge, can last more than 30 hours
  • Support Bluetooth 5 or above. This is crucial for low power consumption as well as low latency between connected devices.
  • Simultaneous wireless connection to 2 or more devices
  • Personalize setting profile with artificial intelligence (A.I.) learning and adapting feature
  • Comfortability for long-hour wearing

There are several brands with top-range consumer-grade headphones that can meet all of the above, including Sony, Bose, Sennheiser, Jabra, Apple, etc.

The Sony WH-1000XM4 is ranked the best among these best with its excellent noise-cancelling function, superb music playback (with the right equalizer setting), advanced A.I. personalization, and nice comfortability in wearing even for the whole day.

However, the Sony WH-1000XM4 is at the same time losing score in its microphone function, bringing doubts of whether it is still good for handling phone calls and/or speaking in online conferencing.

After using it for some time with its latest firmware, I would say its microphone function is still above average, though not among the best. With a simple 3rd party gadget upgrade, it can even instantly be greatly improved to be ranked among the best in handling calls/meetings and also in voice recording for online gaming, podcasting, video narration, etc.

I had been eying for this Sony WH-1000XM4 headset for several months in 2021, but its price tag of around RM1,500 had made me a bit hesitant to buy it, until the last 2021 12.12 online mega sale, when I saw it selling at RM888 promotional price only, I've immediately bought it.

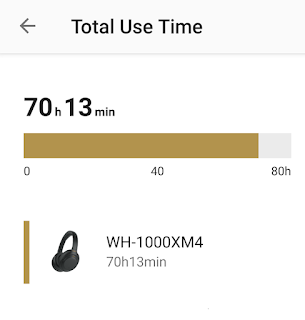
Now I have used this headset for more than 70 hours, most of the time for online conferencing, followed by music listening, and the least usage time is for answering phone calls. I think it's time for me to write my review about this Sony WH-1000XM4 headset based on my past 2 months of 70+ hours usage experience.


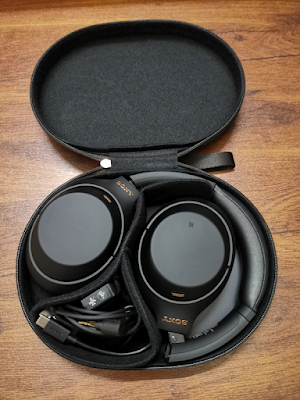
Unboxing the Sony WH-1000XM4 headset

This Sony WH-1000XM4 headset comes with a nice carrying pouch, which is a little bit bulky compared with some other headsets, due to its thick ear cups.


also come together with it in its packaging box are:

  • Stereo audio cable for 3.5mm port (without microphone voice out function)
  • Airplane in-flight audio adapter plug
  • Very short USB charging cable (good enough for charging using power bank)
  • Quick reference guide
  • Instruction for online registration of its 15 months warranty
  • Instruction to download the Sony Headphones Connect mobile app for Android and Apple devices
  • A voucher code for 360 Reality Audio 3-months free trial subscription in either one of Deezer 360, Tidal, nugs.net and Artist Connection.

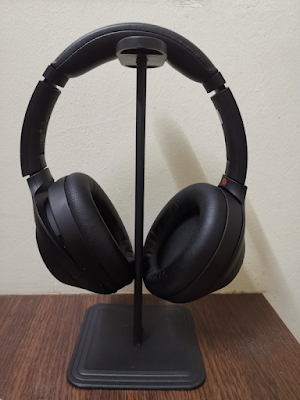
Adding a table-top tower stand for the headset

I have also bought a 3rd party aluminium headphone tower stand for it, at the price of around RM15 only.


Using the 2 buttons at the left ear cup

The Sony WH-1000XM4 left ear cup has 2 buttons. It is very easy for you to locate the correct button by touching and feeling around them with your thumb, without the need of seeing them. A brilliant UX design!

The upper button is a Customizable button that you can use to control either one of:
  • Ambient sound control
  • Google Assistant
  • Amazon Alexa
I have set this button for Google Assistant, and below is how the button works in this mode:

Continue pressing the button to talk or give command to Google Assistant.

When the headset is actively connected to a computer:
  • Press 1 time to toggle music start/stop
  • Press 2 times also to toggle music start/stop
When the headset is actively connected to your handphone:
  • Press 1 time to tell you the current time. Also to read out your phone's notification (such as SMS) for you, if any.
  • Press 2 times to stop reading the notification
The lower button is the Power button:
  • Press 1 time to tell you the current battery level
  • Long press to turn on/off the headset
By the way, the headset has a proximity sensor in this left ear cup. If it detects that you have removed it from your head, it will automatically pause the music and will resume the music when you wear it on again. It will also automatically turn off itself after you've removed it from your head for several minutes.


Using the touch panel at the right ear cup

For the right ear cup, its external surface is actually a touch panel, with the following functions:
  • Cover it completely with your right hand to enter into quick attention mode to let you listen to your surrounding ambient sound by greatly soften the music and temporarily turn off the ANC. It will go back to normal operation after you uncover the right ear cup.
  • Touch it with 2 fingers to toggle speak-to-chat mode on/off, to let you talk with somebody. In this mode, when there is a human speaking voice around, the music will be paused and the speaker will let you listen to the speech. This speak-to-chat feature can also be set to automatically turn on/off by itself based on A.I. detection of human talking voice, but you might face some minor issues with Microsoft Teams. Therefore, I prefer to manually control it using the 2 fingers method.
  • Tap 2 times (when call is incoming) to answer the phone call
  • Tap 2 times (in a call) end the phone call
  • Tap 2 times (not in a call) start/stop music
  • Long tap (when call is incoming) to reject the phone call
  • Long tap (in a call) toggle the call handling device between the headphone and your handphone
  • Long tap (not in a call) to start voice dial function
  • Swipe up to increase the sound volume
  • Swipe down to decrease the sound volume
  • Swipe forward for next music track
  • Swipe backward for previous music track
  • Swipe forward and hold at the edge to fast forward
  • Swipe backward and hold at the edge to fast reverse

Using the Sony Headphones Connect mobile app

The headset settings can be configured with your handphone using the Sony Headphones Connect mobile app which you can download from Google Play Store or Apple App Store.

The app is able to detect your Sony headset once the headset is paired and connected with your handphone via Bluetooth.

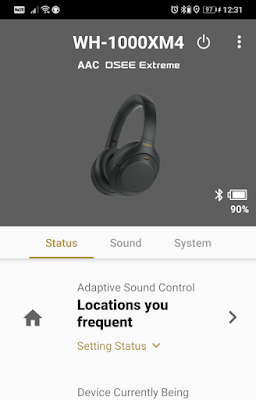
The Sony Headphones Connect app has 3 major pages under the Headphone bottom menu selection, namely: Status, Sound and System.


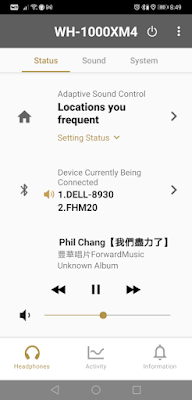
In the Status page, you can turn off the headphone from there. You can also view the current battery level of the headphone, its connection mode (Bluetooth or wired), the digital audio codec in used, whether DSEE Extreme is turned on, etc.

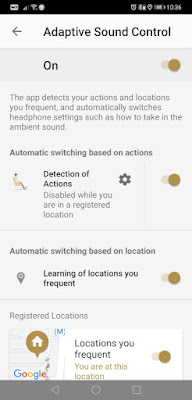
You can also perform the configuration for Adaptive Sound Control there. This is a very powerful A.I. enabled personalization feature which can adjust the sound output based on your detected action (either staying, walking, running or commuting), or based on your detected location (your home, office, favourite coffee shops, library, or any other places you frequently visit).

For each of the actions and/or recorded locations, you can have different sound settings for volume control, ANC level, speech handling, etc. Your headphone will automatically switch and adapt its sound settings based on its detection.


In this way, it can always optimize your music hearing experience by having adaptive settings that suit for your action or location. For example, you might want to maximize the ANC level at noisy places, but reduce the ANC level in places (such as your workplace) where sometimes you need to speak with people coming to you.


Scrolling down the screen, you can see information about currently connected devices (up to 2), and the current sound output is from which device. The headphone is able to automatically switch between the 2 connected devices based on the voice priority and importance, as determined by its A.I. You can also manually switch the sound output device here, or to select another device to replace one of the currently connected devices.

When you are using Adaptive Sound Control, the sound volume of your headset can be automatically adjusted to a just-nice level, not too loud and not too soft. The A.I. of the headset is able to fine-tune the sound volume for you.

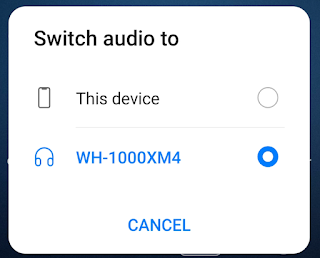
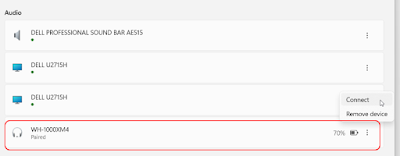
Beside using the app to determine and change the 2 connected devices from the multiple paired devices, you can also perform manual connection directly from the devices itself.

For Android devices such as your handphone, you can perform audio switch from the Switch Audio notification tab.


and for Windows devices such as your laptop or desktop computer, you can do so inside the Bluetooth & Devices setting screen.


The headset is intelligent enough to determine which existing connected device to be replaced. The longer you use your headset, the more accurate its selection will be. 

In case it has disconnected the wrong one, you can always perform manual connection from either the mobile app or the connecting device to get the 2 connected devices as you want.

The last portion of the Status screen shows information of the currently playing music, and the current sound level. The information includes the singer's name, song title, copyright owner, and album name. It supports multilingual display.


My settings in Sony Headphones Connect

For your reference, here are my settings in my Sony Headphones Connect app.

  • Adaptive Sound Control: on
    • Detection of Actions: on
    • Ambient Sound Control: on with default noise-canceling settings for Staying, Walking, Running and Transport
    • Learning of locations you frequent: on
    • Registered Locations: I've registered for a few places where I use the headset, including home, office, library, etc.
    • Notification Tone When Switching: on
  • Ambient Sound Control: on
    • Noise-canceling set automatically by Adaptive Sound Control
  • Speak-to-Chat: off (suggest to turn this off if you frequently use the headset for online conferencing, particularly Microsoft Teams)
  • Noise Canceling Optimizer completed for:
    • Personal optimizing
    • Atmospheric pressure optimizing
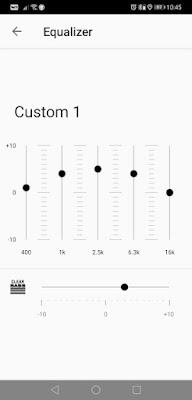
  • Equalizer customized to emphasize on human vocal, with added clear bass for musical instruments. Below is my equalizer setting for your reference:


  • Analyze ear shape for 360 Reality Audio Setup completed
  • Sound Quality Mode: Priority on Sound Quality instead of Stable Connection
  • DSEE Extreme: normally off. Sometimes will turn this on while listening to Youtube Music.
  • Connect to 2 devices simultaneously: on
  • Function of Custom button set to: Google Assistant
  • Touch sensor control panel: on
  • Automatic Power Off set to off when headphones are taken
  • Pause when headphones are taken off: on
  • Notification & voice guide: on
    • Tips for language: if you want your headset to accurately read out non-English words, you need to firstly change the language to that language (such as Chinese). After that, you can change back the language to English.
  • Automatic download of software: on
    • Only when connected via Wi-Fi
  • Activity Settings: record activity
  • Automatic Synchronization of Settings and Records: enabled

Why Sony WH-1000XM4 is excellent for music listening?
  • Sony has the world's leading-edge noise-cancelling technology. The Sony WH-1000XM4 is superb in both passive noise-cancelling and also active noise-cancelling. After you put on this on-ear headset, you can immediately feel ambient noise around you to be much softer, a pretty similar experience with putting on the pilot headset when sitting in the cockpit of helicopter or propeller airplane. With ANC on, you can totally immerse yourself with the music, without disturbance from ambient noise. I have several experience taking a pee and flushing the toilet bowl while wearing the headset. Guess what? I can hardly hear the flushing sound.
  • This headset has a wide frequency range and able to playback the music in high fidelity. You can clearly distinct among the sound from different music instruments, as well as the human singing vocal, and feel their respective distance and position.
  • With its DSEE Extreme technology, this headset is able to improve the music from low bitrate and/or compressed music source.
  • This headset is very comfortable to wear, and you won't feel it "pressing" on your head or on your ears. The length of its band is adjustable, and I don't feel much discomfort even after wearing it for a whole day.
  • Similar to all other on-ear headphones, you can feel some heat around your ear after wearing it for some time. However, unlike most other on-ear headphones, the heat does not continue to build up, and it stays at a still comfortable state, even after wearing it for a whole day.
  • Its fully charged battery can easily last for more than 30 hours, even when you turn on all of its features, even with simultaneous equalizer and DSEE Extreme on.
  • It can work as wireless headphone, as well as wired headphone. It even comes with an airplane in-flight audio adapter plug for you to connect it to the airplane's in-flight entertainment system.
  • Although its 360 Reality Audio feature can only work with several selected online music streaming websites such as Tidal, if you happen to use any one of the supported online music streaming platforms, you will enjoy the great experience of listening to music with 360 degree surround effect.
  • This headset is intelligent enough to automatically pause your music when there is a phone call, or when it detects you take it off from your head. It can automatically resume the music from where it stopped after the phone call, or when it detects you've put it back on your head. It also has feature to soften or pause the music when you speak with somebody around you, without the need of taking it off your head.
  • This headset is highly personalizable. Its equalizer is working pretty well for you to fine-tune your music listening experience.

Why Sony WH-1000XM4 is good for phone call handling?
  • It's Bluetooth connection is pretty stable even though it is quite some distance away from your handphone.
  • It's microphone has excellent noise-cancelling function. Even when you are at a noisy place with lots of people talking, or with TV noise, renovation drilling noise, baby crying, dog barking, motor noise, strong wind blowing noise, etc., those noises will be intelligently filtered out for the other party on your phone. However, if you are in a really noisy environment, your own voice might sound a bit "mechanical" due to the filtering effect.
  • It's right ear cup has touch panel with pretty many features for you to handle your call.
  • Although your voice won't sound as clear and loud as with using headsets with a boom mic, it still can handle satisfactory normally conversation, especially with its latest firmware version. Besides, there is a solution to greatly improve your voice by using 3rd party audio cable with attached boom mic.
  • Other than phone call handling, you can also use this headset to communicate with Google Assistant or Amazon Alexa.

Why Sony WH-1000XM4 is good for online conferencing?

I've used this headset in many video or audio conferencings in the form of Google Meet, Microsoft Teams, Zoom Meeting, Cisco Webex, etc. It can function well in all of them, by setting the conferencing application to use the computer system's audio as input and output.
  • I found that it's Bluetooth works better with computer (PC or laptop) than mobile device (handphone or tablet). Conferencing on computer using this headset has a more stable and better sound than mobile device.
  • Its features such as long battery life, comfortable to wear, does not heat up a lot, etc. makes it suitable for long hour video/audio conferencing.
  • Its excellent noise-cancelling features help you to filter out most of the ambient noise around you, so you can still comfortably have your online conference while you are in a pretty noisy place.
  • Your voice can be greatly improved by using 3rd-party audio cable with attached boom mic. Normally I use this when I am the main speaker/presenter in the online conference. Note that the original audio cable that comes together with this headset only support audio input but not audio output. When getting the 3rd-party audio cable with attached boom mic, you need to make sure the boom mic supports echo cancelling and noise-cancelling.
  • If you are working with multiple computers at the same time, you will find its ability to connect to 2 devices at the same time be very useful.

Why Sony WH-1000XM4 is good for video and gaming?
  • With the correct equalizer setting, this headset is capable to bring you great cinematic sound. It sounds so real to immerse yourself into the video or game.
  • This headset has very low non-noticeable audio latency when connected using Bluetooth, and no latency when connected using audio cable. Your screen's action is in sync with the audio you hear, without any noticeable delay effect.
  • For online gaming that you are going to talk a lot with your partners in the game, your voice will be loud and clear by using a 3rd-party audio cable with attached boom mic.

Some limitation of Sony WH-1000XM4

The Sony WH-1000XM4 will be perfect if the following shortcoming can be resolved, perhaps in the future version of WH-1000XM5.
  • It does not have a mute button. If you want to temporary mute it during a phone call or conference call, you need to do it on your phone dialer software or conference application.
  • Its original audio cable will be perfect if can support audio out, and comes with a good detachable boom mic.
  • It will be nice if its ear cups can be less bulky in design.

All-in-all, if you are looking for a good headset for music listening, video watching, phone call handling, online conferencing and gaming, you won't be wrong getting this Sony WH-1000XM4.


Tuesday, January 11, 2022

My Nippon II NP2-348T mechanical 24-hour segmented timer electric power switch

If you want a certain electrical appliance to be switched on during certain time period(s) of the day, and be switched off otherwise, this Nippon II NP2-348T mechanical 24-hour segmented timer electric power switch can be very handy to you. It cost only less than RM20.


Some examples of usage including:

  • Switching on your TV and set-top-box during day time, and switch them off at midnight.
  • Switching on a light during night time, and switch it off during day time.
  • Switching on a Wifi AP during day time, and switch it off at midnight.
  • Switching on a power charger for 3 hours, then switch it off.
This mechanical segmented timer switches is designed to work in a "set it and forget it" manner. You just need to set it correctly for one time, and it will continuously switch on/off the electricity supply of its socket according to your setting, on daily basis.


Programming this mechanical timer switch is pretty easy.

Each tappet on its dial represents a 15 minutes time interval. If it is pushed in, there will be electricity supply to its socket during that 15 minutes time interval; otherwise, if it is pulled out, there will be no electricity supply to its socket during that 15 minutes time interval.

There are 96 tappets on the dial. You program the timer switch by pushing in and pulling out the tappets accordingly.

When plugged into the wall socket with power switched on, the dial will rotate like a clock, and the electricity supply to its socket will be turned on/off according to your setting.

To make it works at the right timing, just locate an arrow at its top right corner, then dial its ring so that the arrow is pointing to the current time.

There is a bypass switch at its right hand side. If you switch it to "On", the timer will continuously supply electricity to its power socket, and ignore all the settings programmed with its tappets. This is handy when you want to turn on your electric appliance during the time period which it is programmed to be off.

If you switch the bypass switch to "Timer", then it will work according to your programmed time schedule.

If you want to switch off the electricity supply to your appliance during the time period which it is supposed to be on, you can just turn off the wall socket power supply.

However, turning off the wall socket power supply will also stop the dial from rotating. You will need to adjust the dial position to current time after you turned on the wall socket power supply again.


Monday, December 27, 2021

Rectangular wooden digital LED alarm clock with humidity and temperature display

I have bought this rectangular wooden digital LED alarm clock with humidity and temperature display during the recent 12.12 online sale fiesta, at the price of slightly below RM40.

You can use it as a normal desktop clock (with the alarm function switched off) and also as your bedside alarm clock (with up to 3 different alarm time settings).

It is pretty feature-rich. Other than displaying the time (in either 12-hour or 24-hour format), it also displays the humidity (in RH percentage) and room temperature (in either degree Celsius or Fahrenheit). In DP-1 display mode, it can even show the date of today.

When your air-cond is turned off, and the humidity is above 75%, there is a high possibility that it is going to rain.

In normal days, the humidity level should be between 35%-65%. Higher than that, you should consider using dehumidifier to prevent the growth of mold and pests. Lower than that, you should consider using humidifier instead to safeguard the lifespan of your wooden floorings and furniture.

When your air-cond is turned on, both the humidity and temperature should drop. The room temperature should stay at the level that you set for your air-cond, otherwise you might need to service your air-cond as it no longer able to condition your room temperature according to your setting.

There are 3 power sources for this alarm clock:
  • Internal CR2032 battery, used as emergency power source to memorize your clock settings and to keep the time running when there is no other power sources available.
  • 4x AAA batteries, used as emergency power source for the alarm clock to function as normal, in the event of electricity blackout. Without the USB power source, the AAA batteries will be used up within 24 hours.
  • DC 5V 300mA USB power source, which is the main power source for this alarm clock. Note that the alarm clock only comes with a USB cable, and you need to prepare your own wall charger to supply the DC 5V 300mA power supply to the clock.

There are only 3 buttons at the back of the clock (Set, Up and Down), making it a little bit tricky to set up the clock. Anyhow, it comes with a comprehensive multilingual instruction manual for you to refer to when setting up the clock.

There are 3 brightness levels for its LED display. During 6.00pm to 6.59am, the brightness level will be automatically switched to the lowest. This is a nice feature so that its LED display will not be too bright at night until it might disturb your sleep.

The LED display even has a "power saving" mode that will turn it off after 15 seconds of display. You can either touch the clock with your hand, or make some noise by clapping your hands near the clock, to bring up the display. You can also turn off this "power saving" mode for the LED display to stay on.

This clock has altogether 3 alarms, which you can set up to 3 different time of the day for it to chime. In addition, it also has a setting for the alarm function to only work during weekdays, and it won't wake you up during weekends.

All in all, I find this alarm clock elegant looking, feature rich and practical to use. It is inexpensive too, either for own use or as a presentable gift.


Saturday, December 25, 2021

Gas stove heat diffuser metal plate

 I bought this 28cm heat diffuser aluminium plate for gas stove at the price of RM28.80.


It works by placing it on top of gas burner, so that:

  • To distribute heat from the underneath fire evenly, and avoid scorching. This also keeps the base of your cooking utensil clean and anew.
  • To support cooking utensils with smaller base, so that they can sit stably on top of the burner.
  • There is less mess in the event of soup overflow and spillage, as the plate will hold the spilled liquid, preventing it from dropping into the fire and burner.
This plate has 2 sizes available in the market: 24cm and 28cm. If you are in doubt, get the larger 28cm one. If your gas burner is small, you can get the 24cm one, as it will heat up faster and therefore able to save some cooking gas.

This plate also has several different thickness available in the market: 4mm, 6mm, and some even 8mm.

4mm one is just nice. Thicker plates are more heavy-duty to support heavier weight on top of it without deformation. However, they will need more time to diffuse and heat up, and will use up more cooking gas.


There is a chuck that comes together with the plate, for you to move the plate without worrying about burning your hand when accidentally holding a hot plate.


Friday, December 10, 2021

K8 body temperature infra-red thermometer powered by USB

Nowadays, infra-red thermometers are widely used in a lot of places to capture our body temperature, especially for COVID-19 preventive measure at the entrance of most commercial premises.

Infra-red thermometer has the following advantages:

  • Non-contact way of measuring body temperature
  • Fast measurement time of around 1 second
  • Pretty accurate if there is no other infra-red source around that might interfere with its signal receiver
  • Affordable price
For home and personal use, if we want to buy an infra-red thermometer, we might want to look for the following features:
  • Small and lightweight, easy to carry along, and save storage space
  • Accurate reading
  • Non-battery powered, since we are not going to use it frequently
  • Cheap price
I found the K8 body temperature infra-red thermometer that operates with DC 5V and powered by USB, cost slightly above RM10, is an ideal one to be used.


This small little device actually has 3 variants of power source connector: USB-C, micro-USB and lightning connector. If you want a future proof one, choose the one with USB-C connector.

It can be powered by the USB port of handphone...


or powered by the USB port of other devices, such as a laptop.


There is a button at its back to switch its reading between Celsius and Fahrenheit.

It will beep when it captured a new temperature reading in the rage between 32 °C to 42 °C. You will most probably get the same temperature when placing your forehead or palm in front of it.


Friday, December 3, 2021

Self COVID-19 testing by saliva with Sejoy SARS-CoV-2 antigen rapid test kit

There will be occasions that you need to do a COVID-19 self-test, to ensure that you are free from COVID-19 infection, before you attend certain events or enter into certain premises.

There are generally 4 types of COVID-19 self-testing kit available in the market now:

  • Nasal swab specimen test
  • Mouth swab specimen test
  • Nasal + mouth swab specimens test
  • Saliva specimen test
Among them, I find the saliva specimen test type is the easiest to use, cheapest to buy, and does not cause any discomfort during specimen collection.

You can get the Sejoy SARS-CoV-2 antigen rapid test kit at a price of slightly below RM5 per box (for single test) in Mr. DIY, 99 Speedmart, pharmacies, online e-commerce stores, and some other places.


A brief instruction on how to use it is printed at the back of its packaging box.


There is also detailed instruction printed on a large piece of paper inside the box.

Here are the steps to use it:
  • Do not eat or smoke or drink anything other than plain water at least 30 minutes before the test.
  • Wash your mouth with plain water.
  • Use a knife or scissor to unseal the box by breaking its "QC Passed" sealing sticker.
  • Take out its content.
  • Assemble the saliva collection funnel kit on top of the extraction tube.
  • Collect your saliva into the extraction tube until the saliva is slightly on top of the level mark you can see near the bottom of the extraction tube.
  • Remove the saliva collection funnel kit and put it inside the biohazard waste bag.
  • Put the extraction tube into the hole at the back of the packaging box, so that it won't fall down.
  • Unseal the extraction reagent bag.
  • Drop all the extraction reagent liquid into the extraction tube by squeezing on its bag.
  • Cover up the extraction tube with its attached stopper.
  • Mix your saliva with the extraction reagent by shaking the extraction tube for about 1 minute.
  • Take out the test cassette from its aluminum foil pouch.
  • Drop 2 drops of the mixture in the extraction tube by squeezing the tube on top of the "S" area on the test cassette.
  • You will see the liquid slowly moving from one end of the test paper to the other end. The paper will become purple in colour during the movement, and will change back to white after the movement.
  • The test result should be ready in 15-20 minutes.

  • The control line at "C" position should appear, otherwise the test is not successful, and you will need to redo the test again with a new test kit.
  • If you see another line at "T" position, your test result is COVID-19 positive. If there is no line at "T" position, congratulations, your test result is COVID-19 negative.
  • After the test, insert everything (except the large instruction paper) into the biohazrd waste bag, seal it before disposal.

After using the COVID-19 self-testing kit, you are required to report the test result in MySejahtera app regardless your test result is positive or negative.
  • Open up MySejahtera app in your mobile device.
  • Tap on the "Close" button to close the front page.
  • Tap on the "COVID-19 Self Test" icon.
  • Select "Update Self-Test Result".
  • Continue to follow the on-screen instructions to complete your reporting.

The COVID-19 self-testing kit is labelled with manufacturing lot number, year and month of manufacture, and also the year and month of expiry. At first I thought I'd need to key-in these information in the report, but it ends up I just need to report on whether my test result is positive or negative.

If you are tested COVID-19 positive, then you should reconfirm by taking another test with a new test kit.

If both the tests are showing COVID-19 positive, please isolate yourself immediately, and contact MOH immediately. You can click here to get the MOH COVID-19 hotline contacts.


Hint: Click on the "Older Posts" link to continue reading, or click here for a listing of all my past 3 months articles.