Sunday, December 10, 2017

My Logitech M590 multi-device silent and flow wireless mouse

One of my wireless mouse started to have the common mouse problem of single click becomes double click. Therefore, I have recently bought a new Logitech M590 multi-device silent and flow wireless mouse.


Despite this Logitech M590 mouse has some advanced features that distinguish it from ordinary mouse, its packaging is not impressive at all. Its price is higher than ordinary mouse too, cost me RM99 to get it.

This Logitech M590 mouse is very identical to its sibling Logitech M585. The main different between them is that, M585 left and right buttons produce loud clicking sound just like other ordinary mice, while M590 left and right buttons are soundless and produce no clicking sound. Its other buttons also produce softer sound than ordinary mice. This is ideal for night owls who share the same room with roommate(s). Now you can use your computer silently at night without disturbing the sleep of your  roommate(s), provided you use this silent mouse together with a silent keyboard.

This mouse operates with a single AA battery, and comes together with a GP alkaline battery. Logitech claims that its battery life can last as long as 24 months (2 years), which is pretty impressive.

Beside the battery compartment, you can find its USB Unifying receiver after opening its back cover. It has an on/off switch at its back for you to lengthen its battery life by switching it off when not in use.


At the back of its packaging paper card, there is instruction on low to setup to link it with 2 computers using Logitech Flow, which I find is not very useful because it is very difficult to understand. It is only a 7 steps diagram without any explanation words!


Anyhow, I managed to figure out how Logitech Flow works and how to switch the mouse between 2 computers and use its feature to copy-and-paste clipboard content and files from one computer to another, which I will explain in detail in my next posting.

This mouse comes with 1 year warranty, and you can register it in this webpage.


After registration, you can proceed to download Logitech Options, the software for you to configure this Logitech M590 mouse. The Logitech Flow function is inside this Logitech Options.


In fact, after you plugged its Unifying receiver into your computer's USB port, switch on the mouse and turn on your computer, after you successfully logged in Windows, the system will automatically prompt you to download and install Logitech Options.

However, the installation of Logitech Options was not smooth. I have tried in more than one computers. The installation process of Logitech Options will take a very long time, and I only managed to get it successfully installed after I terminated its installation after 10 minutes, and run the installation program again. The installation will magically complete within 2 minutes during the second attempt.


Therefore, you need to download the installer from the above Logitech webpage, for you to perform the second attempt of installation, or you will need to spend unnecessary time and effort to locate the installer file used by the automatic installation process, which stays somewhere deep inside your hard disk.

This Logitech M590 mouse has altogether 6 buttons, as shown in the Logitech Options screen below. The middle button is used to switch between Computer 1 and Computer 2, which you cannot configure for other function. The other 5 buttons which are circled in the Logitech Options screen can be configured to have function according to your personal preference.


You just need to click on the circle, and after that select your preferred function from the menu.


In the Point & Scroll screen, you can set the mouse pointer speed, enable/disable smooth scrolling, and set the scroll wheel direction.


The Flow screen is where you configure the Logitech Flow function. There are 2 rectangles on the screen, the left one is your Computer 1, and the right one is your Computer 2. Once Logitech Flow is up and running, the mouse can seamlessly flow from the screen of one computer to another.


I will explain how to setup Logitech Flow in my next posting.

Beside pairing with its Unifying receiver, this Logitech M590 mouse can also paired with the Bluetooth receiver of your computer or tablet that supports low energy technology. Supported operating system for Bluetooth pairing includes:
  • Windows 8 or Windows 10 or later
  • Mac OS X 10.10 or later
  • Chrome OS
  • Android 5.0 or later
This is useful if you want to use Logitech Flow with 2 computers, but you only have 1 Unifying receiver that comes with the mouse.

If you have another Logitech mouse with Unifying receiver, you can use the Logitech Unifying Software to link this Logitech M590 with the Unifying receiver of the other mouse, as the Unifying receiver can support up to 6 Logitech devices. I will explain how to link Logitech M590 with another Unifying receiver in my next posting.

If your Unifying receiver is linked with more than one mouse, both the mice can control your mouse cursor on the screen at the same time.


If you plan to buy this Logitech M590 wireless mouse, here are some "catches" that you need to consider before making your decision:
  • This mouse can work in Windows 7, but it cannot be connected with Bluetooth to Windows 7 computer. In addition, Windows 7 might have problem recognizing the Logitech Unifying receiver that comes together with the Logitech M590 mouse. Anyhow, it can still function as a mouse in Windows 7 with its Unifying receiver,  despite with these imperfectness. Therefore, it is more advisable to use this mouse in Windows 8 or above. I haven't tested this mouse in Linux or Mac computer though. It should be able to work with Linux Kernel 2.6+, Chrome OS, and Mac OS X 10.10 or later.
  • This mouse does not come with Logitech Darkfield technology and will have difficulty working on glass surface. If you need this feature, can consider the Logitech MX Anywhere 2S mouse, which price is more than double to this Logitech M590.


Friday, December 8, 2017

Automate Flow: Auto enable Bluetooth to connect to car hands-free when you are driving, else disable Bluetooth

This is an example of Automate flow. To learn more about Automate for Android phones, click here.

It is always a good idea to disable the Bluetooth function of your Android phone until you want to pair it with another Bluetooth device, such as hands-free system, GPS, audio speaker, input device (keyboard, mouse, gamepad, ...), etc. This will help to conserve some battery usage of your phone.

However, if you are always wearing a Bluetooth smartwatch that paired with your smartphone, you will need to let the Bluetooth function of your phone to always stay on. In that case, this Automate flow might not be so relevant for your need.

Nowadays, driving laws in many places in the world prohibit holding your phone in your hand while driving. If you are caught with that, you could be imposed with penalty and fine. Therefore, you need a hands-free system to answer to phone calls while driving. Many modern cars already have built-in hands-free function in their audio system. Certain automotive GPS device such as Garmin DriveAssist, Garmin DriveSmart, etc. is also able to link with your smartphone through Bluetooth to provide hands-free and some other additional functions.

Well, if you always disable Bluetooth of your Android phone and manually enable it whenever you want to pair it with a Bluetooth device, it would be very tedious if you are a frequent driver. You will need to enable Bluetooth whenever you sit in your vehicle and started its engine, and disable Blueooth whenever you parked your vehicle and stopped its engine, otherwise you will not be able to use the hands-free function. This Automate flow will help you to automatically perform those action.

In addition, normally when we are in a vehicle on the road, there is no WiFi available. This flow will also help you to disable WiFi when it detected you are travelling in a vehicle. You can edit the flow and remove the "Disable WiFi" block in it if your vehicle does provide WiFi connection that you want to use.


The flow begins with a block to stay and wait until it detected your Android phone carried along with you is travelling in a vehicle. This is a very interesting Automate block. Beside "in vehicle", it can also detect whether you or your phone is:
  • On bicycle
  • On foot
  • Running
  • Still
  • Tilting
  • Walking
  • Unknown
It makes use of sensors of your phone to perform the guessing, and report back with a confidence level. The "in vehicle" block setting of the above flow is as below:

The flow will continue its further actions when it is at least 85% sure that you are in a vehicle. The detection interval is set at 2 minutes. If you want the flow to react faster, you can shorten this detection interval, but it might drain more battery at the same time.

Once it detected you are in a vehicle, it will disable WiFi function of your phone (Block 3).

It will then detect whether the battery level of your phone is above 30%. If it is below, whether your phone is plugged to a power source for charging. If both conditions are negative, it will disable Bluetooth and do nothing. I put 30% battery level as this should be sufficient to keep your phone on with Bluetooth paired for quite a long journey. You can adjust this minimum battery level requirement in Block 14 according to your situation. If your driving distance is most of the time pretty short, probably 15% minimum is good enough for you.

If battery level is OK, it will proceed to enable Bluetooth, wait for 10 seconds for your phone to pair with the Bluetooth device in the vehicle (which as a prerequisite, they must be successfully paired before), such as your car audio system hands-free, or your GPS. If the pairing is successful, it will keep the Bluetooth connection until it is disconnected. Disconnection will happen when your car audio system is switched off (when car engine turned off), or when you manually disable your phone Bluetooth function (in case you do not intend to use hands-free during that journey. For example, you are a passenger in your own car which one of your family member is driving for that trip).

It will wait for 3 minutes before going back to detect whether you are in a vehicle again. 3 minutes is a reasonable minimum time interval for you to leave your car and then to drive it again. That will be the estimated time to stop the car engine, pump the petrol, and resume driving. For other occasions, probably the interval is much longer. You can edit Block 13 to change this interval shorter or longer to suit your need too.

In the event Bluetooth pairing failed after the Bluetooth is enabled, you are very likely to be not in your own car, but in another vehicle either as passenger or driver. Since the hands-free function is not available to you in that vehicle, the flow will proceed to disable Bluetooth and wait for a longer 30 minutes (which you can edit Block 20 to change it to be shorter or longer). 30 minutes is an estimation that you will probably won't drive in your own car, since you are travelling in another vehicle at that moment.

In fact, you can remove both Block 13 and Block 20 and immediately go back to activity checking if you want. The 2 delay blocks are merely for the flow to take a break (and save some battery).

Thursday, December 7, 2017

Automate Flow: Auto enable WiFi when you arrive home and disable WiFi when you leave home

This is an example of Automate flow. To learn more about Automate for Android phones, click here.

It is always a good idea to disable the WiFi function of your Android phone until you want to connect to a WiFi network. This will help to conserve battery usage, and also prevent your phone from automatically get connected to certain open WiFi without your aware, which might be used to hack in your phone.

Normally, there are fix places with WiFi that you will definitely want to use, to conserve your mobile Internet data quota usage. Those places include your home and/or your work place.

This Automate flow will help you to automatically disable WiFi function of your phone after your leave your home, and automatically enable it back when you arrive your home. It will even inform you by voice so that you are aware when WiFi is automatically enabled and disabled by this flow.


Enabling WiFi function does not guarantee a successful connection, because sometimes your access point (AP) or wireless router might have problem in establishing the WiFi connection.

Therefore, after enabling WiFi, this flow will wait for 10 seconds, which should be long enough for normal WiFi connection to be established. It will then check if the connection is successful or not.

If the connection is successful, it will log down the name a.k.a. SSID (service set identifier) of the AP or wireless router your phone has connected to.

If the connection is not successful, it provides option for you to remain enable WiFi or to disable it. Regardless of your selection, you will still need to troubleshoot and find out why the WiFi connection cannot be established. It could be caused by your AP or wireless router is switched off, or hang, or WiFi function disabled, or DHCP IP address allocation full, or other possible issue. If your phone has never made a successful connection with the WiFi at the location before, or you have made your phone "forget" about it, the connection will also be not successful as well.

Before you can use this flow, you need to tell it where is your home. This can be done by tapping on Block 12 "When at location". The following screen will come out.

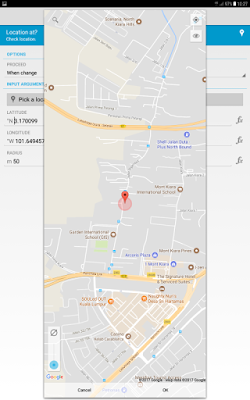
Tap on the "Pick a location on map..." button to bring out Google map. You can then search for your home by either tapping on the "target" icon if you are currently at home, or by tapping on the search (magnifying glass) icon and key in your home address for search, or by manually selecting the location by navigating the map and tap on the targetted place.


When you are done, tap on the OK button below to capture the location's coordinate.

The Radius setting determines the area that you consider your phone is at home. Normally, 50 meter radius as shown above is a good choice. You can set its value larger so that your WiFi is automatically enabled faster when your approaching home, and automatically disabled after you have travelled further away from your home.

You can use this same flow for other places with fixed WiFi, such as your work place. Just go through the same steps able to set the location before running it. You might also want to change the word from "home" to "office" in Blocks 14, 15, 16 and 17 of the flow.

With slight modification, you can even expand this flow to be used for multiple locations.

Hint: Click on the "Older Posts" link to continue reading, or click here for a listing of all my past 3 months articles.