Showing posts with label IT talks. Show all posts

Thursday, May 30, 2019

How to implement select all function for multiple sets of checkbox items on the same webpage using simple JavaScript

When designing a webpage with list of checkbox items, it is common and useful to implement a Select All/None function so that the user can easily select/unselect all items with a single mouse click.

This can be done with a simple JavaScript function, even without the need of using jQuery.

Now, the challenge is, when you have multiple sets of checkbox items on the same webpage, how to implement a shared JavaScript function to handle the Select All/None action to each set of the items respectively, so that when the user Select All in one of the sets, the other sets will remain unaffected by the action?

Let's say, we have 3 sets of item as below:


You can use separate FORM for each of the sets, and use FORM ID to distinguish each of the FORM. Each FORM will need to handle their own SUBMIT action separately.

If the different sets are within the same FORM and share the same SUBMIT action, you can make use of CLASS name in their CHECKBOX elements to distinguish and separate out the sets.

Here is the JavaScript codes to implement the Select All/None function (click the image to enlarge it):


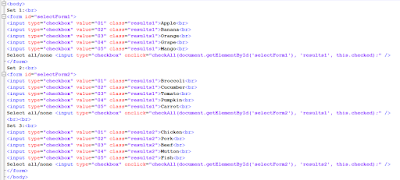
and below is the HTML BODY part of the sample webpage (click the image to enlarge it):


Set 1 is in separate FORM from Set 2 and Set 3 with a different FORM ID. Note that even though Set 1 and Set 2 are both using the same CHECKBOX CLASS name, their checkboxes will can be selected all/none separately.

Set 2 and Set 3 are within the same FORM. We can still separate them by using different CHECKBOX CLASS names.

Our simple checkAll JavaScript function accepts both the FORM ID (as 1st parameter) and CLASS NAME (as 2nd parameter), and making use of its 3rd parameter as toggle. In this way, you can use this checkAll function to handle all the sets on the same webpage.

You can create a HTML file to try it out. Since this is just an ordinary HTML with simple JavaScript, it can run even without any web server. Just create the HTML, and open it with your web browser to test it out.


Friday, May 3, 2019

DSN-less access to Microsoft SQL Server from Raspberry Pi Raspbian Stretch

Accessing Microsoft SQL Server (including SQL Server Express and Azure SQL Database) from Linux isn't that straightforward.

Microsoft does provide free connection library for Linux to access to SQL Server, but the library will not work for Raspbian OS in Raspberry Pi due to conflicting type definition with other essential library in the system.

Below is the easiest way I found out to access SQL Server from Raspberry Pi.

You need to enable and allow TCP/IP access to the SQL Server.

The SQL client to use is FreeTDS through unixODBC.

First of all, make sure the required FreeTDS and unixODBC components are installed in the Raspberry Pi:

sudo apt install freetds-bin freetds-dev tdsodbc unixodbc unixodbc-bin unixodbc-dev

If you are using Python to access the SQL Server, also need to install the following components:

sudo apt install python-pymssql python-pyodbc python-sqlalchemy

If you are using PHP to access the SQL Server, then need to install the following components:

sudo apt install php7.0-odbc

Since we are going to use the DSN-less method to access to the SQL Server, it is not necessary to configure the DSN settings. However, there is still minimal configuration needs to be made.

sudo nano /etc/odbc.ini

[FreeTDS]
Description = SQL Server
Driver = FreeTDS
Trace = No
TDS_Version = 7.0


For the TDS Version, if you are unsure about the version of your SQL Server, then set the TDS Version to 7.0.

You can set the TDS Version according to the following:

  • TDS Ver. 7.0 for SQL Server 7.0
  • TDS Ver. 7.1 for SQL Server 2000
  • TDS Ver. 7.2 for SQL Server 2005
  • TDS Ver. 7.3 for SQL Server 2008
  • TDS Ver. 7.4 for SQL Server 2012, 2014, 2016 or 2017
Lower TDS version has more compatibility but less feature in SQL command and less supported data types.

Another file you need to edit is odbcinst.ini.

sudo nano /etc/odbcinst.ini

[FreeTDS]
Description = FreeTDS unixODBC Driver
Driver = /usr/lib/arm-linux-gnueabihf/odbc/libtdsodbc.so
Setup =  /usr/lib/arm-linux-gnueabihf/odbc/libtdsS.so
fileusage=1
dontdlclose=1
UsageCount=1


Now you should be ready to access to your SQL Server from this Raspberry Pi.

Python test script:

import pyodbc

server = 'your_SQL_Server_IP_address'
database = 'your_database'
user = 'database_user'
password = 'database_user_password'
query = 'SELECT * FROM INFORMATION_SCHEMA.TABLES;'   # your SQL query

conn = pyodbc.connect('DRIVER={FreeTDS};SERVER='+server+';PORT=1433;DATABASE='+database+';UID='+user+';PWD='+password+';')
cursor = conn.cursor()
cursor.execute(query)
for row in cursor.fetchall():
        print row


PHP test script:

$server = 'your_SQL_Server_IP_address';
$database = 'your_database';
$user = 'database_user';
$password = 'database_user_password';
$query = 'SELECT * FROM INFORMATION_SCHEMA.TABLES;';   // your SQL query


if ($db = odbc_connect('DRIVER={FreeTDS};SERVER='.$server.';PORT=1433;DATABASE='.$database.';',$user,$password)) {
        $res = odbc_exec($db, $query);

        while( $row = odbc_fetch_array($res) ) {
                print_r($row);
        }

        odbc_close($db);
}


Monday, April 29, 2019

dnGrep - Free GUI "grep" and "sed" tool for Windows

If you are familiar with UNIX/Linux operating system, you must be using a lot of "grep" command to search for string inside text files, and "sed" command to find and replace string in the text files.

There are identical command in Windows such as "find", "findstr" or even the PowerShell "Select-String", but they are just not as easy to use as "grep" in UNIX/Linux.

There are also GUI tools for Windows which aim to perform the "grep" and "sed" function, majority of the good ones need you to pay for it, except dnGrep which is licensed under GNU GPL v2 and is therefore free for use.


dnGrep is indeed a very powerful find and/or replace tool for Windows. It can not only search for text or keywords inside the target file(s), but also able to perform a text replace action in target text file(s).

Beside normal text files, it is also able to search inside MS Word documents and PDF files. It can also search inside archived file.

You can perform your search by plain text input, or XPath query language, or regular expression (regex), or even phonetic.

You can also specify to search for files in a folder (and sub-folders) within a particular date range in which they are created or last modified.

The search result is displayed with yellow background highlight, together with the line number in the target document. Double click on the search result will open up the target document for further action.

The beauty of its replace function is that, the replace action can be undone.

You can also create "bookmarks" to store frequently used search keywords and conditions.

dnGrep is lightweight, fast in action, powerful and free for use. It is an essential 3-party tool in your Windows computers.

Click here to go to the download page of dnGrep.

Thursday, April 18, 2019

Free database clients able to access multiple DBMS - DBeaver CE & DBSL Database Browser

Nowadays it is not unusual for IT personnel to deal with multiple databases at the same time. There is also a high chance of the need to deal with databases in different database management system (DBMS).

It will be nice to have a universal or multi-platform GUI database client as a single tool for accessing databases in different DBMS. If you are searching for this kind of database tool, and prefer for free solution, I would recommend 2 of them.

DBeaver Community Edition is a more popular one, which can run in Windows, Linux and Mac OS. It is a beast with extensive number of features to view and manage the databases.


The Community Edition supports a vast number of SQL relational databases, while the non-free Enterprise Edition supports additional NoSQL databases including Apache Cassandra, Apache Hive, Hadoop, MongoDB, InfluxDB, Redis, etc.

The Community Edition itself can open and manage most (if not all) of the famous DBMS such as Azure SQL server, IBM DB2, Firebird/Interbase, Informix, Ingres, MySQL/MariaDB, SAP MaxDB, Oracle, PostgreSQL, Microsoft SQL server, SQLite, Sybase, Teradata, etc.

It also supports file-based database like DBF, Microsoft Access, and even CSV file.

With ODBC connection, it supports all databases that is able to be connected via ODBC.


You can open multiple databases and multiple tables at the same time.

It has complete set of table management functions, including import/export and even generating mock data for testing or demo purpose.


If the table relationship is well defined in the database schema, DBeaver can also display the ER-diagram at a mouse click.


DBeaver, even though with the free Community Edition, has everything you need to work with the databases.

But sometimes we just need a simple, lightweight, straightforward, and preferably portable (no installation needed) database tool. Database Browser by DB Software Laboratory will be the one that suit for this purpose. It only run in Windows, either as installed application or as portable application.

Database Browser is very easy to use, and mainly used to view and/or edit the database content. The flow is simple: you select a database, it will list down all the tables. You select a table, it will list out the records in the table.


Database Browser supports famous DBMS such as Oracle, Microsoft SQL server, MySQL/MariaDB, PostgreSQL, Interbase/Firebird, OleDB, SQLite, BDE, MongoDB, etc.

With ODBC connection, it supports all databases that is able to be connected via ODBC.

The list is not as extensive as DBeaver, but is still comparatively more than most other database tool in the market.


It can also show the ER diagram in its SQL Query Builder function. The SQL Query Builder works in a way with GUI interface similar to Microsoft Access.


It supports data import from Excel file, and export to CSV, TAB, Excel, RTF or HTML files.

If you just want to browse or edit the database content, Database Browser will be a handy tool for you.

If you want to deal with views, indexes, stored procedures, sequences, triggers, and even database parameter fine tuning, then you will need DBeaver.

Wednesday, April 17, 2019

Get additional online purchases cashback through Shopback, including Grab calling

Nowadays online merchants and/or e-commerce websites tend to give rebates in the form of special discount, free shipping, coupons, vouchers, cashback, etc. to maintain their attractiveness in having customers purchasing with them.

In addition, if you make payment with certain cashback credit cards for your purchases, you will also receive cashback from the credit card issuing bank as well. During certain debit card cashback campaign, you can also receive cashback by using such debit card too.

Now, you can get another layer of additional cashback, if you perform your online purchases through Shopback.

Shopback has been around for quite some times, and has grown into quite a successful online affiliate marketing portal. It will give you cashback if you access the e-commerce websites from the Shopback website or mobile app (instead of accessing directly to the e-commerce websites or their mobile apps), and made a confirmed purchase within a tracking timeframe.

Many has joint Shopback and enjoy the additional cashback from their e-commerce spending. If you have not joint the bandwagon, it is never too late to create a free Shopback account now. You can get RM5 sign-up cashback if you join by clicking this link to access to Shopback website, and click on the "Claim Your Bonus" there.

After that, continue to click here to go to Shopback mobile app download page to download its app. Note that for certain e-commerce websites including Lazada, 11street, Shopee, etc., you can only get your cashback from Shopback for online purchases done in mobile app, but not in their e-commerce website. (Previously, purchases made in their website were count for Shopback cashback, but things have already changed now.)


For some other e-commerce platform such as Taobao, you can still get Shopback cashback even though you make your purchase in their website.

Beside online e-commerce shopping, you can also get Shopback cashback from Grab calling by opening Shopback mobile app first, then open Grab mobile app from within the Shopback app.

To ensure a successful Shopback cashback for Grab:
  • Book the Grab via Shopback mobile app only.
  • Do not edit the Notes to driver and ensure that there is a code similar to **29437185SB003** under the Notes.
  • Book only JustGrab, GrabCar and GrabShare rides. Cashback is not eligible on GrabTaxi rides.
  • Ensure no existing trips before clicking through Shopback.
  • Click through Shopback again for every ride.
  • No cancellation or incomplete trip.
In fact, inside Shopback app, there is an updated list of Grab valid coupons, promo codes and offers for your easy reference, so that you won't miss out using those deals with Grab.


You can also use Shopback to get additional cashback from food delivery service with Foodpanda, Honestbee, DeliverEat, Eatigo, etc.


and also from hotel and flight booking with Agoda, Booking.com, Expedia, Klook, etc.


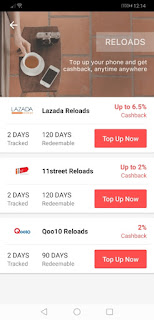
and also from mobile prepaid plan top-up using online reload service from Lazada, 11street, Qoo10, etc.


and also from online ticketing with StubHub, buying concert, festival, event tickets with them.


even subscribing to new broadband service with Unifi, Maxis, Time, etc. and this Shopback cashback amount can be up to several hundred ringgit.


As such, whenever you want to make online purchase, just access to Shopback mobile app and use it to go to the targeted m-commerce app, or access to Shopback web portal and use the link in the website to go to the targeted e-commerce website, you will get Shopback cashback from your confirmed purchases.

The cashback will be accumulated in your Shopback account, which you can then withdraw to your own bank account as real cash.


Friday, April 12, 2019

Format 64GB SD card to FAT32 with AOMEI Partition Assistant

Most Android based devices such as CCTV, dashcam, etc. indicate that they only support SD card up to 32GB only.

This is simply because SD card of 32GB and below is pre-formatted with FAT32 partition which is accessible by the Android system. Microsoft Windows has put itself a limitation to be able to format a storage device into FAT32 partition for up to 32GB only. It will force you to format storage device above 32GB (eg. 64GB, 128GB, ...) with either exFAT or NTFS.

However, most Android based devices don't support exFAT and NTFS, therefore unable to access your storage device with such partition format.

This does not mean that you cannot use storage device of 64GB and above in those Android based devices, because you can still format them into FAT32 by using 3rd party tool such as the free AOMEI Partition Assistant Standard Edition.

The process to convert exFAT partition into FAT32 with AOMEI Partition Assistant Standard Edition is pretty simple.

You just need to right click on the existing partition, select Format Partition from the menu, set the File System as FAT32, click OK, then click Apply which is the first menu bar option on top.


With this, your 64GB or 128GB SD card is very likely to be able to work without problem in those Android based devices.

Click here to download the AOMEI Partition Assistant Standard Edition software for free. It is free for both personal and commercial use.

You might be also interested to read about:


Friday, April 5, 2019

Fix the "need new app to open ms-wpc" message keeps on pop-up problem in Windows 10

If you are facing a problem with Windows 10 with a pop-up message as below that keeps on prompting even though you continuously clicked on the OK button, here is the fix.

Right click on the Windows icon on the left of taskbar, and run Windows PowerShell as admin.


Copy and paste the following command to run in the Windows PowerShell admin console.

Get-AppXPackage -AllUsers | Foreach {Add-AppxPackage -DisableDevelopmentMode -Register "$($_.InstallLocation)\AppXManifest.xml"}

Hopefully after this, your problem will be fixed.

Wednesday, March 27, 2019

EmEditor - lightweight text editor able to open large file and also manipulate CSV

Recently, I was looking for a text editor that is capable to open and edit an SQL dump as large as 2.7 GB, and I only found EmEditor to be the workable one. Most of the well-known text editors for Windows failed to open the file. Several managed to open, but became extremely slow and easy to crash during navigation or editing.

EmEditor by Emurasoft has been around since 1997. Its user interface is still Windows 95 alike, and not that impressive at all. It seems to be powerful, with quite a lot of functions, but looking for the function will probably need some times searching in its menu items. It has most of the basic function of a modern text editor, including syntax highlighting for programming languages and scripts.

Due to its old fashion user interface, you probably won't use EmEditor for normal text editing or program coding. However, EmEditor has 2 unique features that really make a difference from other editors. These 2 superb features are:

  • ability to open and edit large text file, as big as 248 GB or 2.1 billion lines!
  • ability to manipulate CSV file with nice tabulation of the data into columns.
If you need a lightweight editor to open text file with millions of line, you are very likely end up with EmEditor. EmEditor is able to open such large file without consuming much memory or taking up much CPU resources.

Example of those large text files including but not limited to:
  • SQL dump with data
  • Log file
  • Large dataset in CSV or XML
EmEditor is pretty fast in loading the large text file. If the file is really large and over a gigabit, it still needs some times to fully load the file, but not that long.

Sequential moving in between text is seamless and fast, but jumping will take a longer time. Editing character by character is also fast, but text replacement with highlighting and cut will also take a longer time.


EmEditor has function to split a file into multiple smaller files, and also the reverse function to combine several files into one.

This is handy in the situation whereby you need to search for a portion of the large file, and export it out for further manipulation using other tools. Another situation is to split a large chunk of SQL dump into smaller files, so that the SQL server can import by handling smaller files.

EmEditor has powerful CSV manipulation functions similar to spreadsheet such as MS Excel or LibreOffice Calc. Compared with those spreadsheet programs, EmEditor is pretty lightweight and faster to load up.

It can tabulate the CSV data into columns, insert/delete a column, perform sorting, perform filtering, convert the CSV separator, etc.


Because of these 2 unique functions, I find EmEditor a handy tools for IT person, particularly for dealing with large text files involving dataset or log file.

Friday, March 22, 2019

Cellular frequency bands allocated to Malaysia mobile network operators

The telecommunication spectrum assignment in Malaysia is handled by Malaysian Communications and Multimedia Commission (MCMC).

Mobile network operators (MNOs) need to pay multi-million ringgit to MCMC in order to get the spectrum assignment in specific frequency band, so that they can provide cellular mobile service to customers with their assigned frequency bands.

The customers' device need to be able to communicate on the same band with the cellular transmitter at the nearby telco tower of the mobile service provider in order to establish a connection for voice and data transmission.

SIRIM is the certification body who will test and certify the mobile devices sold in the local market are complying to the spectrum used in Malaysia.

Current allocated frequency bands to MNOs in Malaysia are as below. Note that the mobile operator might not make use of all of their allocated frequency bands. In fact, most of them are not using the 900MHz band for 2G GSM.


Lower frequency means longer wavelength. This will have better in-house penetration and also able to reach a longer distance, but the bandwidth is lower and connection speed is slower.

Higher frequency means shorter wavelength. This can carry more bandwidth and also provide faster connection speed, at the trade-off of poorer in-house penetration and shorter coverage distance.

LTE frequency bands are numbered according to either the FDD specification or the TDD specification. For example, FDD Band 5 used by Unifi Mobile has a low frequency of 850MHz, therefore the LTE connection speed in this band is generally slower than those in FDD Band 3 (1800MHz).

Android mobile device users can install an app called LTE Discovery by Simply Advanced to have realtime information about which LTE band the device is connected to, as well as the signal strength, cellular tower position, and many other related information.

Tourists bringing mobile phone and/or tablet to Malaysia can check the table above with their own device specification on 2G/3G/4G to ensure that their device can function well in Malaysia, either using roaming or a SIM card purchased in Malaysia from one of the MNOs or MVNOs.

Tuesday, March 19, 2019

Hotlink Postpaid Flex plan by Maxis

Hotlink Postpaid Flex is a postpaid (not prepaid) mobile plan operated by Maxis.

At a monthly fixed cost of as low as RM30, you can get unlimited voice calls, unlimited SMS and 1GB of high speed data usage. After the data quota used up, you can still use the Internet at capped speed for no additional charge.

On top of the base plan, you can buy monthly auto-renewed or single month one time bundle(s), which provides you categorized apps-based unlimited high-speed Internet access:

  • Unlimited Social (RM10) - Facebook, Instagram, Snapchat, Pinterest & Twitter.
  • Unlimited Music (RM10) - Spotify, Joox, Saavn, KK Box & Smule.
  • Unlimited Chat (RM5) - WeChat, WhatsApp, Line, IMO, QQ & IM.
These apps-based unlimited Internet access bundles are sharable via mobile hotspot tethering, although the tether speed will be capped at 5Mbps.

Additional high speed Internet quota can also be purchased as Internet pass with the current rate as follow:
  • 2GB for RM10 (valid until next billing cycle)
  • 1GB for RM3 (valid for 1 day)
However, only the base Internet plan can be tethered, and these additional Internet pass cannot be tethered to share with other devices.

If you need more high speed data in your base plan, you can switch your plan to:
  • RM30 plan = 1GB high speed Internet + unlimited calls + unlimited SMS
  • RM40 plan = 5GB high speed Internet + unlimited calls + unlimited SMS
  • RM60 plan = 10GB high speed Internet + unlimited calls + unlimited SMS
When you subscribe or switch to the RM60 plan called Hotlink Postpaid Flex Plus, you can buy the following phones with 24 months contract with very attractive price:
  • Vivo Y81i @ RM1 only
  • Vivo Y85 @ RM199
  • Vivo Y95 @ RM399
Note that these are mid-range Android smartphones, which performance is not comparable with high end or flagship smartphones.

You can install the Hotlink Flex app available in Google Play Store or iTune App Store to manage your account and monitor your high speed Internet data usage.

Note that the app for this Hotlink Postpaid Flex plan is called Hotlink Flex, not the other Hotlink RED (for Hotlink prepaid users) or MyMaxis (for Maxis postpaid users).

Inside the Hotlink Flex app, there are also quite a number of hot deals containing discount e-voucher as a kind of benefit to its users.


Note that as this is a postpaid plan, Maxis will charge you RM10/month to send itemized paper statement to your address. This is considered pretty expensive. Even if you opt for the summarized paper statement, it will also cost you RM5/month.

You can eliminate this monthly charge by opting for eBill to have your monthly statement sent to your email address instead. eBill is free of charge. You can switch between eBill and paper statement inside the Hotlink Flex app.

You can also set up Direct Debit to have Maxis auto-charge your credit card for monthly payments, so that you don't have to worry about handling your monthly payment. Hotlink Flex app contains a direct web link for you to manage your Direct Debit instruction, which you can register, change credit card, suspend, reactivate or terminate your Direct Debit with Maxis.

To subscribe or port in to this Hotlink Postpaid Flex plan, you will need to visit a Maxis Store. Your SIM card will be given to you on the spot. If there is available stock for the Vivo phone and you are subscribing to the Hotlink Postpaid Flex Plus plan with contract, you can also straight away carry your phone back from the shop.

This is quite a cost effective plan, especially for those who can make good use of the unlimited calls and unlimited SMS (e.g. businessman, sales person, agent, remote support person, etc. who needs to make a lot of calls and/or SMS every month). After all, Maxis is still the industry leader with good and stable 2G/3G/4G network coverage and speed that you can rely on.


Sunday, March 17, 2019

Unifi Mobile #bebas prepaid with no credit reload expiry

It seems that Webe Digital (formerly known as Packet One or P1) had taken a long time to keep on pivoting their mobile service from P1 4G to Webe to Unifi Mobile, until recently, they seems to find some light at the end of the tunnel after the launching of Unifi Mobile #bebas prepaid plan in January 2018.

However, this prepaid plan has become less and less attractive. Initially when it was newly launched, it provided each subscribers with up to 5 free SIM cards, in which each SIM card preloaded with free 20GB of LTE data, 10 minutes voice call and 10 SMS.

Soon, it changed to provide each subscribers with up to 3 free SIM cards only, and each SIM card preloaded with free 10GB of LTE data, 10 minutes voice call and 10 SMS.

Now, it has changed to provide each subscribers with only 1 free SIM card, and the SIM card preloaded with free 10GB of LTE data, 50MB of 3G/LTE data, 10 minutes voice call and 10 SMS. Soon, the SIM card might cost you RM10, and the bundled LTE data might be further reduced to 2GB only.

In order to subscribe to this Unifi Mobile #bebas prepaid plan, you will need to download and install the Mobile@Unifi app from Google Play Store or iTune App Store, then order your SIM pack from inside the app.

During the SIM ordering process, you can either select a new number or port-in an existing phone number from another telco's existing plan. You can also select to collect your SIM pack for free at your chosen TMpoint outlet, or to have your SIM pack courier to you at the cost of RM10.60.


What makes this Unifi Mobile #bebas prepaid plan attractive?
  • You can get a beautiful phone number (or port-in your existing phone number) and start using it without paying a single sen.
  • You can port out the beautiful phone number to your preferred telco later, to get a better service.
  • If you prefer to stay with the plan, unlike other prepaid plan with fixed weekly or monthly reload commitment, your reload in this plan does not expire. This means your next reload has no time limit, and you can perform the next reload only after you have used up all the existing quota.
Anyhow, you need to keep your SIM card active at least once in every 90 days, otherwise your number could be terminated.

To keep your SIM card active, just perform any one of the following actions, and your 90 days deadline counter will be zerorized and recalculated from scratch:
  • Make a call to any number
  • Send an SMS to any number
  • Connect to the Internet and use some data
  • Top-up your plan with at least RM10

Unifi Mobile is using its own ex-P1/Webe 4G LTE infrastructure, which has limited coverage, and running on LTE Band 5 (B5, 850MHz band). It is also riding on Celcom 3G and LTE infrastructure to obtain a much wider coverage, which is crucial to provide usable service to its subscribers nationwide.

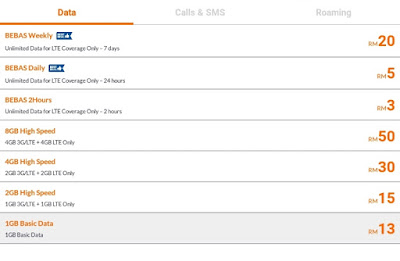
This has made their plan a little bit complicated. Their data usage quota is separated from own Band-5 LTE (listed as LTE only in the subscription options) and Celcom network (listed as 3G/LTE in the subscription options).

For 2GB, 4GB and 8GB high speed data top-up, you get 50% of the top-up data for their own Band-5 LTE usage, another 50% for Celcom 3G/LTE usage. If you are connected to their own tower, you consume your data quota under LTE; If you are connected to Celcom tower, you consume your data quota under 3G/LTE.

Unlike other telcos which provide free unlimited capped basic data, you need to pay for the basic data in this Unifi Mobile prepaid plan. You can connected to the Basic Data either using 2G/3G or LTE, with a capped maximum speed.

Note that beside the ordinary non-expiry data reload options, there are also some unlimited data reload options with expiry (2 hours, 24 hours, 7 days) for you to subscribe whenever you need to consume a lot of data usage during certain specific occasions.

The voice call and SMS subscriptions are more straightforward, and both of them are bundled together.

Currently there are only 2 types of subscription available:
  • 200 minutes call + 200 SMS for RM30
  • 60 minutes call + 60 SMS for RM10
You can consider the SMS as free bundle to the voice call minutes, and each voice call is costed at 15 sen (for 200 minutes) and 16.67 sen (for 60 minutes) respectively.

This is considered pretty attractive, because for normal postpaid plans, unused voice call minutes and SMS will be burnt every month, and for normal prepaid plans, you got to keep on top-up every week or every month in order to keep the unused voice call minutes and SMS, or else all the accumulation of them will be burnt in one go.

For this Unifi Mobile #bebas prepaid plan, 15 sen per minute is really 15 sen per minute, there is no restriction of when you use it. There is no commitment to pay monthly or to periodically top-up a minimum amount, until it is fully used up, as long as you remember to keep your line active (you got plenty of SMS, just simply send out one SMS every quarter will be able to keep your line active).

As such, this Unifi Mobile #bebas prepaid plan might be suitable for you if you are:
  • trying to get a free beautiful new mobile number.
  • planning to use it for tablet that connects to WiFi most of the time.
  • planning to use it for secondary phone with low usage.
  • planning to use it for mainly receive calls and/or SMS.
  • an elderly person who most of the time stays at home with Unifi broadband subscription (with WiFi, IPTV and DECT phone), so you only need to use your mobile phone when you are not at home.
  • a tourist who plans to stay in Malaysia for at least a few days, up to 3 months, and wants to get a free SIM card with free 10GB data, together with minimal bundled voice minutes and SMS. (you don't need to pay for it, until you need to top-up after fully used)
  • a person who finds that Unifi Mobile #bebas prepaid plan is able to provide flexibility and freedom to pay for your actual use, without monthly payment or periodic top-up commitment.
You can easily toggle on/off the IDD and roaming service of your SIM card from within the Mobile@Unifi app setting.

It is advisable for you to turn OFF both IDD and roaming unless you need to use them. This is because if you use them (either intentionally or accidentally) without prior subscription to an IDD and/or roaming pass, you will be charged on Pay As You Use (PAYU) basis which could burn your wallet a big hole. The rate of IDD and roaming pass in Unifi Mobile is on par with most other postpaid/prepaid plans, not so attractive either. The IDD and roaming pass in Yoodo has more attractive price.

Thursday, March 14, 2019

Yoodo - mobile service as cheap as RM3/month suitable for light usage users and backpackers

Yoodo is a mobile service provider in Malaysia operating under the umbrella of Celcom Axiata and riding on the mobile network infrastructure of Celcom.

You can't find any official outlet of Yoodo, because they operate on the Internet and prefer you to be self-service to subscribe to their mobile service, and to self-manage your mobile plan based on your actual need on monthly (30 days) basis.

Yoodo was just launched in 2018. Initially, it was not so attractive, until its data plan been reduced to cheaper price, and the quota starting from as low as 2GB/month usage @ RM12  (instead of starting from 5GB/month @ RM30 when it was launched).

Yoodo is currently one of the very few mobile service providers in Malaysia that enables you to spend less than RM30 per month in your mobile service.

You might want to seriously consider using Yoodo if you are:

  • a light usage mobile user who prefers not to spend too much on your mobile plan. If you are a medium data usage user, you can opt for Hotlink Postpaid Flex instead, which provides unlimited nationwide calls and unlimited SMS, with price starting from RM30/month only (for 1GB data plan, add RM10/month to get additional 4GB/month). If you are a heavy data usage user, there are plenty of postpaid/prepaid plans available with high data quota, including those with unlimited data + unlimited calls + unlimited SMS.
  • planning to maintain a beautiful mobile phone number at the lowest possible cost at RM3/month.
  • planning to use it for tablet that connects to WiFi most of the time, and does not need any voice or SMS bundle.
  • planning to use it for receiving calls and SMS.
  • planning to use it for making calls and/or SMS, with low to medium data usage. 
  • a backpacker or tourist who plans to stay in Malaysia for more than a week to a few months, and wants to get a mobile plan with cheap IDD option to receive and/or make calls and SMS to other countries.
  • a backpacker or tourist who plans to visit Malaysia and some other surrounding countries, with cheap roaming option.
  • a person who finds that Yoodo is able to provide flexibility and freedom to customize your own plan based on your actual need from month to month.
Yoodo plan is pretty straightforward. Its base plan consists of 3 portions: data, voice and SMS, which you can customize your usage for the month (30 days validity from day of subscription).

You can always make change to your plan for the upcoming month. So, if you know that next month your usage will be higher (for example, when going for outstation), you can subscribe a higher plan for next month, and then fall back to the lower plan the month after.

There is a GUI in Yoodo's website for you to try out how to adjust your base plan for data, voice and SMS, with the price automatically calculated for you.

The beauty of Yoodo plan is that, as long as it is still active, you can always receive phone calls and SMS, even you just subscribe a data plan and leave the subscription to voice and SMS to remain as zero.

Unlike certain data plans from other telcos which will impose restriction on hotspot tethering (mobile data sharing), there is no tethering restriction on Yoodo data subscription, be it a base plan or booster plan.

Yoodo SIM pack can be ordered online for free, and will be courier to you for free too.

Click here to order your Yoodo SIM pack and receive RM20 credit in your e-wallet when you successfully activated a plan with the SIM card.


If you need the SIM pack to be delivered to you within 2 hours, it is possible if your receiving address is in Klang Valley, and you are willing to pay for the express delivery service. This express delivery option is available when you order your Yoodo SIM pack. This will be necessary for backpackers or tourists. You can arrange for your accommodation's reception to receive the SIM pack on your behalf while you are away visiting places.

You will need an Android phone or iPhone in order to manage your Yoodo account with the Yoodo app, which you can download and install from Google Play Store or iTune App Store. Each account can manage up to 5 Yoodo SIMs.

Note that the device you use to manage your Yoodo account with Yoodo app need not be the same device which you are going to install the Yoodo SIM card. If it is the same device, then you might need to connect to WiFi to download the app and to perform SIM card activation, before you got mobile data available for use.

After you've received your SIM pack, you need to activate the SIM card inside it to start your subscription. Don't worry whether you have already customized your base plan during SIM pack ordering process or not, because you will be given a chance to customize the base plan again during the activation process.

However, if you have customized your base plan for a mobile number port-in from another telco, your base plan for the first month cannot be changed during activation. You will need to order a new SIM and start over the process for such a change.

Yes, Yoodo does support MNP (mobile number portability).


Yoodo activation process involves scanning (or manually key-in) the barcode of the SIM card, taking a photo of your NRIC or passport, taking a photo of yourself which requires you to do some action, and paying for your first month subscription by using your credit/debit card or PayPal account.

You might want to use a phone with better camera for the activation process to be smoother, because it will use OCR to scan your NRIC/passport and use face recognition AI to scan your face.

Don't forget to key-in this Referral Code during activation for you and me to get RM20 in our e-wallet respectively: cwqhp2909

After you become a Yoodo user, you will also have your own unique Referral Code to get RM20 for each referee sign-up.


Below is the Yoodo Dashboard shown in Yoodo app for you to manage your Yoodo subscription.

It will show you your current plan and usage. Don't worry when your base plan used up in the middle of the month, you can always purchase a booster plan by taping on "Buy more" to get additional quota for the month.

For example, even though I did not subscribe any voice plan for the month, if I need to make call, I can purchase a voice call booster plan to get the required quota immediately.


Note that you can buy roaming and IDD service from the above Dashboard screen too. Just follow the steps, the app will explain about the service to you clearly.

Your plan will be auto-renewed after 30 days, using the same configuration as this month unless you change it. Changes will take effect on the next cycle, and before it is effective, you can always come back and modify the configuration by tapping on "Change".


In the above screen, you can switch off the auto-renew function, and your e-wallet or linked credit/debit card or PayPal account will not be automatically charged when your current 30 days subscription cycle ended.

If you don't pay for the next month, you can still receive voice calls and SMS, but unable to access to Internet, make call and send SMS. There is a grace period for this, after that, your account will be terminated and your mobile number will be unusable.

Beside the 3 base plans of data, voice and SMS, you can also subscribe for specific app data usage add-ons, including Instagram, Facebook, YouTube, WhatsApp, and PUBG Mobile. The data usage for subscribed add-ons will be consumed first before the base data plan is deducted for the month. Note that these add-ons are not applicable for tethering.


Also note that since Yoodo is riding on Celcom network, it shares the same pros and cons, as well as strength and weaknesses, with Celcom mobile service, which you might be interested to read my another article here.

Yoodo's customer service is pretty friendly, helpful and responsive. They are contactable with Live Chat in the app and also in their website, within the operating hour from 9am to 9pm (weekdays) and from 9am to 6pm (weekends). To access to Live Chat, just go to the Help section and scroll to the very bottom of the screen, and look for this:


Beside using Live Chat, you can also fill in a web form to submit an issue ticket to them. There is also a community forum to discuss with other Yoodo users and staffs.

No doubt Yoodo's establishment and its business model has disrupted the Malaysia mobile service market. It provides a 3rd kind of mobile subscription beside the traditional prepaid and postpaid plans.

It is flexible that you can customize your plan according to your need, with booster plan to boost up your quota within a subscription cycle, so that eventually you only pay for what you need to use. It is also very easy to exit, either by MNP to another telco, or stop paying for the subsequent month and let the subscription lapses by itself.

There are also options for immediate termination and SIM card replacement, in the event of handphone lost, for example.

If you find it interesting, you can order the SIM pack for free without any obligation. Then when you want to start using it, you can customize your own plan in Yoodo app, and activate the SIM card to start your subscription.


Friday, March 8, 2019

Comparison of Maxis vs Celcom network usage experience (year 2019)

Maxis and Celcom are the 2 mobile service market leaders in Malaysia in terms of network coverage and speed. They are closely challenged by Digi and U Mobile, followed by Unifi Mobile.

This comparison is made based on my personal experience and observation by installing SIM card of different operator, one at a time, into the same SIM card slot of the same handphone, and using the handphone at the same location during the observation timeframe.

Note that only Maxis, Celcom and Digi (and their respective sub-brands) are using own 2G/3G/4G and even 5G network. Yes only has 4G coverage at limited areas. The others are somehow riding on the network of these Big 3 (mostly on Celcom), as shown in the table below.


However, based on my observation, the SIM card of the operator does play a role in your network usage experience. For example, TuneTalk and Celcom will be connected to the same infrastructure belonged to Celcom, but the way your handphone maintains the connection with their SIM card might behave differently.

Between Maxis and Celcom, I observed that Maxis provides an overall better experience, particularly when you are inside a building. This observation is made in a location which OpenSignal indicates that both their 2G/3G/4G signal at the area are equally strong.

How does Maxis achieve the better result? This is possibly due to Maxis behave differently from Celcom when the phone is in standby mode (not in phone call, no SMS in/out, no foreground open app, screen is on).

When WiFi is connected, Maxis will settle down with the most stable signal at highest strength (in terms of dBm and ASU). For layman, this will be a state which your phone get the most signal bars shown at the status bar. In my observation, unless there is background network activity ongoing, else it will settle down to 3G UMTS connection, giving a full bars or close to that. The maximum network speed at UMTS is 384 kbps only.

When WiFi is off, Maxis will immediately scale up its connection, and maintain at a balance between speed and signal strength, to provide optimal network stability. In my case, it will stay at HSPA+ with maximum speed of 42.2 Mbps. It will only reach out to 4G LTE when the phone's network activity increases, demanding higher network speed.

On the other hand, Celcom will always go for the highest generation and stays at 4G LTE or LTE+ as long as there are 2 bars of signal and above for 4G, regardless WiFi is connected or not, despite the signal at lower generation is much stronger.

U Mobile will settle down with 2.75G EDGE with maximum speed of 220 kbps, when WiFi is connected. OpenSignal showed that it connects to the same Maxis tower when Maxis was tested as above.

By connecting and staying at lower generation when WiFi is connected, it actually helps to save some battery usage.

When WiFi is connected, it seems that:
  • Maxis connection will stay at the most stable signal at highest strength.
  • Celcom connection will try to show off they got 4G LTE/LTE+ at the area by connecting to 4G, even though the signal is comparatively weaker than lower generations.
  • U Mobile will connect to the lowest possible generation while maintaining decent connection speed.

When WiFi is disconnected and Internet is in used, it seems that:
  • Maxis connection will try to strike a balance between speed and stability.
  • Celcom connection will actually fall back to HSPA when LTE/LTE+ signal is too weak for stable connection, otherwise it will just stay at LTE/LTE+.
  • U Mobile does not have 4G coverage at the area, since the connection never reach LTE/LTE+.

When there is an incoming phone call or SMS, it seems that:
  • Maxis connection will raise from UMTS to HSPA.
  • Celcom connection will drop from LTE to HSPA if the 4G signal is too weak.
  • U Mobile connection will raise from EDGE to UMTS.

Due to the different in their behavior:
  • When I make a call from another phone, Maxis will ring faster than Celcom. Sometimes, you will see the connection of Celcom changed from LTE to HSPA before the phone actually rings.
  • When I send an SMS from another phone, it will generally reach Maxis faster than Celcom.
  • The voice quality in a phone call with Maxis is generally more stable and better than Celcom.
  • There is not much different between them in Internet usage, their speed is almost the same in this area, regardless connected with HSPA or LTE. The download speed is much higher than the upload speed.
  • Let the phone lying overnight, U Mobile is able to conserve slightly more battery than Maxis (different for about 1% draining), which in turn conserves more battery than Celcom (different for about 2% draining).
Therefore, Maxis provides an overall better network usage experience than Celcom, in terms of battery saving, phone call quality, speed of receiving phone call and speed of receiving SMS.

Besides, there are several other reports available in the Internet about general comparison of Malaysia mobile service providers, including comparison of postpaid packages, prepaid packages, price, coverage, network speed, etc. One of the good source is OpenSignal which you can search around for their analysis reports.

Tuesday, February 19, 2019

The evolution of cellular mobile technology (from 1G to 5G)

Do you still remember the first generation of mobile phone running on 1G analog cellular telecommunication network? The phone is as bulky as a brick with large external antenna. The average talk time for each battery recharge is about 35 minutes only. It was a luxury item.

Mobile phones started to become popular during the 2G digital era, whereby SMS text messages were made possible. Sending SMS at that time was not as convenient as today, as the phones were having physical T9 keypad, and typing alphabets would need more than one strokes.

Apple has changed the world during 3G era by introducing iPhone supported with iTune app store. Physical keypad was totally removed from the phone, giving larger space for its touch screen.

Today we are at 4G era, moving forward to 5G soon.

The table below summarizes the evolution of cellular mobile technology from 1G to 5G. We can see that for each advancement of generation, or sub-generation in between, there would be an increase in data transfer speed, and wider range of network application usage.


5G will be essential for the IoT connected world, particularly for connected vehicles and smart cities.

5G technology promises to greatly reduce the latency (the "preparation time" required before 2 wirelessly connected device to start transmitting data to each other) to around 1 milliseconds, compared with the current 30 milliseconds in 4G LTE.

5G technology also promises a 20 times increase in network speed from 4G, bringing gigabit Internet access possible to all mobile devices.

5G technology also promises a much stable and reliable signal strength by utilizing massive MIMO beamforming technology, which is a matured technology already in used in Wireless-AC WiFi networks for years.

On the other hand, 5G will require much stronger end-to-end cybersecurity protection and user privacy protection.

Are you excited to the upcoming 5G technology? It is said that key industry players are already working on 6G, which will mesh over satellite WiFi technology.


Tuesday, February 12, 2019

Smart devices Li-polymer battery fast charging technology and compatibility

Nowadays, one of the selling points of smart devices (phones, tablets, watches, cameras, etc.) is how soon can they recharge their Li-polymer battery. There are already products which claim to be able to recharge from 10% to 100% within 20 minutes.

The battery charging speed is an important convenience indicator. If your mobile device can recharge its battery within a short period of time, it will greatly reduce your waiting time for its battery recharging, and also reduce the need of bringing along a power bank.

Imagine that when you are on the move and taking a short break at a place, you just need to borrow a power source for 5-10 minutes to quickly recharge your phone to bring up its battery level to be sufficient for the rest of the day, there will be less worry for you about the phone running out of battery power, and you don't need to wait for a long time for the recharging process.

The Li-polymer battery fast charging technology evolves following the evolution of USB into Type C era, and the introduction of industry standard called USB Power Delivery (USB-PD).


Traditionally, the USB cable has more emphasis on data transfer than charging function. The maximum power or Wattage (Power = Voltage x Current) a traditional USB cable and its charger can deliver is merely 2.5W.

With the current USB 3.1 standard, theoretically the maximum charging power can go as high as 100W. The more wattage the charging mechanism can deliver, the faster will be the charging process.

The charging mechanism consists of:
  • The charger
  • The cable
  • The device (phone/tablet/etc. for non-removable battery)
  • The battery
For fast charging to happen and to be safe, all the 4 charging components must be compatible and working well with each other. Otherwise, you will probably end up with traditional 2.5W slow charging, or your fast charging will be at risk of overheat, overcharge, battery damage or even device damage.

Compatible fast charging components will form a charging mechanism that can deliver stable fast charging wattage, and has electronic circuits and mechanisms to protect the battery and device from being damaged (such as catching fire, explode, bulking, malfunction, ...), overheat, overcharge, etc.

Different device manufacturer has come out with different kinds of fast charging mechanism, under different brand names such as Quick Charge, TurboPower, Pump Express, SuperCharge, VOOC, and so on.


If the device and battery is USB-PD compliance, then you can fast charge it with 3rd party or other brand of USB cable and/or charger that are also USB-PD compliance.

If the device and battery is Qualcomm Quick Charge compatible, then you can fast charge it with 3rd party or other brand of fast charger with Qualcomm Quick Charge chipset inside, using USB cable that supports 5A current transmission.

If you want to play safe, the rule of thumb is to fast charge your device using original charger and original cable from the same manufacturer designed for your device.

It seems that Oppo Super VOOC can charge its supported Oppo phones more faster than the others, however the Super VOOC charging mechanism is pretty proprietary. Huawei SuperCharge 2.0 found in its Mate 20 Pro, Mate 20X and later model of devices can also charge pretty fast at 40W, and is compatible to USB-PD and Qualcomm Quick Charge, although the wattage might be lower when fast charged with 3rd party compatible charger and cable.

Here are some tips if you want to buy a power bank, 3rd party charger or 3rd party USB cable:
  • Choose the USB cable that can support 5A charging. It is backward compatible and more future proof.
  • Choose the power bank that support Quick Charge 3.0 or Quick Charge 4.0+ to enable fast charging with compatible devices. Make sure it also has built-in mechanism to protect the battery and device properly. Choose for branded product that is reliable.
  • Choose the wall charger that support the same charging voltage and current with your original wall charger. Make sure it also has built-in mechanism to protect the battery and device properly. Choose for branded product that is reliable.


Saturday, February 2, 2019

Online check whether handphone / tablet is genuine local original set with SIRIM MCMC Label registration

Communication products particularly handphones and tablets sold by authorized distribution channels in Malaysia are required to be certified by SIRIM under the Communications and Multimedia (Technical Standards) Regulations 2000.

Certified products will carry a genuine MCMC Label with serial number, normally stuck on the packaging box. Alternatively, it could be in the form of electronic MCMC Label stored digitally in the device, displayable on the screen normally from About page.

As such, you can know whether your handphone and/or tablet is genuine local original set by checking for its IMEI number(s) and/or Serial Number with SIRIM MCMC Label registration. If the result of the check is "not found" then your device is not registered with SIRIM, and most probably was imported from non-proper channel, or is a clone/counterfeit product.

There are 2 common ways to perform the checking online. One way is through the SIRIM e-comM enquiry website, and another is by using the SIRIM Check Your Label mobile app.

Below is the URL to check using the IMEI number of the handphone/tablet. For dual-SIM products, both IMEI numbers can be checked respectively:
https://ecomm.sirim.my/SirimEnquiry/search_IMEI.aspx


And you can download the Check Your Label mobile app from Google Play Store (for Android) and Apple iTune Store (for iOS).

The Check Your Label app will display slightly more information than the e-comM website.


Online checking for Huawei smartphone warranty period expiry and applicable country

If you have bought a new Huawei product such as a smartphone / tablet / laptop and have registered for its warranty, whereby the registration was done by your dealer or by yourself, you can actually check for its warranty information in Huawei Consumer Products website by using the serial number of your product.

You can, of course, make use of the same webpage to check whether:

  • Your product has already been registered for warranty or not.
  • Your product is a new set or used/refurbished set. Used or refurbished set will have warranty expiry shorter than the full warranty period.
  • Your product is an original local set or non-local set.
  • Your product is genuine Huawei product or counterfeit product with invalid serial number.

You just need 2 steps to perform this warranty checking.

Firstly, you need to know the serial number of your product, which is printed on the label at the packaging box.

For Huawei smartphone, the easiest way to find out your phone's serial number is by dialing *#06# which will display its serial number and IMEI number(s) on the screen. You can then long tap on the displayed serial number to copy it into your clipboard.

Another way to view the smartphone's serial number is by going to Settings > System > About Phone > Status.

Once you obtained the product serial number, open your web browser and visit to this webpage: https://consumer.huawei.com/my/support/warranty-query/


Paste or key-in your device serial number, and also enter the 4-characters captcha as verification code, then press the Search button.

For Huawei smartphone, the product warranty information page will show out:
  • The product name and model number
  • The product serial number
  • Expected warranty expiration date
  • Applicable scope
  • Screen damage warranty expiration date
  • Premium service expiration date


In addition, the device warranty expiration information is also available in the HiCare mobile app most probably pre-installed in the Huawei smartphone. Just open the app in the phone, tap on Me option, you'll be able to find the warranty expiration date and applicable country under the Device Benefits section.


Just tap into the Warranty and/or Screen Insurance image link to view the detail information.

Furthermore, you can continue to check whether your device is genuine local original set with SIRIM MCMC Label registration.

Thursday, January 17, 2019

Fixed MySQL Workbench installation problem with missing Visual C++ Redistributable package (2015)

MySQL Workbench is a very useful unified visual tool for database architects, developers, and DBAs working on MySQL and/or MariaDB. It provides data modeling, SQL development, and comprehensive administration tools for server configuration, user administration, backup, etc.

MySQL Workbench Community Edition is free for use, which you can download from MySQL website. It is available for MS Windows, Ubuntu Linux, Red Hat Enterprise Linux, Oracle Linux Fedora and macOS X.

MySQL Workbench is a very good companion to work together with Laragon. In fact, it is among the few (if not the only) free MySQL database administration tools that is able to let user design database with EER diagram and also able to reverse engineer the tables of existing database into EER diagram. This feature is normally available only in the commercial version of other database administration tools.


If you are using Windows 10 and trying to install MySQL Workbench version 8, you might hit with a error during installation saying that Visual C++ Redistributable package (2015) is missing, and you need to install that before you're able to proceed to install MySQL Workbench.

Unfortunately, this problem cannot be simply resolved by installing Microsoft Visual C++ Redistributable package (2015), because the installer program will tell you that it has already been installed.

In fact, this problem is caused by the newer Microsoft Visual C++ Redistributable package (2017) already installed in your Windows system. Its installation might have deleted some registry keys used by the Visual C++ 2015 Redistributable.

The solution is to repair the installed Microsoft Visual C++ 2017 Redistributable (note: not to install or repair the 2015 redistributable, but the 2017 one). It is advisable to repair both the x64 and x86 versions of Microsoft Visual C++ 2017 Redistributable.

To do so, go to Windows System > Control Panel > Uninstall a program and locate for Microsoft Visual C++ 2017 Redistributable (x64). Right click on it and select Change (note: is Change, not Uninstall). Then click the Repair button to start the repair process.


You might be required to reboot your Windows at the end of the process.

When it is done, continue to do the same for Microsoft Visual C++ 2017 Redistributable (x86).


After this, try to install MySQL Workbench again. The installation process should be OK now.

Hint: Click on the "Older Posts" link to continue reading, or click here for a listing of all my past 3 months articles.